Debug SDK Functions
This page will show you a sample scene named Debug SDK Functions. It will break down most of the API functions inside the Genies Avatar SDK.
Here is a list of all the features:
- Log in to a user’s Genies account.
- Spawn multiple user Avatars and default Avatars.
- Gift a user an asset (useful for custom UGC wearables).
- Modify an Avatar’s wearables, skin color, and body size.
- Display a list of all wearables in a user’s inventory.
This page will be using version X.Y.Z of the Genies SDK Avatar package, but replace it with the latest package version.
Import the Sample Scene
Import with Bootstrap Wizard
From the top menu, select Tools > Genies > SDK Bootstrap Wizard window. At the bottom, click the Import Sample Scenes button.

Import with Package Manager
From the top menu, select Windows > Package Manager window. Then select Packages: In Project on the top left dropdown and also select the Genies Avatar SDK package on the left side menu.
Click the Samples tab and click the Import button next to the Debug SDK Functions sample.
![]()
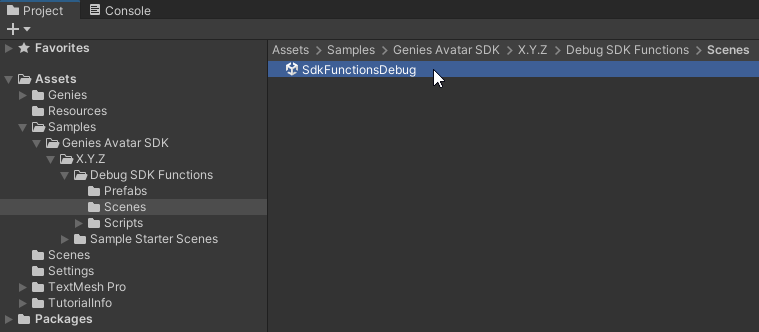
Open the Sample Scene
In your Project window, open the Assets > Samples > Genies Avatar SDK > X.Y.Z > Debug SDK Functions > Scenes folder. Double click the SdkFunctionsDebug scene to open it.
Test the Example Scene
The next steps will show to test the sample scene functionality.
Start the OTP Login
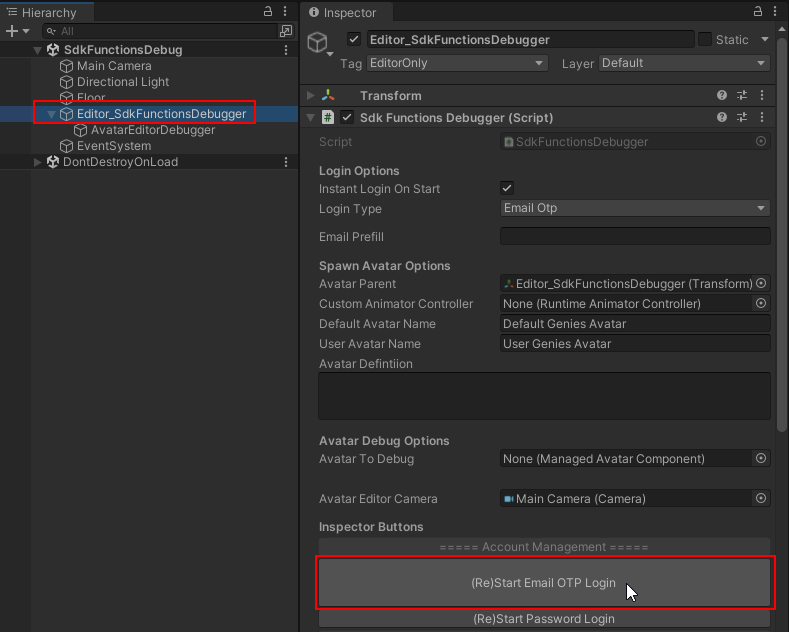
The first step will be to login to your Genies account. Press the Play button.
In the Hierarchy window, select the Editor_RuntimeSdkFunctions object. Then in the Inspector window, click the (Re)Start Email OTP Login button.
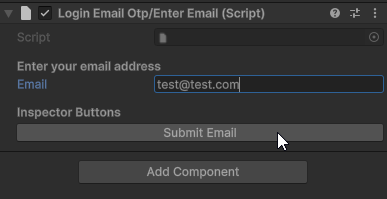
Submit Email
A new component should appear. Enter your email in the input field. Then press the Submit Email button.
Submit the OTP Code
The component should update and you should receive an email. Add the OTP code into the input field and click the Submit Email Code button.
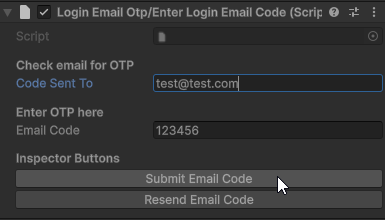
Click the Resend Email Code button if you did not receive an email.
Confirm the Login
A new component should appear and display your Genies login name if the login was succesful.

Spawn the User Avatar
Click the Spawn User Avatar button one time.

Clicking the Spawn User Avatar button multiple times in quick succession may cause Unity to crash.
Confirm the User Avatar Spawned
You should now see the user Avatar spawn in the Scene window.
![]()
Spawn the Default Avatar
Click the Spawn Default Avatar button.

Confirm the Default Avatar Spawned
You should now see the default Avatar spawn in the Scene window. You may have to move one of the Avatar objects to see both of them.
![]()
Your user Avatar may look identical to the default Avatar if you have never edited your Avatar before.
Destroy the Last Spawned Avatar
Click the Destroy Last Spawned Avatar button. The default Avatar should be deleted from the scene.

Add User Avatar to Editor Debugger
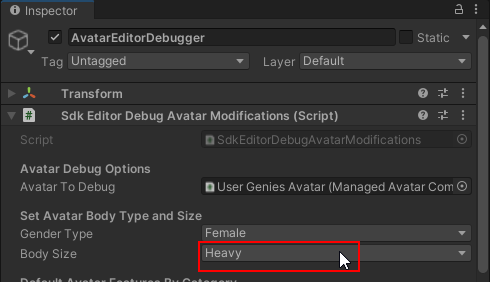
Select the AvatarEditorDebugger object which is a child to the Editor_RuntimeSdkFunctions object. Drag and drop the User Genies Avatar into the Avatar To Debug property.
![]()
The AvatarEditorDebugger object contains APIs specific to editing the Avatar such as the body size or gifting the user an asset.
Set the Body Size to Heavy
Set the Body Size property to Heavy.
Set the Avatar Body Type
Click the Set Avatar Body Type button.

Confirm the Avatar is Heavy
The user Avatar should now display a bigger body type.
![]()
Conclusion
There are many other functionalities in this sample scene. One of the most important is gifting a user an asset such as custom wearables.
Check out the Reward Users with Custom Wearables tutorial for more information.