Login
The first section of this tutorial is to create a login screen for the user to sign into their Genies account.
Setup the Scene
The first step is to create a scene for the player to move around in and have a camera following it.
Open Unity Project
Follow the Getting Started tutorial for directions on how to create a Unity project with the Genies Avatar SDK installed.
Open a New Scene
In the Project window, find a folder named Scenes and double click the SampleScene asset to open it.
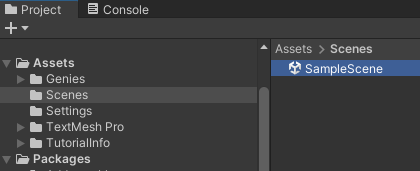
This is scene is included by default when creating a new Unity project. If for some reason your Unity project does not have this folder or asset, then create a new folder named Scenes and create a new scene named SampleScene.
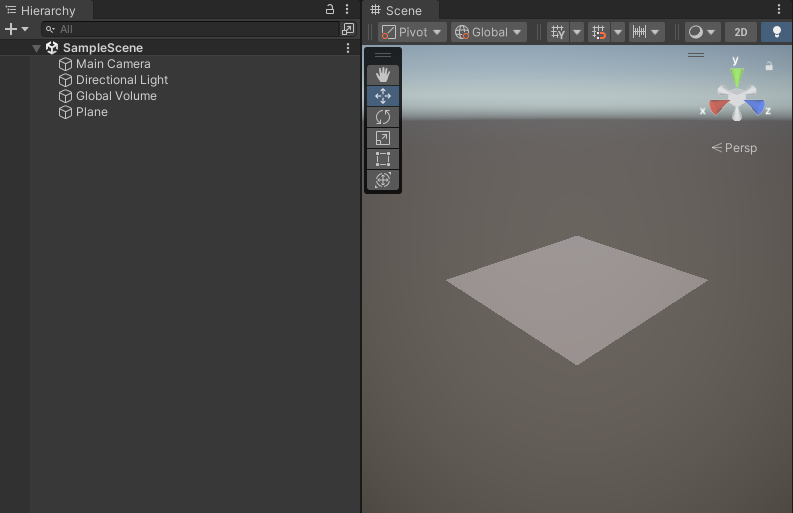
Add the Ground Plane
Create a ground object using the Create > 3D Object > Plane option in the Hierarchy window.
Add a Cinemachine Camera
Cinemachine is a Unity registry package that has a built-in camera that can follow a target.
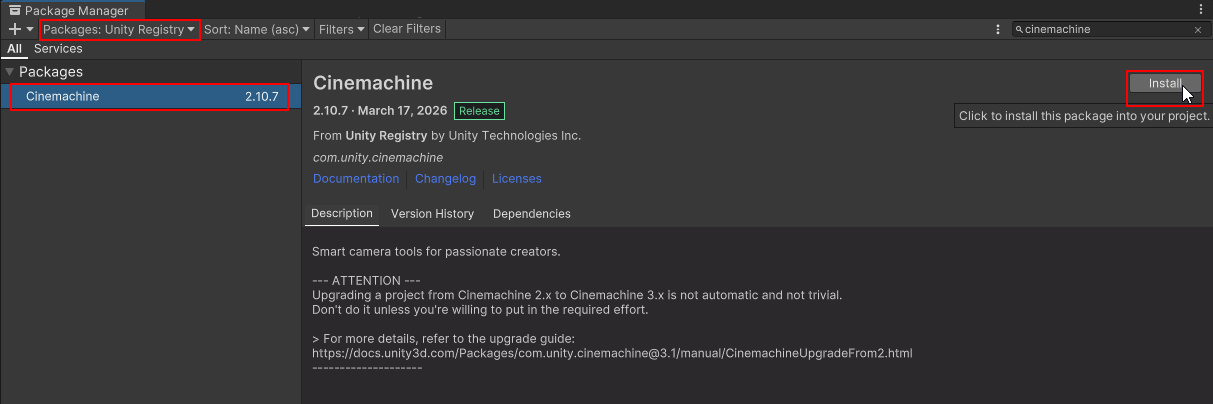
Install Cinemachine
From the top menu, select Window > Package Manager window. Then select Packages: Unity Registry on the top left dropdown and also select the Cinemachine package on the left side menu.
Click the Install button at the top right.
Add a Free Look Camera
Create a camera using the Create > Cinemachine > FreeLook Camera option in the Hierarchy window.

A FreeLook Camera is useful tool from the Cinemachine package for creating third-person cameras that follow the player.
Add an Event System
The Login UI cannot be interactable without an Event System object.
Create an Event System
In the Hierarchy window, select the Create > UI > Event System option.
This will be replaced later when the character controller is added.
Replace the Input System
Select the EventSystem object and open the Inspector window. Click the Replace with InputSystemUIInputModule button.
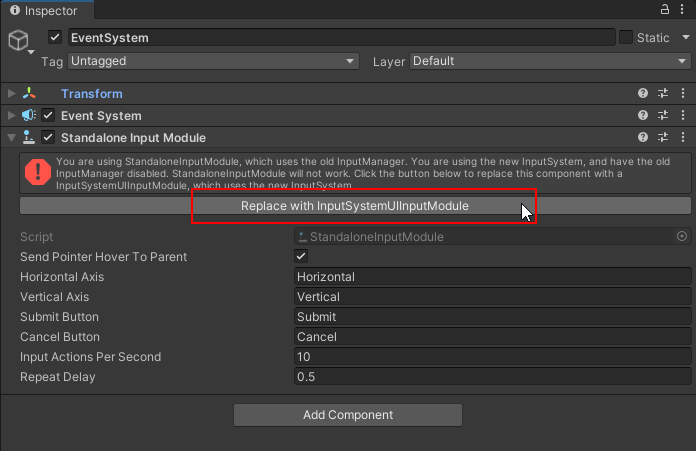
This is required because the Bootstrap Wizard updated to the new input system to work with the sample scenes.
Add a Login UI
The next step is to create a login screen UI for the user to login to their Genies account.
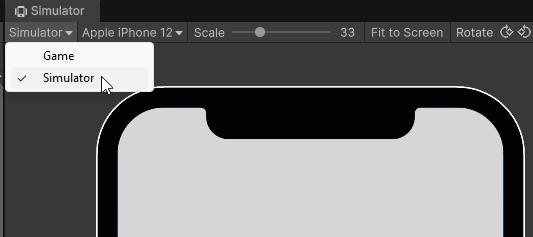
Open the Simulator Window
Click the top-left dropdown menu in the Game window and select Simulator. Then select a mobile device.
Download the Login Canvas Package
Download this Unity package that contains a Login Canvas prefab:
Import the Login Canvas Package
Right click in the Project window and select Import Package > Custom Package... option. Select the login-canvas.unitypackage file. After importing, drag and drop the Login Canvas prefab into the scene.
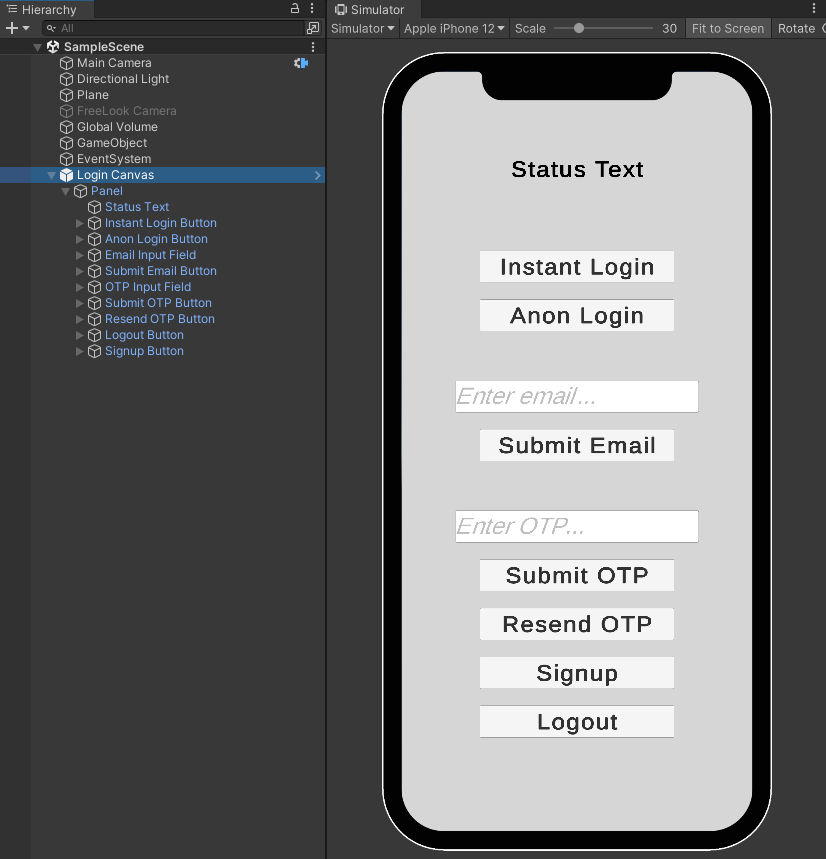
You may need to import the TextMeshPro packages if the text is not appearing. See the Common Issues page for a breakdown.
Create the Login Controller Script
Now the login screen needs logic so it calls the API methods to login the user to their Genies account.
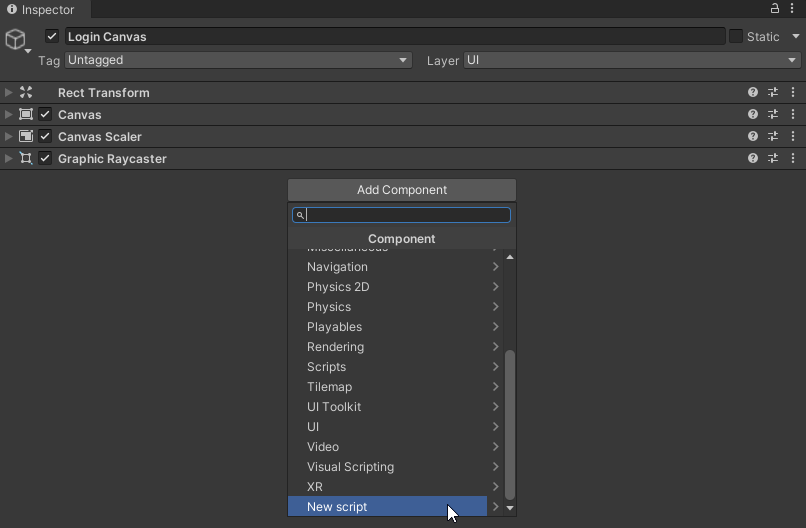
Create a New Script
In the Hierarchy window, select the Login Canvas object. In the Inspector window, click the Add Component button near the bottom and then select the bottom option to New Script. Name the script LoginController.
Add Code to the Script
Open the LoginController script.
You can copy and paste the entire code here:
LoginController.cs
using UnityEngine;
using Genies.Sdk;
using TMPro;
using UnityEngine.UI;

public class LoginController : MonoBehaviour
{
    [Header("UI References")]
    [SerializeField] private TMP_Text statusText;
    [SerializeField] private Button instantLoginButton;
    [SerializeField] private Button anonLoginButton;
    [SerializeField] private TMP_InputField emailInputField;
    [SerializeField] private Button submitEmailButton;
    [SerializeField] private TMP_InputField otpInputField;
    [SerializeField] private Button submitOTPButton;
    [SerializeField] private Button resendOTPButton;
    [SerializeField] private Button logoutButton;
    [SerializeField] private Button signupButton;

    // Triggered when the user clicks the "Submit Email" button
    private async void OnSubmitEmail()
    {
        string email = emailInputField.text;
        statusText.text = $"Email submitted: {email}";
        (bool success, string errorMessage) = await AvatarSdk.StartLoginEmailOtpAsync(email);
        if (success)
        {
            statusText.text = "OTP sent successfully. Please check your email.";
        }
        else
        {
            statusText.text = "Error sending OTP: " + errorMessage;
        }
    }

    // Triggered when the user clicks the "Resend OTP" button
    private async void OnResendOTP()
    {
        statusText.text = "Resending OTP...";
        (bool success, string errorMessage) = await AvatarSdk.ResendEmailCodeAsync();
        if (success)
        {
            statusText.text = "OTP resent successfully. Please check your email.";
        }
        else
        {
            statusText.text = "Error resending OTP: " + errorMessage;
        }
    }

    // Triggered when the user clicks the "Submit OTP" button
    private async void OnSubmitOTP()
    {
        string otpCode = otpInputField.text;
        statusText.text = $"OTP submitted: {otpCode}";
        (bool success, string errorMessage) = await AvatarSdk.SubmitEmailOtpCodeAsync(otpCode);
        if (success)
        {
            statusText.text = "OTP verified successfully. User logged in.";
        }
        else
        {
            statusText.text = "Error verifying OTP: " + errorMessage;
        }
    }

    // Triggered when the user clicks the "Instant Login" button
    private async void OnInstantLogin()
    {
        statusText.text = "Attempting instant login...";
        var result = await AvatarSdk.TryInstantLoginAsync();
        if (result.isLoggedIn)
        {
            statusText.text = "Instant login successful.";
        }
        else
        {
            statusText.text = "Instant login failed.";
        }
    }

    // Triggered when the user clicks the "Anon Login" button
    private async void OnAnonLogin()
    {
        statusText.text = "Attempting anonymous login...";
        var result = await AvatarSdk.StartLoginAnonymousAsync();
        if (result.succeeded)
        {
            statusText.text = "Anonymous login successful.";
        }
        else
        {
            statusText.text = "Anonymous login failed: " + result.failReason;
        }
    }

    // Triggered when the user successfully logs in
    private void OnUserLogin()
    {
        statusText.text = "User logged in.";
        this.gameObject.SetActive(false);
    }

    // Triggered when the user clicks the "Logout" button
    private async void OnLogout()
    {
        statusText.text = "Logging out...";
        await AvatarSdk.LogOutAsync();
        statusText.text = "Logged out.";
    }

    // Triggered when the user clicks the "Sign Up" button
    public void OnSignUp()
    {
        Application.OpenURL(AvatarSdk.UrlGeniesHubSignUp);
    }

    private void Start()
    {
        statusText.text = "Ready";

        // Button listeners
        submitEmailButton.onClick.AddListener(OnSubmitEmail);
        submitOTPButton.onClick.AddListener(OnSubmitOTP);
        logoutButton.onClick.AddListener(OnLogout);
        instantLoginButton.onClick.AddListener(OnInstantLogin);
        anonLoginButton.onClick.AddListener(OnAnonLogin);
        resendOTPButton.onClick.AddListener(OnResendOTP);
        signupButton.onClick.AddListener(OnSignUp);

        // Event listeners
        AvatarSdk.Events.UserLoggedIn += OnUserLogin;
    }

    private void OnDestroy()
    {
        // Remove button listeners
        submitEmailButton.onClick.RemoveListener(OnSubmitEmail);
        submitOTPButton.onClick.RemoveListener(OnSubmitOTP);
        logoutButton.onClick.RemoveListener(OnLogout);
        instantLoginButton.onClick.RemoveListener(OnInstantLogin);
        anonLoginButton.onClick.RemoveListener(OnAnonLogin);
        resendOTPButton.onClick.RemoveListener(OnResendOTP);
        signupButton.onClick.RemoveListener(OnSignUp);

        // Clean up event listeners
        AvatarSdk.Events.UserLoggedIn -= OnUserLogin;
    }
}
Initial Code
Start by adding this initial code to create object references for the UI elements:
using UnityEngine;
using Genies.Sdk;
using TMPro;
using UnityEngine.UI;

public class LoginController : MonoBehaviour
{
    [Header("UI References")]
    [SerializeField] private TMP_Text statusText;
    [SerializeField] private Button instantLoginButton;
    [SerializeField] private Button anonLoginButton;
    [SerializeField] private TMP_InputField emailInputField;
    [SerializeField] private Button submitEmailButton;
    [SerializeField] private TMP_InputField otpInputField;
    [SerializeField] private Button submitOTPButton;
    [SerializeField] private Button resendOTPButton;
    [SerializeField] private Button logoutButton;
    [SerializeField] private Button signupButton;
}
On Submit Email Function
Add this function to the LoginController class:
    // Triggered when the user clicks the "Submit Email" button
    private async void OnSubmitEmail()
    {
        string email = emailInputField.text;
        statusText.text = $"Email submitted: {email}";
        (bool success, string errorMessage) = await AvatarSdk.StartLoginEmailOtpAsync(email);
        if (success)
        {
            statusText.text = "OTP sent successfully. Please check your email.";
        }
        else
        {
            statusText.text = "Error sending OTP: " + errorMessage;
        }
    }
This function uses StartLoginEmailOtpAsync to submit the inputted email and start the OTP login process. If it is a valid email, then the user should receive a email with an OTP verification code.
On Resend OTP Function
Add this function to the LoginController class:
    // Triggered when the user clicks the "Resend OTP" button
    private async void OnResendOTP()
    {
        statusText.text = "Resending OTP...";
        (bool success, string errorMessage) = await AvatarSdk.ResendEmailCodeAsync();
        if (success)
        {
            statusText.text = "OTP resent successfully. Please check your email.";
        }
        else
        {
            statusText.text = "Error resending OTP: " + errorMessage;
        }
    }
This function uses ResendEmailCodeAsync to resend a new OTP to the email that requested the initial OTP. It's good practice to have this functionality in case the first OTP failed to send or the user deleted the message by mistake.
On Submit OTP Function
Add this function to the LoginController class:
    // Triggered when the user clicks the "Submit OTP" button
    private async void OnSubmitOTP()
    {
        string otpCode = otpInputField.text;
        statusText.text = $"OTP submitted: {otpCode}";
        (bool success, string errorMessage) = await AvatarSdk.SubmitEmailOtpCodeAsync(otpCode);
        if (success)
        {
            statusText.text = "OTP verified successfully. User logged in.";
        }
        else
        {
            statusText.text = "Error verifying OTP: " + errorMessage;
        }
    }
This function uses SubmitEmailOtpCodeAsync to submit the inputted OTP verification code. If the code is correct, then it will sign in the user to their Genies account and create authorization credential tokens so that user can instant login the next time.
On Instant Login Function
Add this function to the LoginController class:
    // Triggered when the user clicks the "Instant Login" button
    private async void OnInstantLogin()
    {
        statusText.text = "Attempting instant login...";
        var result = await AvatarSdk.TryInstantLoginAsync();
        if (result.isLoggedIn)
        {
            statusText.text = "Instant login successful.";
        }
        else
        {
            statusText.text = "Instant login failed.";
        }
    }
This function uses TryInstantLoginAsync to login using stored authorization credential tokens instead of doing the OTP workflow. This will only work if the user has signed in before with the OTP workflow.
On Anon Login Function
Add this function to the LoginController class:
    // Triggered when the user clicks the "Anon Login" button
    private async void OnAnonLogin()
    {
        statusText.text = "Attempting anonymous login...";
        var result = await AvatarSdk.StartLoginAnonymousAsync();
        if (result.succeeded)
        {
            statusText.text = "Anonymous login successful.";
        }
        else
        {
            statusText.text = "Anonymous login failed: " + result.failReason;
        }
    }
This function uses StartLoginAnonymousAsync to login with the anonymous login flow. This allows users to login without needing a Genies account but it will not have access to a persistent Avatar.
On User Login Function
Add this function to the LoginController class:
    // Triggered when the user successfully logs in
    private void OnUserLogin()
    {
        statusText.text = "User logged in.";
        this.gameObject.SetActive(false);
    }
This function deactivates the login UI object to hide it once the user is logged in.
On Logout Function
Add this function to the LoginController class:
    // Triggered when the user clicks the "Logout" button
    private async void OnLogout()
    {
        statusText.text = "Logging out...";
        await AvatarSdk.LogOutAsync();
        statusText.text = "Logged out.";
    }
This function uses LogOutAsync to log out the user if they are logged in to their Genies account.
On Signup Function
Add this function to the LoginController class:
    // Triggered when the user clicks the "Sign Up" button
    public void OnSignUp()
    {
        Application.OpenURL(AvatarSdk.UrlGeniesHubSignUp);
    }
This function uses the UrlGeniesHubSignUp parameter to open the Developer Portal signup website on the user's browser.
Start Function
Add this function to the LoginController class:
    private void Start()
    {
        statusText.text = "Ready";

        // Button listeners
        submitEmailButton.onClick.AddListener(OnSubmitEmail);
        submitOTPButton.onClick.AddListener(OnSubmitOTP);
        logoutButton.onClick.AddListener(OnLogout);
        instantLoginButton.onClick.AddListener(OnInstantLogin);
        anonLoginButton.onClick.AddListener(OnAnonLogin);
        resendOTPButton.onClick.AddListener(OnResendOTP);
        signupButton.onClick.AddListener(OnSignUp);

        // Event listeners
        AvatarSdk.Events.UserLoggedIn += OnUserLogin;
    }
This function will add listeners to all the button click events and also to the AvatarSdk.Events.UserLoggedIn event which is fired when a user logs in.
On Destroy Function
Add this function to the LoginController class:
    private void OnDestroy()
    {
        // Remove button listeners
        submitEmailButton.onClick.RemoveListener(OnSubmitEmail);
        submitOTPButton.onClick.RemoveListener(OnSubmitOTP);
        logoutButton.onClick.RemoveListener(OnLogout);
        instantLoginButton.onClick.RemoveListener(OnInstantLogin);
        anonLoginButton.onClick.RemoveListener(OnAnonLogin);
        resendOTPButton.onClick.RemoveListener(OnResendOTP);
        signupButton.onClick.RemoveListener(OnSignUp);

        // Clean up event listeners
        AvatarSdk.Events.UserLoggedIn -= OnUserLogin;
    }
This function will remove all button and event listeners when the script is destroyed. It is good coding practice to cleanup event listeners when destroying an object to avoid memory leak.
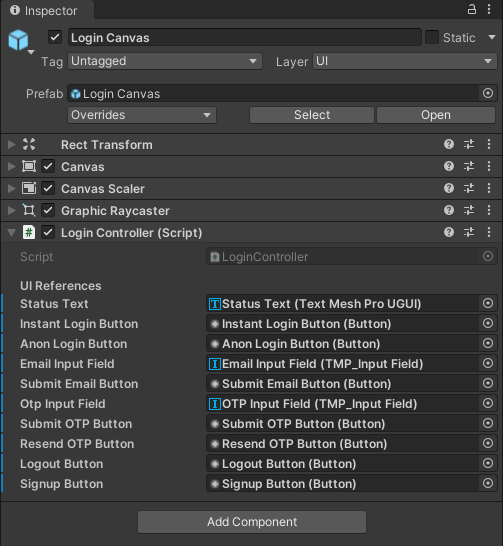
Add the UI References
Save the code and return to Unity. In the Hierarchy window, select the Login Canvas object. Drag and drop all the needed objects from the Hierarchy window into the reference input fields in the Inspector window.
Test the Code
Enter Play mode. You should be able to login which will hide the login UI.