Infinite Runner Tutorial
This tutorial will demonstrate how to make a infinite runner game using TypeScript.
Requirements
In order to complete this tutorial, make sure you completed the following:
- Created a Unity project that contains the Genies SDK (Getting Started tutorial)
- Installed and setup VS Code to use TypeScript (VS Code page)
Setting Up the Scene
Create a New Scene
Open a Unity project that contains the Genies SDK and create a new scene.
Open the Simulator Window
The Game window has an option for Simulator mode in the top left corner. Select this mode and choose a device you can test on.
Add a Ground Plane
In the Hierarchy, press the Create button and select 3D Object > Plane. Select it and open the Inspector window.
Edit the following properties:
- Set the Position property to X:
0, Y:0, Z:475. - Set the Scale property to X:
0.5, Y:1, Z:100.
Modify the Main Camera
Select the Main Camera object in the Hierarchy and open the Inspector.
Edit the following properties:
- Set the Position property to X:
0, Y:4, Z:-5. - Set the Rotation property to X:
15, Y:0, Z:0.
Add a Player Capsule
In the Hierarchy, press the Create button and select 3D Object > Capsule. Rename it Player Root. Select it and open the Inspector window. Set the Position property to X: 0, Y: 1, Z: 0.
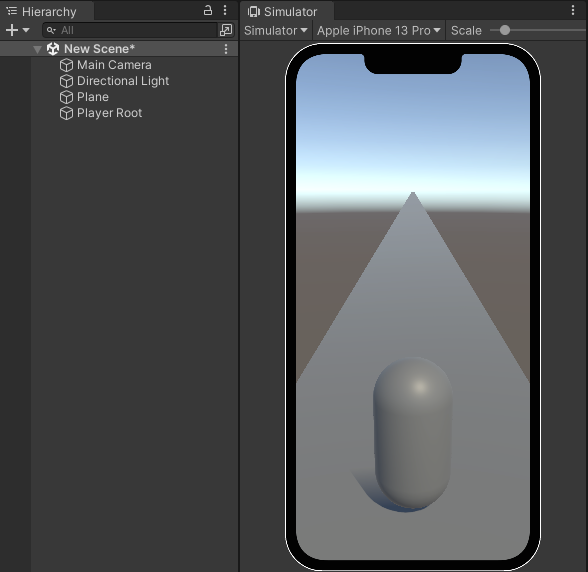
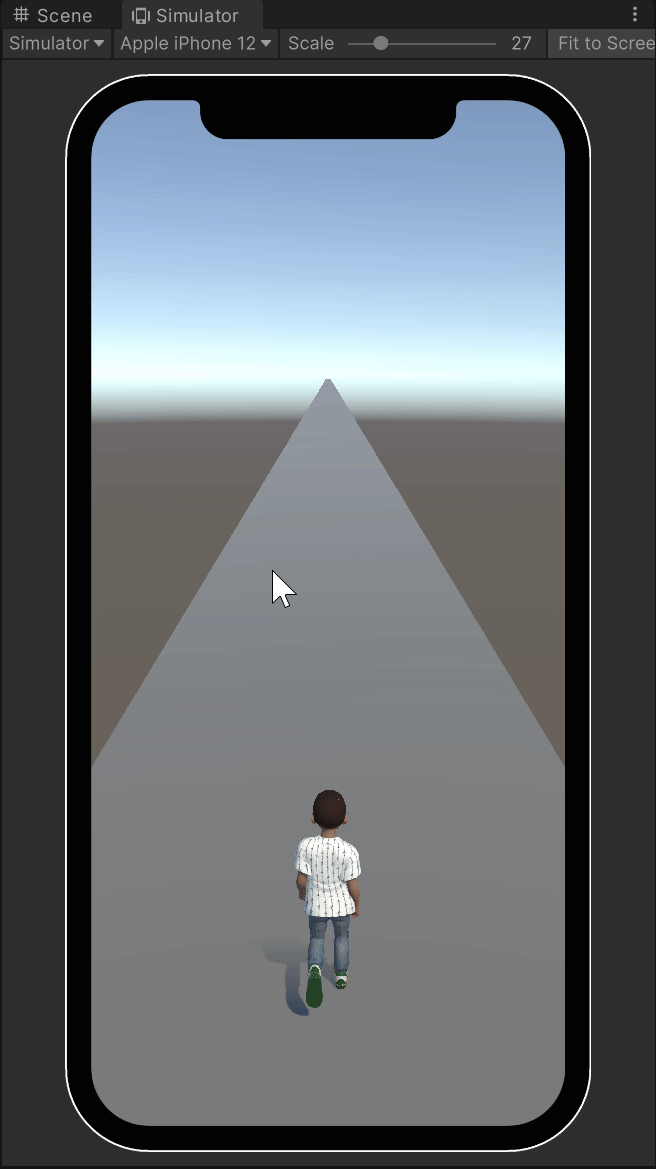
Check the Scene
The scene should now be setup with a camera facing down a road plane and a player capsule front and center.
Controlling the Player
Create a Player Controller Script
In the Project window, right click in the Assets > Experience folder and select GENIES > Scripts > Create Genies Behaviour Script. Rename the script to PlayerController.
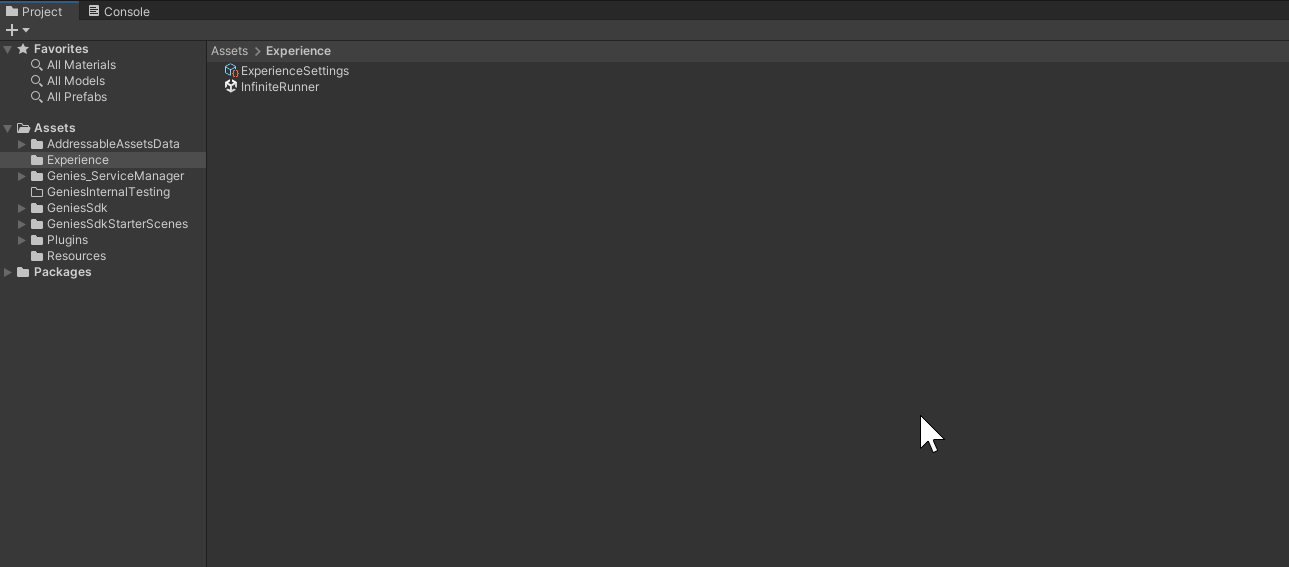
One of the requirements to properly build your project for the app is to have all custom assets in the Assets > Experience folder.
Add Preliminary Code
Open the PlayerController script in VS Code by double clicking it. This script will need to import several packages and define a couple variables to load the Avatar and move the player with the mouse swipe input.
Add the following code:
import { GeniesSdk } from 'Genies.Components.SDK.Core';
import { UserAvatar } from "Genies.Components.Sdk.External.Avatars";
import { MonoBehaviour, Input, Vector3, Mathf, Time, GameObject, RuntimeAnimatorController, Animator, Collider } from 'UnityEngine';

export default class PlayerController extends MonoBehaviour {

    @Header("Player Settings")
    @SerializeField private playerSpeed: number;
    @SerializeField private playerAnimator: RuntimeAnimatorController;

    private targetLane = 0;
    private mouseStartPos: Vector3;

    public static OnAvatarLoaded : GeniesEvent<[]> = new GeniesEvent<[]>();

    async Start() {
        //Starting code goes here...
    }

    Update() {
        //Updating code goes here...
    }
}
Add the Starting Code
When the script first starts, it will need to initialize the SDK and load the Avatar which are both asynchronous tasks. It will also need to attach the Avatar as a child of the Player Root object and set the animation to be running. Lastly, it needs to send an event trigger that the Avatar was loaded.
Add the following code:
async Start() {
    await GeniesSdk.Initialize();
    await this.LoadAvatar();
    PlayerController.OnAvatarLoaded.trigger();
}

//Load Avatar, attach to Player Root, and trigger the run animation
private async LoadAvatar() {
    let userAvatar = await UserAvatar.CreateAndLoadUserAvatar();
    userAvatar.transform.parent = this.transform;
    userAvatar.SetAnimatorController(this.playerAnimator);
    userAvatar.GetComponentInChildren<Animator>(true).SetFloat("idle_run_walk", 1);
}
Add the Updating Code
Every frame, the player will be moving towards the target lane and the target lane can be changed by the mouse swipe input.
Add the following code:
If you see any errors in VS Code after adding this code (specifically around the Vector3 subtraction), then you may need to read how to Set the TypeScript Version to fix it.
Update() {
    this.CheckSwipe();
    this.MovePlayer();
}

private CheckSwipe(){
    if (Input.GetMouseButtonDown(0))
    {
        this.mouseStartPos = Input.mousePosition;
    }

    if (Input.GetMouseButtonUp(0))
    {
        // Calculate the swipe direction vector
        let direction = Input.mousePosition - this.mouseStartPos;

        // Determine if the swipe was more horizontal than vertical
        if (Mathf.Abs(direction.x) > Mathf.Abs(direction.y))
        {
            //Change target lane based on swipe direction
            if (direction.x > 0 && this.targetLane < 1) {
                this.targetLane = this.targetLane + 1;
            }
            if (direction.x < 0 && this.targetLane > -1) {
                this.targetLane = this.targetLane - 1;
            }
        }
    }
}

//Move player towards target lane
private MovePlayer() {
    let playerPos = this.transform.position;
    let targetPos = new Vector3(this.targetLane, playerPos.y, playerPos.z);
    let newPos = Vector3.MoveTowards(playerPos, targetPos, this.playerSpeed * Time.deltaTime);
    this.transform.position = newPos;
}
Attach the Script
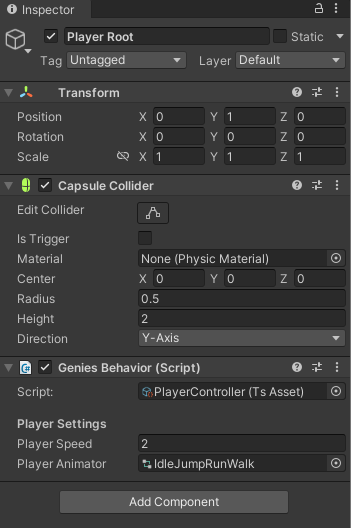
Save the code and return to Unity. Select the Player Root object and open the Inspector window. Remove the Capsule (Mesh Filter) and Mesh Render components so the capsule disappears from the Scene.
Then drag and drop the PlayerController script into the components list. Change the following properties:
- Set the Player Speed property to
2. - Set the Player Animator property to the IdleJumpRunWalk which is located inside the Assets > GeniesSdk > Animation folder.
Test the Project
Enter Play mode. The Avatar should load and be able to move by swiping the mouse.
Creating Enemies
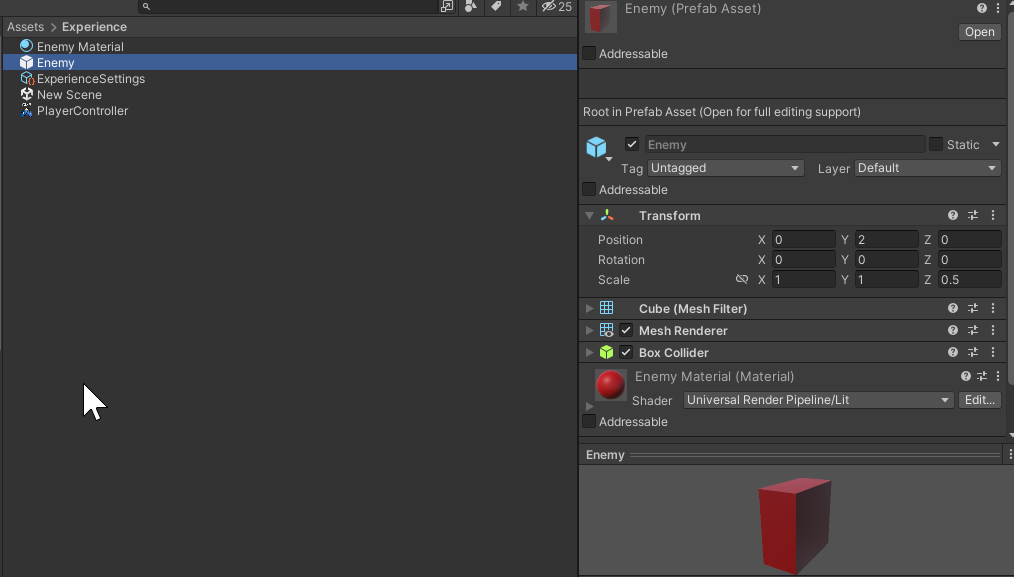
Create an Enemy Prefab
Add a new 3D cube to the scene named Enemy. Create and add a red material to it. Then change the Scale properties to be X: 1, Y: 1, Z: 0.5. Also activate the Is Trigger property in the Box Collider component. Drag it into the Project window to create a new prefab and delete the Enemy object from the scene.
Create an Enemy Pool
Object pooling is an efficient way to manage several prefab instances. Instead of repeatedly creating and destroying objects, it spawns all needed instances at the start and recycles them as active or inactive when needed.
Create a new empty GameObject and name it Enemy Pool.
Create the Enemy Controller Script
Create a new Genies Beviour Script and name it EnemyController.
Add the Preliminary Code
Double click to open the EnemyController script. This script will need a reference to the PlayerController script so it can start spawning enemies once the player's Avatar is loaded.
Add the following code:
import { GameObject, MonoBehaviour, Object, Vector3, Random, Time, WaitForSeconds, Mathf } from "UnityEngine";

import PlayerController from "./PlayerController";

export default class EnemyController extends MonoBehaviour {

    @Header("Enemy Settings")
    @SerializeField private prefab: GameObject;
    @SerializeField private amountToPool: number;
    @SerializeField private enemySpeed: number;
    @SerializeField private enemySpawnDelay: number;

    private poolList: GameObject[] = [];
    private spawnPosition: Vector3 = new Vector3(0, 0.5, 100);

    Start() {
        //Starting code goes here...
    }

    Update() {
        //Updating code goes here...
    }

    //Coroutine code goes here...
}
Add the Coroutine Code
The enemies will be spawned in time intervals so a coroutine will make it easy to wait in between spawning an enemy.
Add the following code below the Update function:
*SpawnEnemies() {
    while(true) {
        yield null;
        //Get a deactivated enemy from the pool
        let enemy = this.GetPooledObject();
        if (enemy) {
            //Spawn in a random lane and activate
            let lane = Mathf.Floor(Random.Range(-1, 2));
            enemy.transform.position = new Vector3(
                lane,
                this.spawnPosition.y,
                this.spawnPosition.z);
            enemy.SetActive(true);
        }
        yield new WaitForSeconds(this.enemySpawnDelay);
    }
}

private GetPooledObject() : GameObject {
    let result = null;

    for(let i = 0; i < this.amountToPool; i++) {
        let temp = this.poolList[i];
        if(!temp.activeInHierarchy) {
            result = temp;
            break;
        }
    }

    return result;
}
Add the Starting Code
When the script first runs, it will spawn all the needed enemy instances and deactivate them. It also needs to start the coroutine to spawn enemies once the player's Avatar is loaded.
Add the following code:
Start() {
    this.SpawnPool();
        PlayerController.OnAvatarLoaded.addListener(
            () => this.StartCoroutine(this.SpawnEnemies())
        );
}

private SpawnPool() {
    for(let i = 0; i < this.amountToPool; i++) {
        let temp = Object.Instantiate(this.prefab, this.transform) as GameObject;
        temp.SetActive(false);
        this.poolList[i] = temp;
    }
}
Add the Updating Code
During each frame, the active enemies need to keep moving down the path until they are behind the camera and then deactivated.
Add the following code:
Update() {
    this.MoveEnemies();
}

private MoveEnemies() {
    //iterate through all pooled enemy instances
    this.poolList.forEach ((enemy) => {
        //check if an enemy is active
        if(enemy.activeInHierarchy) {
            //deactivate enemies that are off screen
            if (enemy.transform.position.z < -10) {
                enemy.SetActive(false);
            //move enemies if not
            }else{
                enemy.transform.position = new Vector3(
                    enemy.transform.position.x,
                    enemy.transform.position.y,
                    enemy.transform.position.z - this.enemySpeed * Time.deltaTime);
            }
        }
    });
}
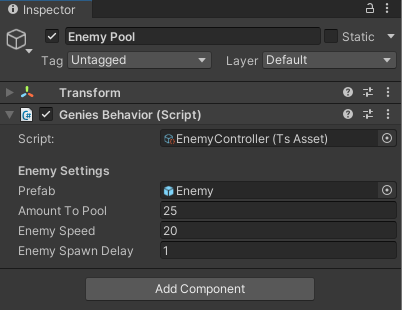
Attach the Script
Save the code and return to Unity. Select the Enemy Pool object and open the Inspector window. Drag and drop the EnemyController script into the components list. Change the following properties:
- Set the Prefab property to the Enemy prefab.
- Set the Amount To Pool property to
25. - Set the Enemy Speed property to
20. - Set the Enemy Spawn Delay property to
1.
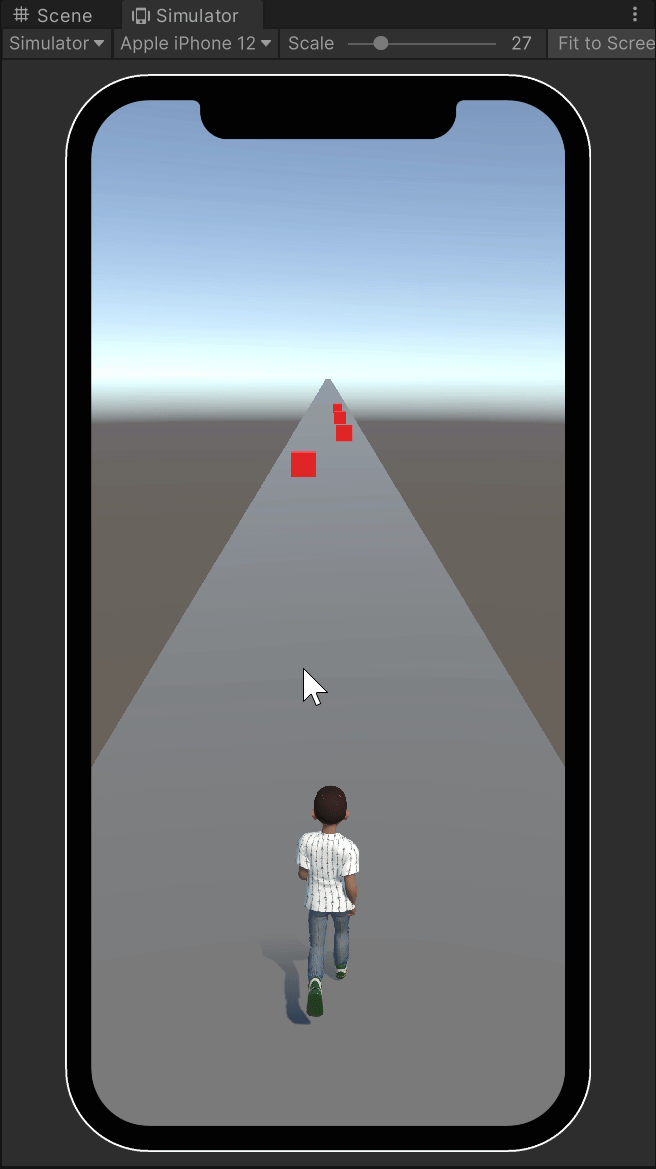
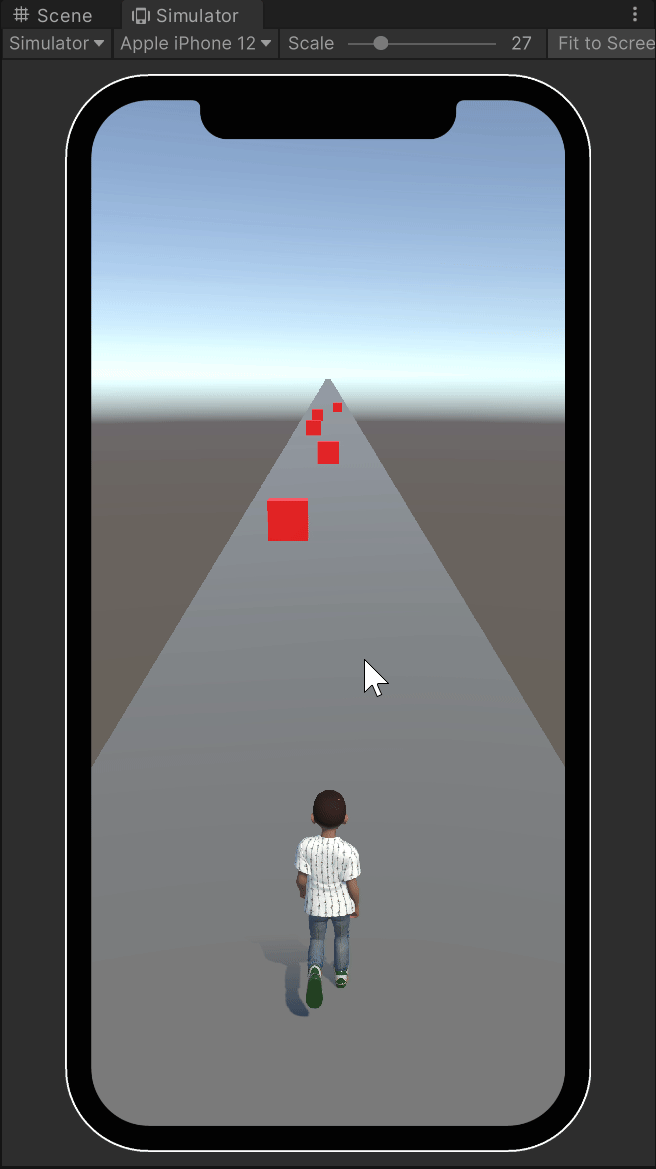
Test the Project
Enter Play mode. The enemies should be spawning and moving once the Avatar loads in.
Adding Collision
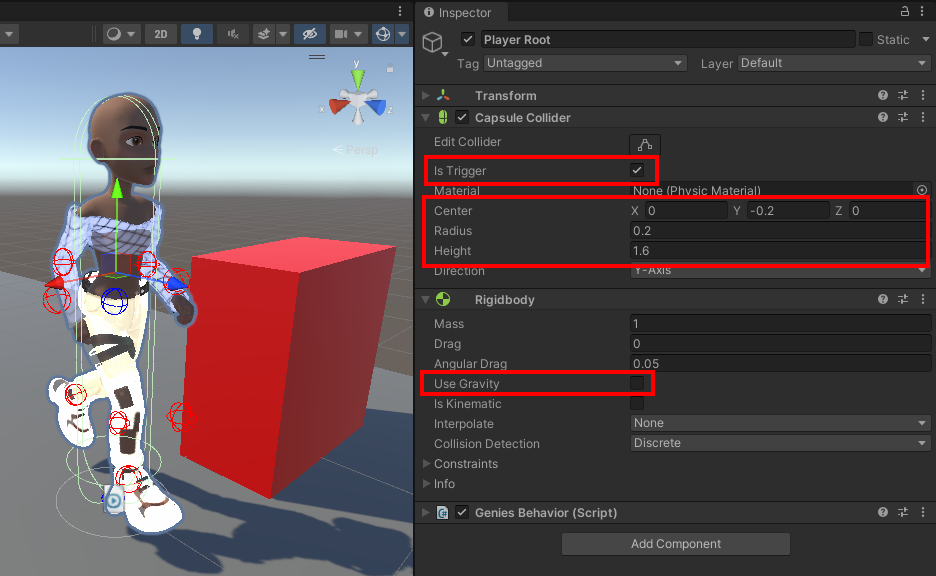
Add Player Collision Components
The player needs a more accurate collider that reflects the size of the Avatar and a Rigidbody component to trigger collision events. Select the Player Root object and add a Rigidbody component.
Then edit the following properties:
- Activate the Is Trigger property.
- Set the Center property to X:
0, Y:-0.2, Z:0. - Set the Radius property to
0.2. - Set the Height property to
1.6. - Deactivate the Use Gravity property.
Add Code to Player Controller
Open the PlayerController script. Add the highlighted lines of code to trigger a OnGameOver event if the player collides with a enemy.
//... Near line 15
    public static OnAvatarLoaded : GeniesEvent<[]> = new GeniesEvent<[]>();
    public static OnGameOver : GeniesEvent<[]> = new GeniesEvent<[]>();

    async Start() {
//...

//... After the Update function
    OnTriggerEnter(coll: Collider) {
        if (coll.gameObject.name == "Enemy(Clone)") {
            PlayerController.OnGameOver.trigger();
        }
    }
//...
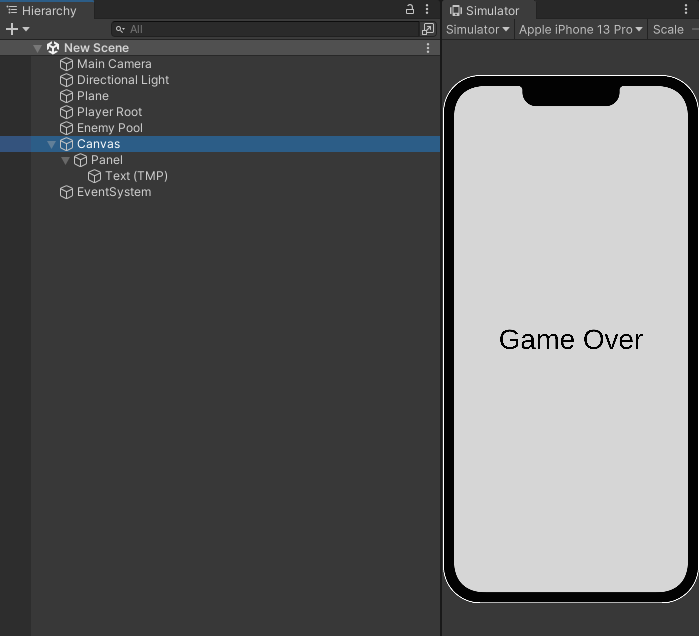
Create Game Over UI
Add a UI Canvas object to the scene. Then add a UI Panel and UI Text to the canvas so it represents a game over screen.
Create a Canvas Controller
Create a new Genies Beviour Script and name it CanvasController.
Add the Canvas Logic
Double click to open the CanvasController script. This script needs to hide the game over panel at the start and display it once the OnGameOver event is triggered from the player.
Add the following code:
import { MonoBehaviour, GameObject } from "UnityEngine";

import PlayerController from "./PlayerController";

export default class CanvasController extends MonoBehaviour {

    @Header("Canvas Settings")
    @SerializeField private panel: GameObject;

    Start() {
        this.panel.SetActive(false);
        PlayerController.OnGameOver.addListener(this.DisplayGameOver);
    }

    private DisplayGameOver() {
        this.panel.SetActive(true);
    }
}
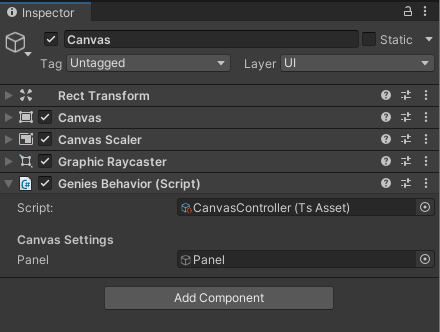
Attach the Script
Save the code and return to Unity. Select the Canvas object and drag and drop the CanvasController script into the components list. Set the Panel property to the Panel object reference.
Test the Project
Enter Play mode. The Game Over panel should appear after collision.
Conclusion
Congrats on making your first Genies Experience with TypeScript!
Here is the full set of code if needed:
Player Controller script
import { GeniesSdk } from 'Genies.Components.SDK.Core';
import { UserAvatar } from "Genies.Components.Sdk.External.Avatars";
import { MonoBehaviour, Input, Vector3, Mathf, Time, GameObject, RuntimeAnimatorController, Animator, Collider } from 'UnityEngine';

export default class PlayerController extends MonoBehaviour {

    @Header("Player Settings")
    @SerializeField private playerSpeed: number;
    @SerializeField private playerAnimator: RuntimeAnimatorController;

    private targetLane = 0;
    private mouseStartPos: Vector3;

    public static OnAvatarLoaded : GeniesEvent<[]> = new GeniesEvent<[]>();
    public static OnGameOver : GeniesEvent<[]> = new GeniesEvent<[]>();

    async Start() {
        await GeniesSdk.Initialize();
        await this.LoadAvatar();
        PlayerController.OnAvatarLoaded.trigger();
    }

    //Load Avatar, attach to Player Root, and trigger the run animation
    private async LoadAvatar() {
        let userAvatar = await UserAvatar.CreateAndLoadUserAvatar();
        userAvatar.transform.parent = this.transform;
        userAvatar.SetAnimatorController(this.playerAnimator);
        userAvatar.GetComponentInChildren<Animator>(true).SetFloat("idle_run_walk", 1);
    }

    Update() {
        this.CheckSwipe();
        this.MovePlayer();
    }

    private CheckSwipe(){
        if (Input.GetMouseButtonDown(0))
        {
            this.mouseStartPos = Input.mousePosition;
        }

        if (Input.GetMouseButtonUp(0))
        {
            // Calculate the swipe direction vector
            let direction = Input.mousePosition - this.mouseStartPos;

            // Determine if the swipe was more horizontal than vertical
            if (Mathf.Abs(direction.x) > Mathf.Abs(direction.y))
            {
                //Change target lane based on swipe direction
                if (direction.x > 0 && this.targetLane < 1) {
                    this.targetLane = this.targetLane + 1;
                }
                if (direction.x < 0 && this.targetLane > -1) {
                    this.targetLane = this.targetLane - 1;
                }
            }
        }
    }

    //Move player towards target lane
    private MovePlayer() {
        let playerPos = this.transform.position;
        let targetPos = new Vector3(this.targetLane, playerPos.y, playerPos.z);
        let newPos = Vector3.MoveTowards(playerPos, targetPos, this.playerSpeed * Time.deltaTime);
        this.transform.position = newPos;
    }

    OnTriggerEnter(coll: Collider) {
        if (coll.gameObject.name == "Enemy(Clone)") {
            PlayerController.OnGameOver.trigger();
        }
    }
}
Enemy Controller script
import { GameObject, MonoBehaviour, Object, Vector3, Random, Time, WaitForSeconds, Mathf } from "UnityEngine";

import PlayerController from "./PlayerController";

export default class EnemyController extends MonoBehaviour {

    @Header("Enemy Settings")
    @SerializeField private prefab: GameObject;
    @SerializeField private amountToPool: number;
    @SerializeField private enemySpeed: number;
    @SerializeField private enemySpawnDelay: number;

    private poolList: GameObject[] = [];
    private spawnPosition: Vector3 = new Vector3(0, 0.5, 100);

    Start() {
        this.SpawnPool();
        PlayerController.OnAvatarLoaded.addListener(
            () => this.StartCoroutine(this.SpawnEnemies())
        );
    }

    private SpawnPool() {
        for(let i = 0; i < this.amountToPool; i++) {
            let temp = Object.Instantiate(this.prefab, this.transform) as GameObject;
            temp.SetActive(false);
            this.poolList[i] = temp;
        }
    }

    Update() {
        this.MoveEnemies();
    }

    private MoveEnemies() {
        //iterate through all pooled enemy instances
        this.poolList.forEach ((enemy) => {
            //check if an enemy is active
            if(enemy.activeInHierarchy) {
                //deactivate enemies that are off screen
                if (enemy.transform.position.z < -10) {
                    enemy.SetActive(false);
                //move enemies if not
                }else{
                    enemy.transform.position = new Vector3(
                        enemy.transform.position.x,
                        enemy.transform.position.y,
                        enemy.transform.position.z - this.enemySpeed * Time.deltaTime);
                }
            }
        });
    }

    *SpawnEnemies() {
        while(true) {
            yield null;
            //Get a deactivated enemy from the pool
            let enemy = this.GetPooledObject();
            if (enemy) {
                //Spawn in a random lane and activate
                let lane = Mathf.Floor(Random.Range(-1, 2));
                enemy.transform.position = new Vector3(
                    lane,
                    this.spawnPosition.y,
                    this.spawnPosition.z);
                enemy.SetActive(true);
            }
            yield new WaitForSeconds(this.enemySpawnDelay);
        }
    }

    private GetPooledObject() : GameObject {
        let result = null;

        for(let i = 0; i < this.amountToPool; i++) {
            let temp = this.poolList[i];
            if(!temp.activeInHierarchy) {
                result = temp;
                break;
            }
        }

        return result;
    }
}
Canvas Controller script
import { MonoBehaviour, GameObject } from "UnityEngine";

import PlayerController from "./PlayerController";

export default class CanvasController extends MonoBehaviour {

    @Header("Canvas Settings")
    @SerializeField private panel: GameObject;

    Start() {
        this.panel.SetActive(false);
        PlayerController.OnGameOver.addListener(this.DisplayGameOver);
    }

    private DisplayGameOver() {
        this.panel.SetActive(true);
    }
}