Shooter Game Tutorial
This tutorial will demonstrate how to make a shooter game using advanced concepts such as scriptable objects, game state loop, and singletons.
Check out the Infinite Runner tutorial for a project introducing TypeScript.
Setting Up the Scene
The starting scene will be provided from an asset package also containing the gun Avatar overlay prefabs and player animations.
Download Starting Assets
Download the starting asset package: ShooterGame.unitypackage
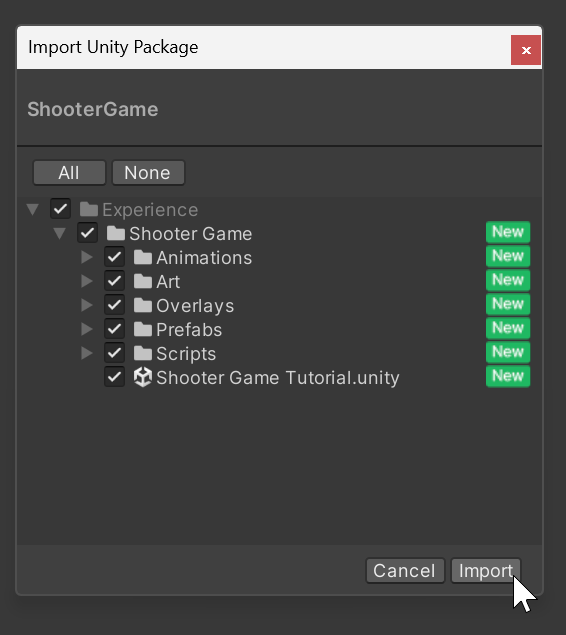
Import the Starting Assets
Open a Unity project with the Genies SDK installed. Then right click in the Project window and select Import Package > Custom Package and select the downloaded package. Make sure all the assets are selected and click Import.
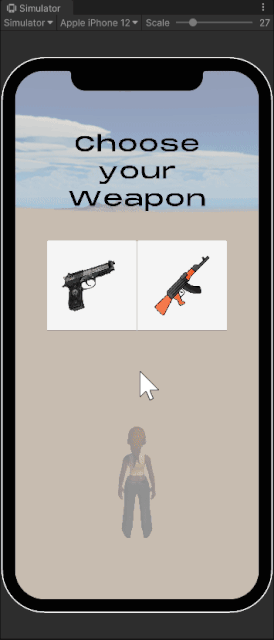
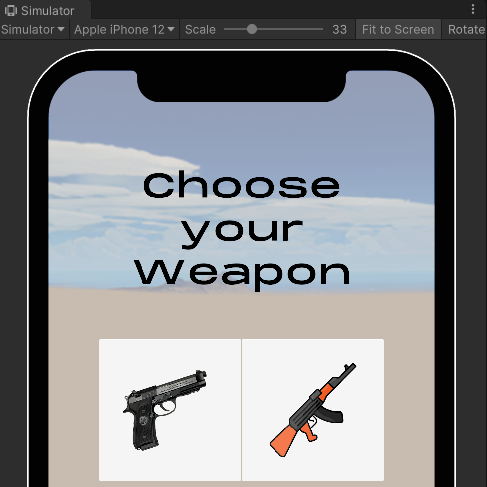
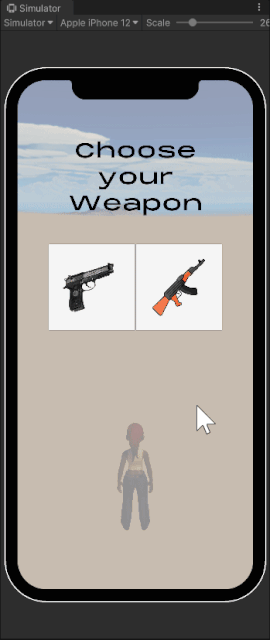
Open the Scene
Once the package is finished importing, open the scene named Shooter Game Tutorial. Press the Play button to see the starting weapon selection menu.
Create Scriptable Objects
The two weapons will have similar types of data like fire rate and bullet speed, but will have different values. This is a good example of how scriptable objects can be helpful to organize the weapon data.
Create a Scriptable Object Script
In the Shooter Game > Scripts folder, right click in the Project window and select the GENIES > Scripting > Create Genies ScriptableObject Script option. Name the script WeaponScriptableObject.

Edit the Script
Double click the WeaponScriptableObject script to open the code editor. Then add this code to create a list of properties for the weapons:
import { AvatarOverlay } from "Genies.Components.Sdk.External.Avatars";
import { ScriptableObject } from "UnityEngine";

export default class WeaponScriptableObject extends ScriptableObject {

    @Header("Shooting Animation Properties")
    public triggerName: string;

    @Header("Bullet Properties")
    public bulletSpeed: number;
    public bulletCooldown: number;

    @Header("Gun Properties")
    public gunOverlay: AvatarOverlay;
}
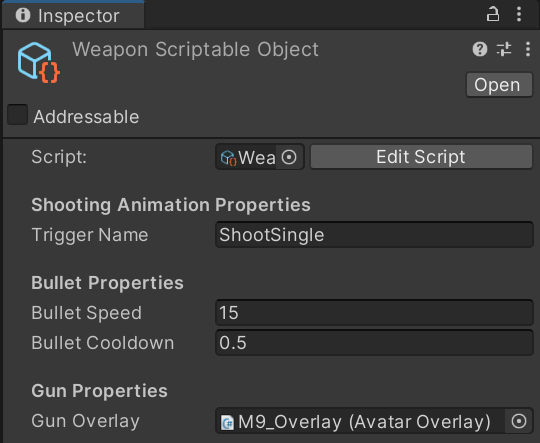
Create a M9 Instance
Save the script and then open the Project window. Right click the WeaponScriptableObject script and select the GENIES > Create GeniesScriptableObject Instance option. Name the instance M9_SO. Select the instance and open the Inspector window. Fill in the properties with these values:
- Trigger Name:
ShootSingle - Bullet Speed:
15 - Bullet Cooldown:
0.5 - Gun Overlay:
M9_Overlay
The M9_Overlay asset can be found in the Shooter Game > Overlays folder.
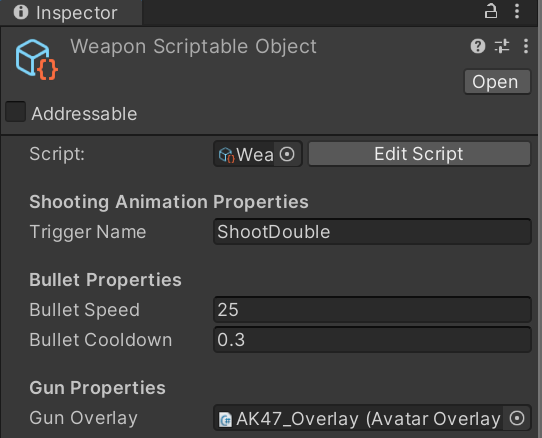
Create an AK47 Instance
Right click the WeaponScriptableObject script again and select the GENIES > Create GeniesScriptableObject Instance option. Name the instance AK47_SO. Select the instance and open the Inspector window. Fill in the properties with these values:
- Trigger Name:
ShootDouble - Bullet Speed:
25 - Bullet Cooldown:
0.3 - Gun Overlay:
AK47_Overlay
Create a Game Manager
The game manager will handle the UI and track the game state which will determine the logic for other Game Objects.
A game state describes what part of the game is taking place such as choosing a weapon, playing the game, or the game is over.
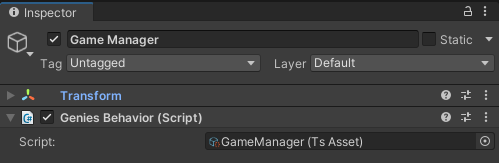
Create a New Script
In the Scripts folder, right click in the Project window and select the GENIES > Scripting > Create Genies Behavior Script option. Name the script GameManager. Then create an empty Game Object named Game Manager and attach the GameManager script to it.
Edit the Script
Double click the GameManager script to open the code editor. Then add this code:
The static public property Instance and the Awake method is creating a singleton of the Game Manager script which means there can only be one version of the script that can be referenced by other scripts.
import { GameObject, MonoBehaviour } from "UnityEngine";
import { Button } from "UnityEngine.UI";
import { TMP_Text } from "TMPro";

import WeaponScriptableObject from "./WeaponScriptableObject";

export default class GameManager extends MonoBehaviour {

    @Header("Weapon Selection UI")
    @SerializeField private weaponSelectionPanel: GameObject;
    @SerializeField private m9Button: Button;
    @SerializeField private ak47Button: Button;

    @Header("Score UI")
    @SerializeField private scorePanel: GameObject;
    @SerializeField private scoreText: TMP_Text;

    @Header("Replay UI")
    @SerializeField private replayPanel: GameObject;
    @SerializeField private replayButton: Button;

    @Header("Scriptable Object Instances")
    @SerializeField private m9_so: WeaponScriptableObject;
    @SerializeField private ak47_so: WeaponScriptableObject;

    @NonSerialized public GameState = {
        INITIAL: 0,
        LOADING: 1,
        WEAPON_SELECTION: 2,
        GAME_PLAY: 3,
        GAME_OVER: 4
    }

    @NonSerialized public OnGameStateChange: GeniesEvent<[number]> = new GeniesEvent<[number]>();

    @NonSerialized public static Instance: GameManager;

    private selectedWeapon: WeaponScriptableObject;
    private gameState: number;
    private score: number;

    Awake() {
        if(GameManager.Instance == null) {
            GameManager.Instance = this;
        }else{
            GameObject.Destroy(this.gameObject);
        }
    }

    Start() {
        this.ChangeGameState(this.GameState.LOADING);
        this.ak47Button.onClick.AddListener(() => this.ChooseWeapon(this.ak47_so));
        this.m9Button.onClick.AddListener(() => this.ChooseWeapon(this.m9_so));
        this.replayButton.onClick.AddListener(() => this.ChangeGameState(this.GameState.WEAPON_SELECTION));
    }

    public GetGameState() {
        return this.gameState;
    }

    public ChangeGameState(newState: number) {
        if (newState == this.gameState) {
            return;
        }
        switch(newState) {
            case this.GameState.LOADING:
                this.TogglePanels(false, false, false);
                break;
            case this.GameState.WEAPON_SELECTION:
                this.score = 0;
                this.scoreText.text = this.score.toString();
                this.TogglePanels(true, false, false);
                break;
            case this.GameState.GAME_PLAY:
                this.TogglePanels(false, false, true);
                break;
            case this.GameState.GAME_OVER:
                this.TogglePanels(false, true, true);
                break;
        }
        this.OnGameStateChange.trigger(newState);
        this.gameState = newState;
    }

    private TogglePanels(weaponSelection: bool, replay: bool, score: bool) {
        this.weaponSelectionPanel.SetActive(weaponSelection);
        this.replayPanel.SetActive(replay);
        this.scorePanel.SetActive(score);
    }

    private ChooseWeapon(weapon: WeaponScriptableObject) {
        this.selectedWeapon = weapon;
        this.ChangeGameState(this.GameState.GAME_PLAY);
    }

    public GetSelectedWeapon() {
        return this.selectedWeapon;
    }

    public IncreaseScore() {
        this.score += 1;
        this.scoreText.text = this.score.toString();
    }
}
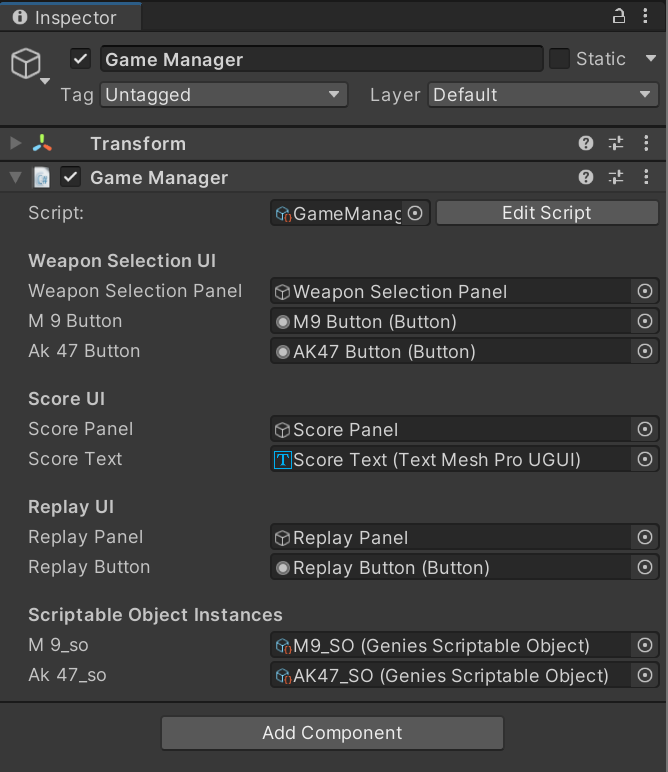
Add the Properties
Save the script. In the Hierarchy, select the Game Manager object and open the Inspector window. Drag in the required references for the properties:
Most of the properties are UI elements that are children of the Canvas object in the Hierarchy.
Test the Project
Enter Play mode. All of the UI should disappear as it enters the LOADING game state waiting for the Avatar to load.
Create a Player
The player will be a loaded Avatar that has logic to equip and shoot the weapon selected.
Create a New Script
In the Scripts folder, right click in the Project window and select the GENIES > Scripting > Create Genies Behavior Script option. Name the script PlayerController. Then create an empty Game Object named Player and attach the PlayerController script to it.
Add Physics Components
Add a Capsule Collider and Rigidbody component to the Player object.
Then edit the following properties:
- Set the Transform Position property to X:
0, Y:0, Z:0. - Activate the Is Trigger property.
- Set the Center property to X:
0, Y:0.8, Z:0. - Set the Radius property to
0.2. - Set the Height property to
1.6. - Deactivate the Use Gravity property.
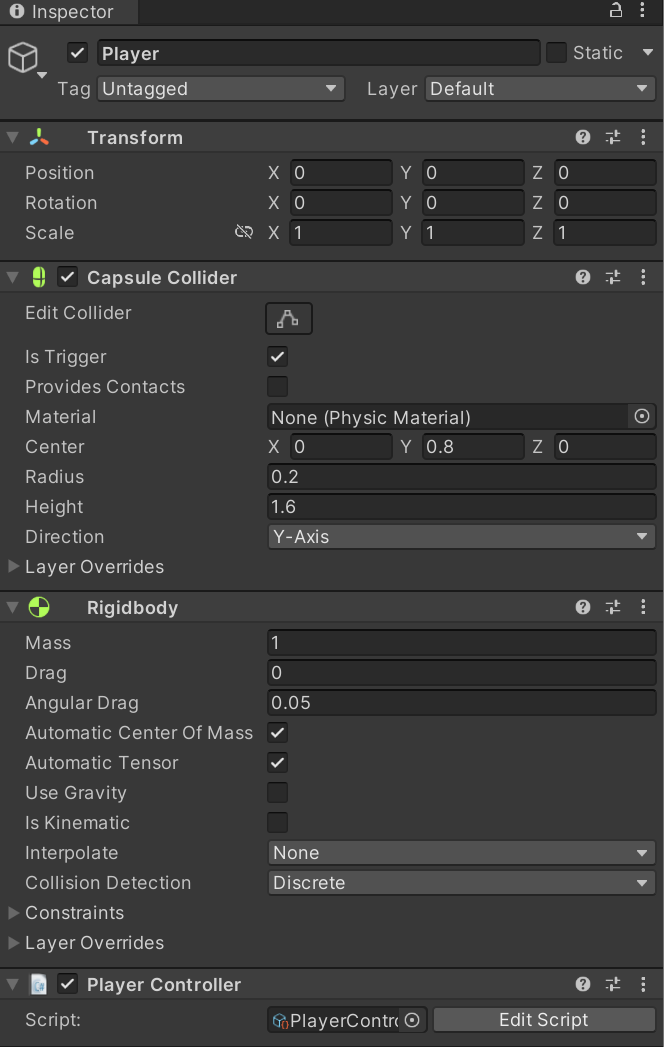
Add User Avatar Component
Add a User Avatar component to the Player object. Then drag in the PlayerAnimator reference found in the Shooter Game > Animations folder.
![]()
The User Avatar component loads the Avatar with a given Animator Controller attached. Check out the Loading Avatars page for more information.
Edit the Script
Open the PlayerController script and add the following code:
import { MonoBehaviour, Collider, Input, Vector3, Mathf, Screen, GameObject, Time, Animator, WaitForSeconds } from 'UnityEngine';
import { UserAvatar } from "Genies.Components.Sdk.External.Avatars";
import { GeniesSdk } from 'Genies.Components.SDK.Core';

import GameManager from './GameManager';
import WeaponScriptableObject from './WeaponScriptableObject';

export default class PlayerController extends MonoBehaviour {

    private animator: Animator;
    private myUserAvatar: UserAvatar;

    private gameManager: GameManager;

    private equippedWeapon: WeaponScriptableObject;

    private bulletSpawn: GameObject;

    private idleTriggerName = "Idle";
    private dyingTriggerName = "Dying";

    private lastBulletTime = 0;
    private playerRotation = 0;
    private maxPlayerRotation = 30;

    @NonSerialized public OnBulletShot : GeniesEvent<[Vector3, Vector3]> = new GeniesEvent<[Vector3, Vector3]>();

    async Start() {
        this.gameManager = GameManager.Instance;
        this.gameManager.OnGameStateChange.addListener(this.GameStateChange);
        await GeniesSdk.Initialize();
        this.myUserAvatar = this.GetComponent<UserAvatar>();
        await this.myUserAvatar.LoadAvatarAsync();
        this.animator = this.GetComponentInChildren<Animator>();
        this.gameManager.ChangeGameState(this.gameManager.GameState.WEAPON_SELECTION);
    }

    Update() {
        if(Input.touchCount > 0) {
            if(this.gameManager.GetGameState() == this.gameManager.GameState.GAME_PLAY) {
                this.RotatePlayer();
                this.CheckShoot();
            }
        }
    }

    private EquipWeapon(weapon: WeaponScriptableObject) {
        this.equippedWeapon = weapon;
        this.myUserAvatar.AddOverlay(weapon.gunOverlay);
        this.bulletSpawn = GameObject.Find("Bullet Spawn").gameObject;
    }

    private RemoveWeapon() {
        if(this.equippedWeapon) {
            this.myUserAvatar.RemoveOverlay(this.equippedWeapon.gunOverlay);
            this.equippedWeapon = null;
        }
    }

    private ResetRotation() {
        this.playerRotation = 0;
        this.transform.eulerAngles = new Vector3(0, this.playerRotation, 0);
    }

    private RotatePlayer() {
        let touch = Input.GetTouch(0);
        let touchPosition = touch.position;
        let screenWidth = Screen.width;
        let screenRatio = Mathf.InverseLerp(0, screenWidth, touchPosition.x);
        this.playerRotation = Mathf.Lerp(-this.maxPlayerRotation, this.maxPlayerRotation, screenRatio);
        this.transform.eulerAngles = new Vector3(0, this.playerRotation, 0);
    }

    private CheckShoot() {
        if(Time.time > this.lastBulletTime + this.equippedWeapon.bulletCooldown) {
            this.lastBulletTime = Time.time;
            this.animator.SetTrigger(this.equippedWeapon.triggerName);
            this.animator.speed = 1;
            this.StartCoroutine(this.TriggerShoot());
        }
    }

    private *TriggerShoot() {
        yield new WaitForSeconds(0.1);
        let position = this.bulletSpawn.transform.position
        let speed: float = this.equippedWeapon.bulletSpeed
        let velocity = this.transform.forward * speed;
        this.OnBulletShot.trigger(position, velocity);
    }

    private *PauseAnimatorAfterXSeconds(seconds: float) {
        yield new WaitForSeconds(seconds);
        this.animator.speed = 0;
    }

    OnTriggerEnter(other: Collider) {
        if(other.gameObject.name == "Enemy(Clone)") {
            this.gameManager.ChangeGameState(this.gameManager.GameState.GAME_OVER);
        }
    }

    private GameStateChange(gameState: number) {
        if(gameState == this.gameManager.GameState.WEAPON_SELECTION) {
            this.RemoveWeapon();
            this.animator.SetTrigger(this.idleTriggerName);
            this.animator.speed = 1;
            this.ResetRotation();
        }
        if(gameState == this.gameManager.GameState.GAME_PLAY) {
            this.EquipWeapon(this.gameManager.GetSelectedWeapon());
            this.animator.SetTrigger(this.equippedWeapon.triggerName);
            this.animator.speed = 1;
            this.StartCoroutine(this.PauseAnimatorAfterXSeconds(0.23))
        }
        if(gameState == this.gameManager.GameState.GAME_OVER) {
            this.animator.SetTrigger(this.dyingTriggerName);
            this.animator.speed = 1;
        }
    }
}
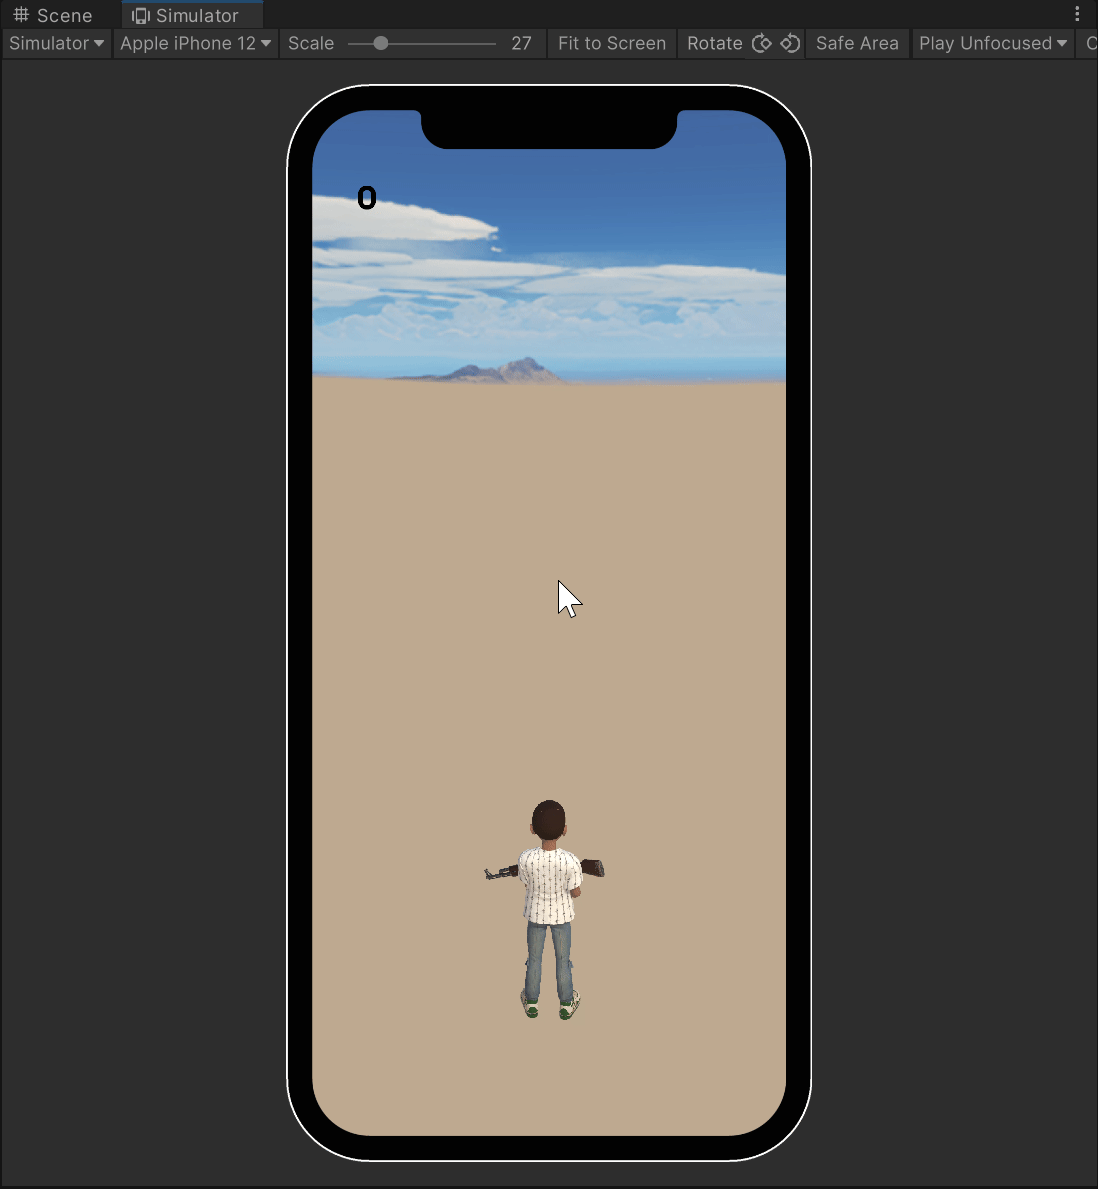
Test the Project
Enter Play mode. The player should load and once a weapon is selected, then it should be equipped to the player. Rotate the player and activate the shooting animation by clicking the mouse.
Create an Object Pool Script
Creating a generic object pool script is useful to reuse for enemies and bullets.
Object pooling is an efficient way to manage several prefab instances. Instead of repeatedly creating and destroying objects, it spawns all needed instances at the start and recycles them as active or inactive when needed.
Create a Genies Script
In the Scripts folder, right click in the Project window and select the GENIES > Scripting > Create Genies Script option. Name the script ObjectPool.
Edit the Script
Open the ObjectPool script. Add the following code and save the script:
This script has functionality to return objects to the pool after a certain amount of time using the checkExpired method.
import { GameObject, Object, Time } from "UnityEngine";

export class ObjectPool  {
    private prefab: GameObject;
    private objects: GameObject[] = [];
    private parentContainer: GameObject;
    private times: number[] = [];

    constructor(prefab: GameObject, initialSize: number, parent: GameObject) {
        this.prefab = prefab;
        this.parentContainer = parent;

        for (let i = 0; i < initialSize; i++) {
            let temp = Object.Instantiate(this.prefab, this.parentContainer.transform) as GameObject;
            temp.SetActive(false);
            this.objects[i] = temp;
            this.times[i] = 0;
        }
    }

    public get(): GameObject {
        let result = null;

        for(let i = 0; i < this.objects.length; i++) {
            if(!this.objects[i].activeInHierarchy) {
                result = this.objects[i];
                this.times[i] = Time.time;
                break;
            }
        }

        return result;
    }

    public returnToPool(obj: GameObject): void {
        obj.SetActive(false);
    }

    public returnAll(): void {
        for(let i = 0; i < this.objects.length; i++) {
            this.objects[i].SetActive(false);
        }
    }

    public getActiveCount(): number {
        let count = 0;

        for(let i = 0; i < this.objects.length; i++) {
            if(this.objects[i].activeInHierarchy) {
                count = count + 1;
            }
        }
        return count;
    }

    public checkExpired(lifetime: number): void {
        for(let i = 0; i < this.objects.length; i++) {
            if(this.objects[i].activeInHierarchy && Time.time > this.times[i] + lifetime) {
                this.returnToPool(this.objects[i]);
            }
        }
    }
}
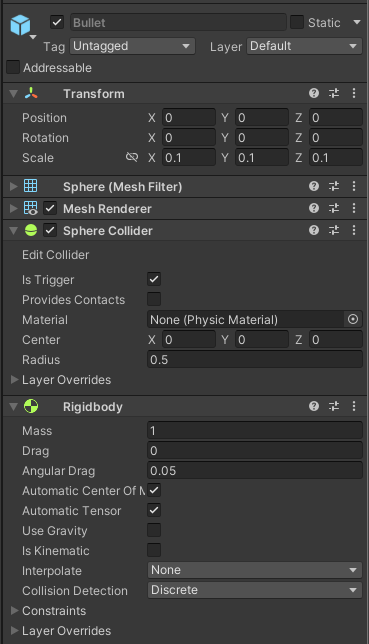
Create Bullets
Create a Bullet Prefab
Create a new 3D sphere Game Object and name it Bullet. Add a Rigidbody component to it. Then change the following properties:
- Set the Scale property to X:
0.1, Y:0.1, Z:0.1. - Activate the Is Trigger property.
- Deactivate the Use Gravity property.
Then drag the Bullet object into the Project window to create a prefab. Delete it from the scene.
Create a New Script
Right click in the Project window and select the GENIES > Scripting > Create Genies Behaviour Script option. Name the script BulletPoolController.
Edit the Script
Open the BulletPoolController script and add the following code:
import { GameObject, MonoBehaviour, Rigidbody, Vector3 } from "UnityEngine";
import PlayerController from "./PlayerController";
import { ObjectPool } from "./ObjectPool";
import GameManager from "./GameManager";

export default class BulletPoolController extends MonoBehaviour {

    @SerializeField private prefab: GameObject;
    @SerializeField private amountToPool: number = 25;
    @SerializeField private bulletLifetime: number = 5;

    @SerializeField private player: PlayerController;
    private gameManager: GameManager;

    private bulletPool: ObjectPool;

    Start() {
        this.bulletPool = new ObjectPool(this.prefab, this.amountToPool, this.gameObject);
        this.player.OnBulletShot.addListener(this.ShootBullet);
        this.gameManager = GameManager.Instance;
        this.gameManager.OnGameStateChange.addListener(this.GameStateChange);
    }

    Update() {
        this.bulletPool.checkExpired(this.bulletLifetime);
    }

    private ShootBullet(position: Vector3, velocity: Vector3) {
        let bullet = this.bulletPool.get();
        bullet.transform.position = position;
        let rb = bullet.GetComponent<Rigidbody>();
        rb.velocity = velocity;
        bullet.SetActive(true);
    }

    private GameStateChange(gameState: number) {
        if(gameState == this.gameManager.GameState.GAME_OVER) {
            this.bulletPool.returnAll();
        }
    }
}
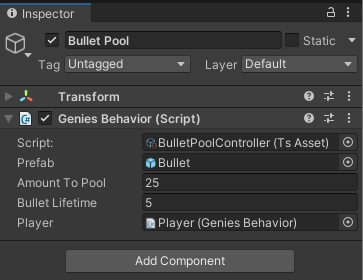
Add to Game Object
Create new empty Game Object named Bullet Pool. Add the BulletPoolController script as a component to the Bullet Pool object. Then add in the following property values:
Test the Project
Enter Play mode. Bullets should now fire from the gun as it is being shot.
Create Enemies
Create an Enemy Object
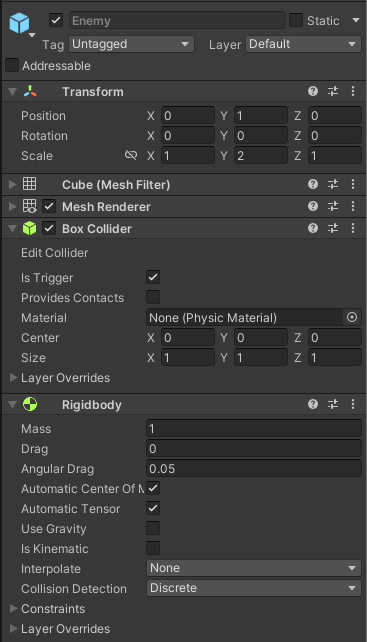
Create a new 3D cube Game Object and name it Enemy. Add a Rigidbody component to it. Then change the following properties:
- Set the Scale property to X:
1, Y:2, Z:1. - Activate the Is Trigger property.
- Deactivate the Use Gravity property.
Create a New Script
Right click in the Project window and select the GENIES > Scripting > Create Genies Behaviour Script option. Name the script EnemyController.
Edit the Script
Open the EnemyController script and add the following code:
import { Collider, MonoBehaviour } from "UnityEngine";
import GameManager from "./GameManager";

export default class EnemyController extends MonoBehaviour {

    private gameManager: GameManager;

    Start() {
        this.gameManager = GameManager.Instance;
    }

    OnTriggerEnter(other: Collider) {
        if(other.gameObject.name == "Bullet(Clone)") {
            this.gameManager.IncreaseScore();
            other.gameObject.SetActive(false);
            this.gameObject.SetActive(false);
        }
    }
}
Add to Enemy
Drag the EnemyController script into the Enemy object as a component. Then drag the Enemy object into the Project window to create a prefab. Delete it from the scene.
Create a New Script
Right click in the Project window and select the GENIES > Scripting > Create Genies Behaviour Script option. Name the script EnemyPoolController.
Edit the Script
Open the EnemyPoolController script and add the following code:
import { GameObject, MonoBehaviour, Random, Rigidbody, Transform, Vector3, WaitForSeconds } from "UnityEngine";
import { ObjectPool } from "./ObjectPool";
import GameManager from "./GameManager";

export default class EnemyPoolController extends MonoBehaviour {
    @SerializeField private prefab: GameObject;
    @SerializeField private amountToPool: number = 25;
    @SerializeField private enemySpeed: number = 5;
    @SerializeField private enemyLifetime: number = 10;
    @SerializeField private enemySpawnDelay: number = 1;

    @SerializeField private target: Transform;

    private gameManager: GameManager;

    private enemyPool: ObjectPool;

    Start() {
        this.enemyPool = new ObjectPool(this.prefab, this.amountToPool, this.gameObject);
        this.gameManager = GameManager.Instance;
        this.gameManager.OnGameStateChange.addListener(this.GameStateChange);
    }

    Update() {
       this.enemyPool.checkExpired(this.enemyLifetime);
    }

    private *SpawnEnemies() {
        while(true) {
            let position = new Vector3(Random.Range(-5, 5), 1, 30);
            let enemy = this.enemyPool.get();
            enemy.transform.position = position;
            let rb = enemy.GetComponent<Rigidbody>();
            let diff = this.target.position - enemy.transform.position;
            rb.velocity = diff.normalized * this.enemySpeed;
            enemy.SetActive(true);
            yield new WaitForSeconds(this.enemySpawnDelay);
        }
    }

    private GameStateChange(gameState: number) {
        if(gameState == this.gameManager.GameState.GAME_PLAY) {
            this.StartCoroutine(this.SpawnEnemies())
        }
        if(gameState == this.gameManager.GameState.GAME_OVER) {
            this.enemyPool.returnAll();
            this.StopAllCoroutines();
        }
    }
}
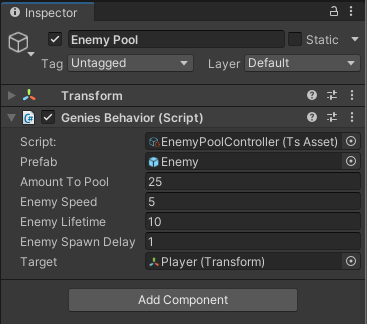
Add to Game Object
Create new empty Game Object named Enemy Pool. Add the EnemyPoolController script as a component to the Enemy Pool object. Then add in the following property values:
Test the Project
Enter Play mode. The game should now be complete!
Conclusion
Congrats on making a shooter game with TypeScript! The goal of this lesson is to introduce singletons, scriptable objects, and a game state loop.