UV Unwrapping
Definition
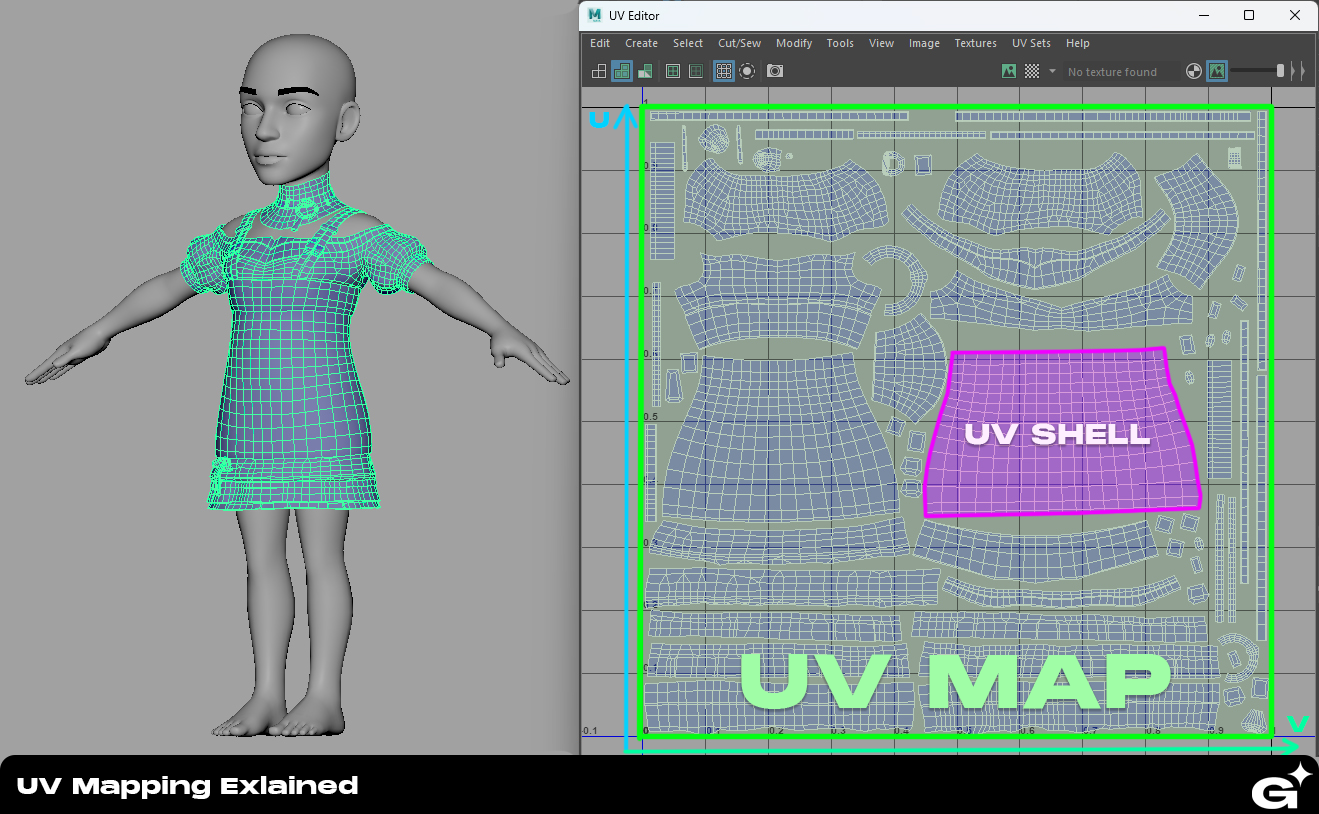
UV Unwrapping in a process of creating a UV Map for a 3D model. A UV Map is a a 2D coordinate system that maps each vertex of the model to a corresponding location on a flat texture image.
In a few words a UV map is a “flattened” 2D representation of a 3D model.
To simplify it even more, UV map can be imagined as a colorful candy wrapper that covers the 3D model and makes it look appealing. Majority of 3D models are complex and it is hard to have one “wrapper” for them that does not stretch much.
Part of the UV Mapping process is splitting the “wrapper” into different islands, UV shells, that will be unwrapped individually. This process is referred to as “cutting UV seams”.
UV shell refers to a distinct and separate group of UV islands within a UV map. A UV shell represents a connected set of UV islands that correspond to a specific part or component of the 3D model's surface.
Technical Requirements
Genies ecosystem will have an ability for the in-app users to customize the wearables by changing the color and material of the defined editable areas. It will also allow to add tileable textures and upload a custom image to use as the color of the wearable editable area. In order to support this function, the UVs of the wearables should conform to the following rules:
- all UV shells have the same rotation
- all UV shells have the same scale
- UV seam lines are hidden or placed appropriately
- none or minimal UV stretching
- UV shells packed in one UDIM space
Automatic UV Mapping can give a pretty good and fast result when it comes to UV Unwrapping, but we highly encourage our creators to double check the automated result and edit it if needed to ensure the best final result.
UVs for Tileable Textures
When creating UVs for your wearable, keep in mind the in-app asset customization function of the Genies ecosystem. In order to support it, your asset should have the UVs that will work with tileable textures.
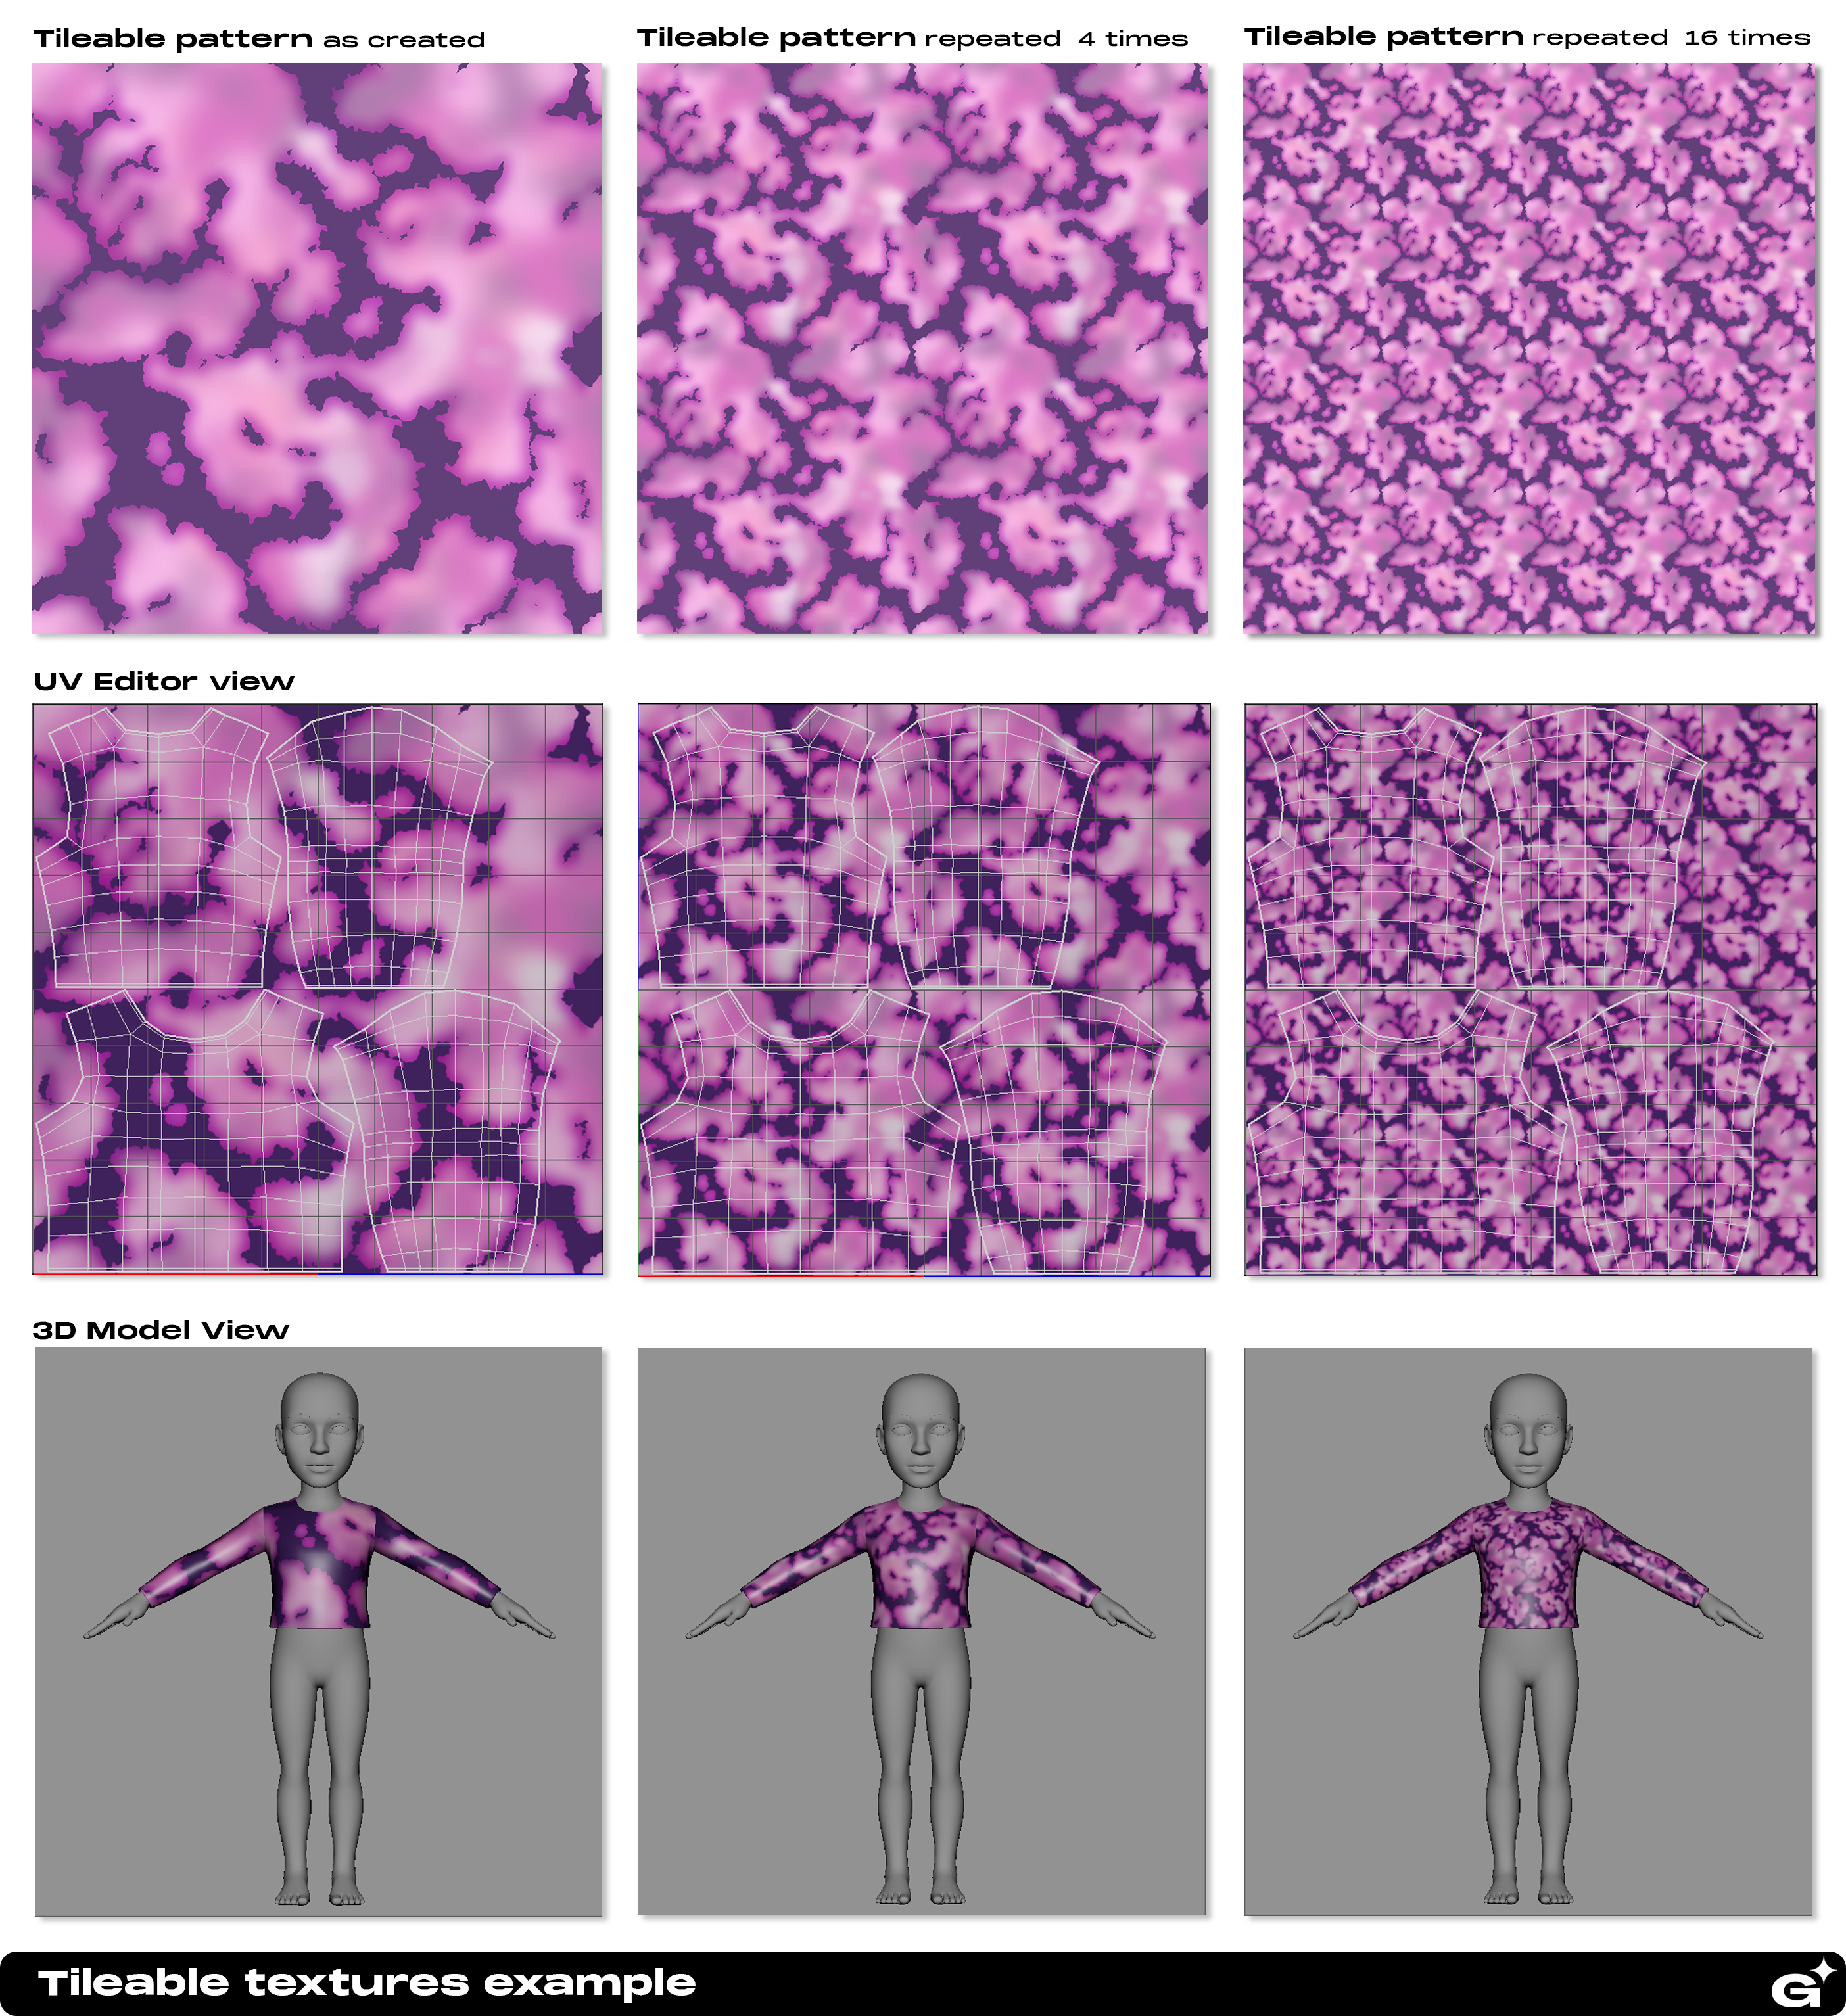
Texture tiling in 3D modeling is the process of repeating the same texture map across the entire surface. It ensures a continuous and realistic appearance without visible seams or stretching. Tiling is especially useful for optimizing resources and maintaining visual quality on large surfaces or repeating patterns.
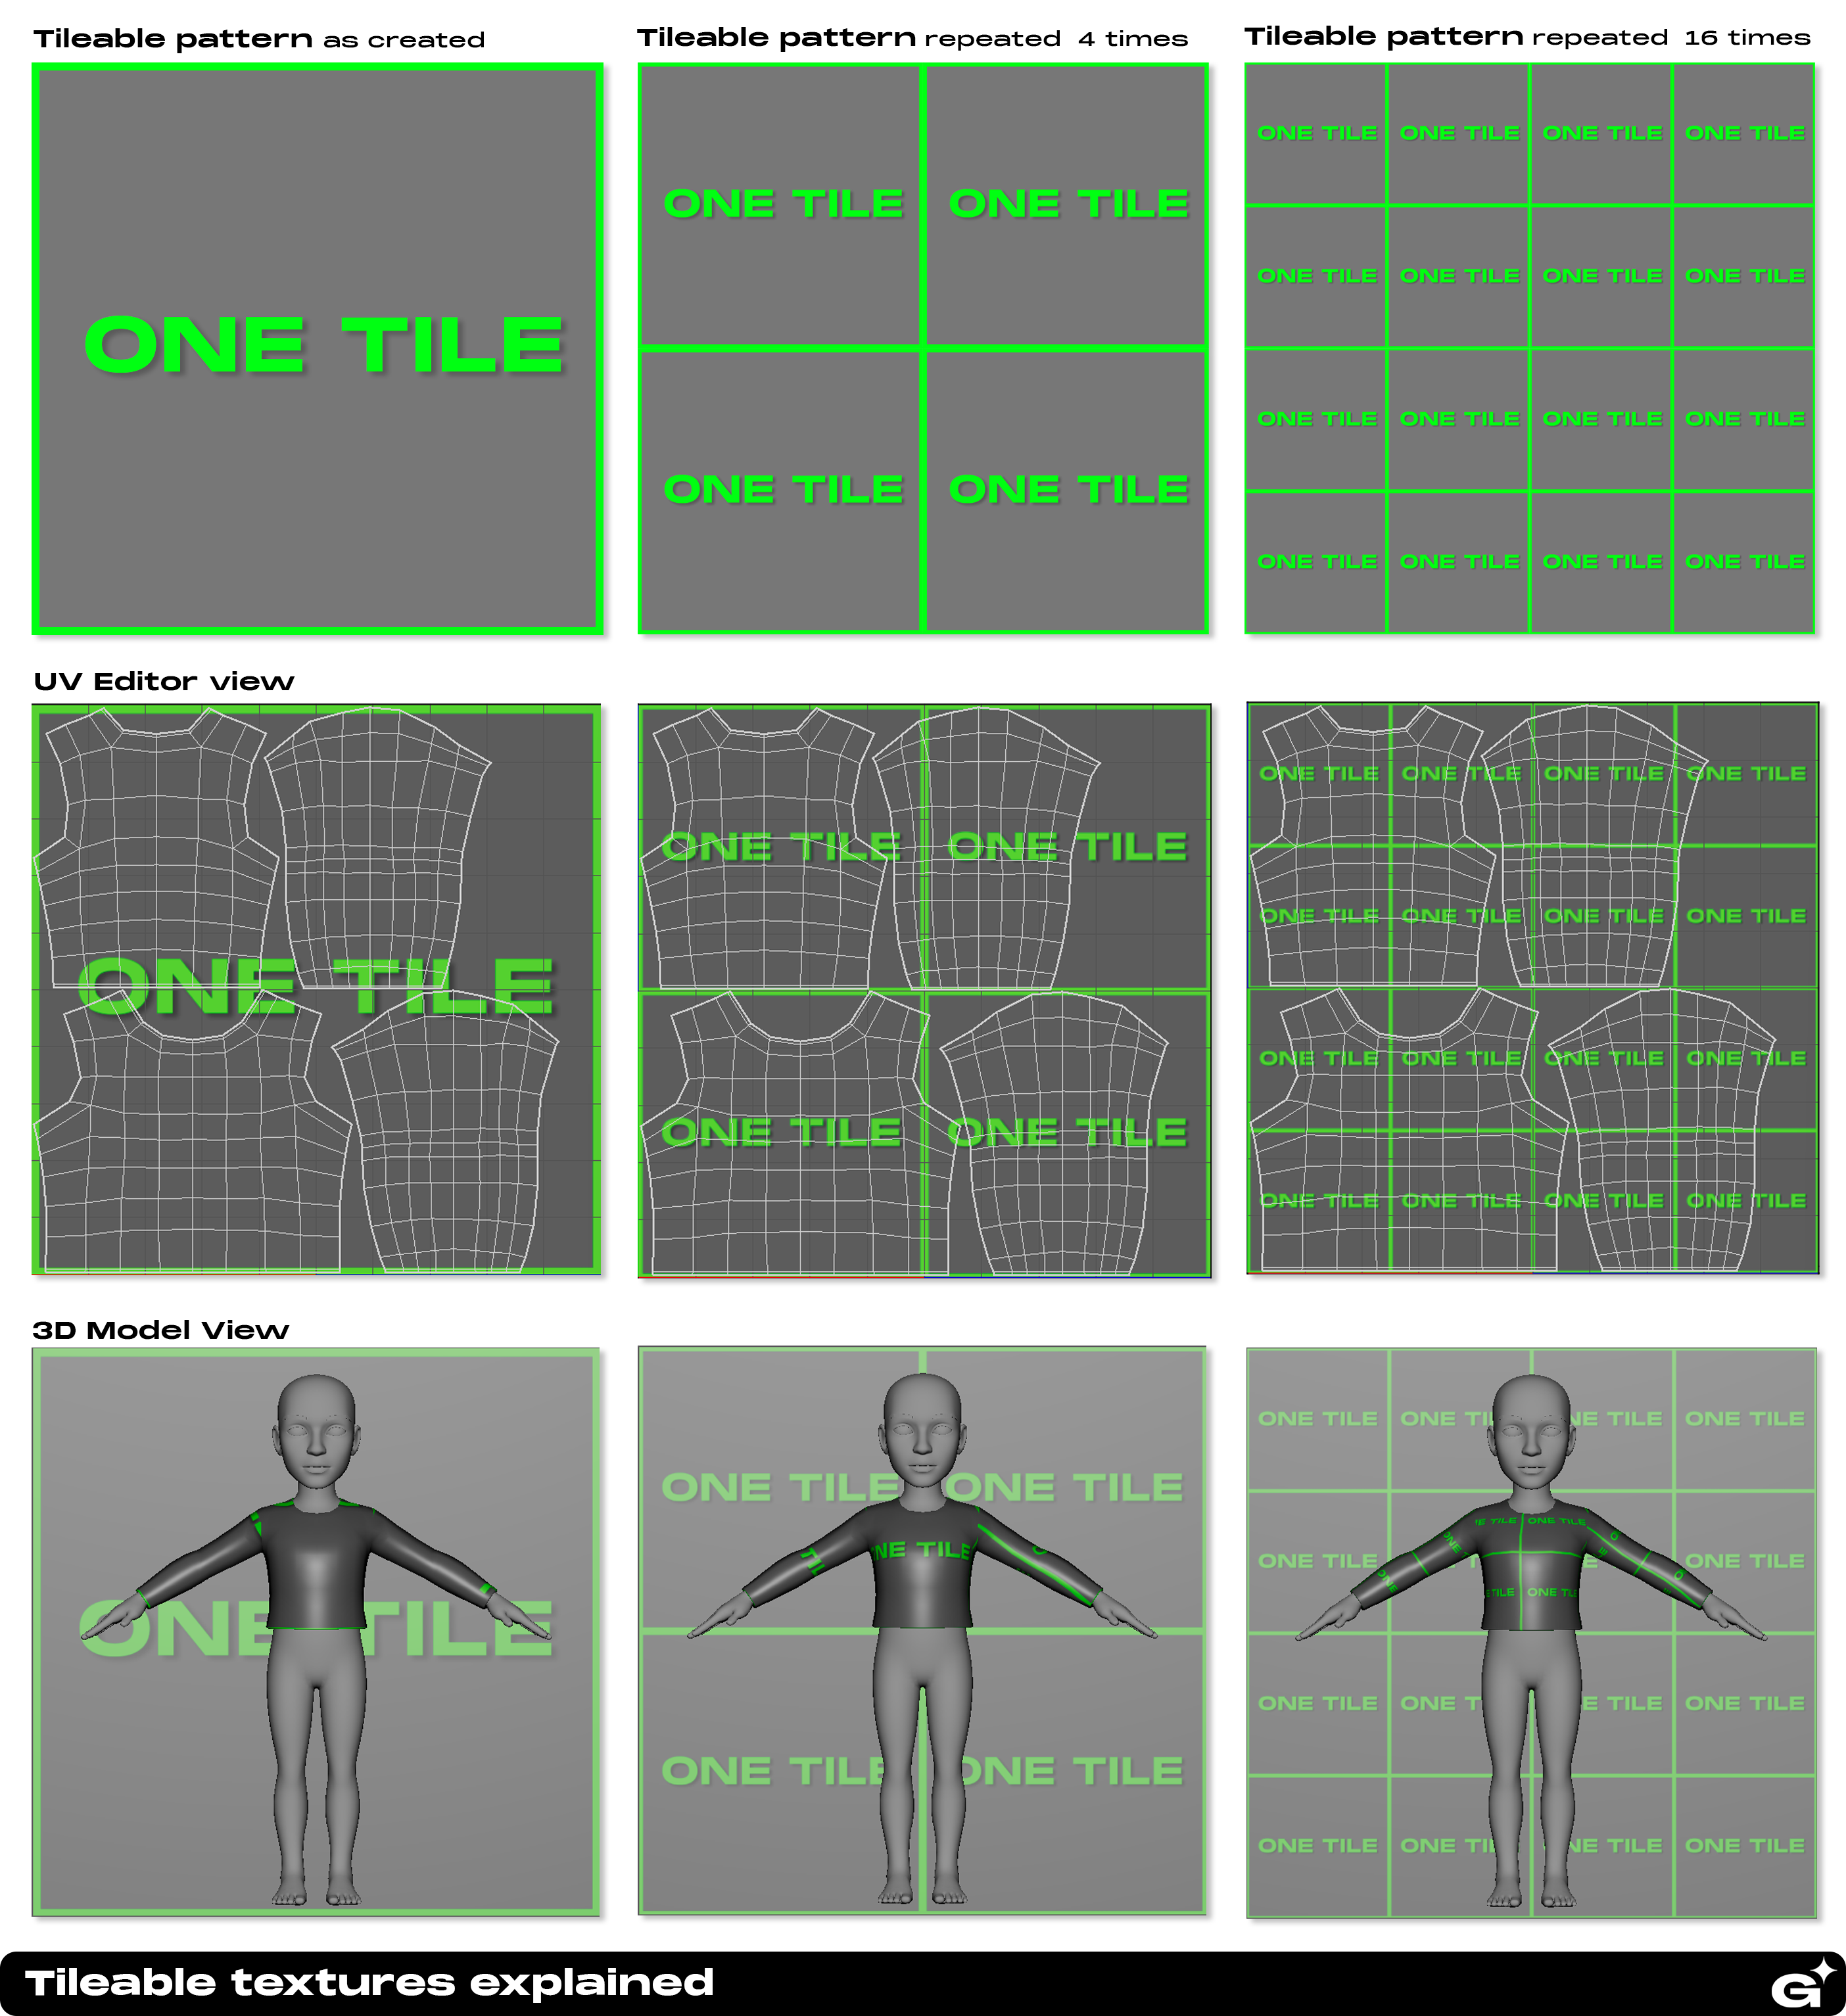
The example below showcases how the in-app user will be able to apply a custom pattern to your 3D creation within the Genies ecosystem. The in-app user will have an ability to choose the pattern, edit how many times the pattern will be repeated on the assed by scaling the pattern as well as edit the rotation of the pattern.
UV Unwrapping software
Here is a list of software that can be used for the UV Unwrapping:
- Autodesk Maya
- Blender
- Maxon Zbrush
- Headus UV Layout (stand alone software)
- Rizom UV (stand alone software)
UV Unwrapping Process
UV Projection
3D software offer multiple ways of UV map creation through the means of UV projection. Different techniques like planar, cylindrical, or spherical mapping can be used depending on the model's shape and requirements.
Cut and Sew UV Seams
During the UV unwrapping process, artists need to strategically place seams on the model's surface to define where the surface will be split into UV shells for unwrapping. Careful placement of seams can help minimize texture stretching and distortion.
Here are two techniques that will help to place the UV seams appropriately on the wearable:
Defining UV seams like a sewing lines
Since we are talking about wearables here, the best way to think about the UV shells here is to imagine what the sewing pattern for this type of clothing will look like. The UV seams on the wearable are equivalent to the sewing seams on the clothes.
Imagine UV SEAMS as SEWING SEAMS for your 3D Creation.
“Hiding” UV seams
It is advised to place your UV seams in the areas that are not visible or that are not in focus on the 3D model. Some cut lines can be hidden on the back of the model, some can be on the sides, under the arms, in between the legs and so on.
Always keep in mind that your wearable will be equipped on the avatar that will be used in multiple Experiences within the Genies ecosystem. That means that your 3D Creation will be viewed from all the angles.
Unfolding UV Shells
After the UV seams are defined of the wearable it is time to cut those seams and unfold the UV shells on a 2D layout. This step ensures that the UV shells are “flattened” appropriately without any stretching.
Unfold and optimize UV Shells
After the UV seams are defined of the wearable it is time to cut those seams and unfold the UV shells on a 2D layout. This step ensures that the UV shells are “flattened” appropriately without any stretching.
“Squared” or “Straightened” UV Shells
This is an advanced UV Mapping technique that allows you to have a nice straight edge on your UV shells when needed. Using this technique will make the patterns tile nicer on your wearable and you will be able to pack your UV shells more efficiently.
First, pick the edge that will be in the center of your UV shell and see if it will be reasonable to make it straight. Then locate other parts of the UV shell, that can potentially be straight if you will be sewing this wearable in real life. For example, ends of sleeves, shirts and pants can be straighten.
You can manually straighten the needed lines by scaling then in one axes and “relax” the surrounding UV components.
UV Layout
The arrangement of UV shells within the UV space is called the UV layout. Auto UV Layout can be very helpful to arrange the UV shells of a complex 3D model. Artists also arrange UV shells manually in an organized and efficient manner to optimize texture resolution and facilitate easier painting and editing of textures.
When creating a UV layout of your 3D Creation, it is important to keep an eye to the scale and rotation of the UV shells. Both of those parameters should be consistent throughout the model.
UDIM Space
All UV shells should fit in one texture square / one UDIM space. Please make sure the UV shells stay within the 1:1 UV square and have at least 4 px buffer with the borders of it.
UV Shell Scale
After creating the UV shells of a digital wearable it is very important to make sure that the scale of the ALL the UV shells is relative to each other. This will ensure that the final textures will have the consistent resolution and if patterns applied - they will be scaled the same throughout the asset
UV Shell Rotation
It is important to maintain consistent rotation of ALL UV shells throughout the asset. This will make the texturing process a lot easier and will allow the in-app users to customize your wearable with tileable patterns and custom images without any visual issues.
Check UVs with Tileable Checker Pattern
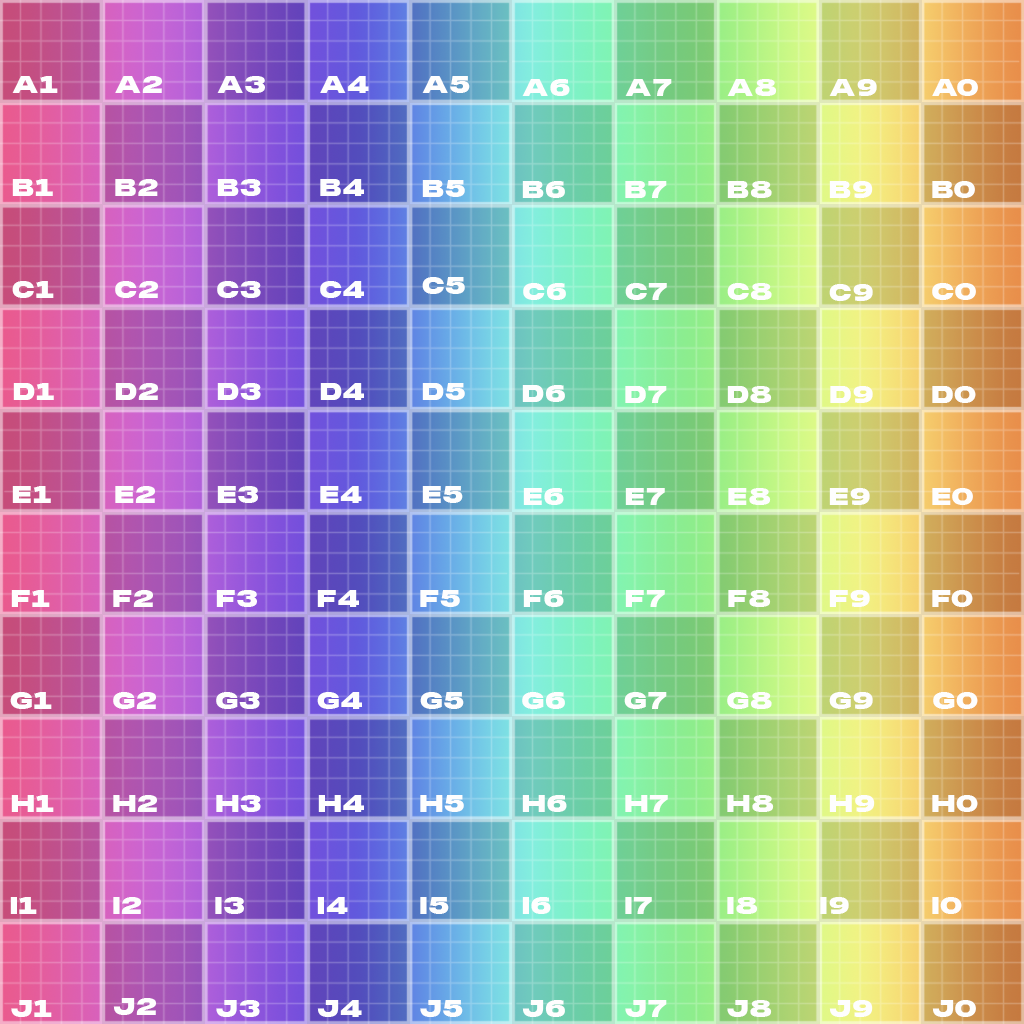
It is advised to double check your UVs after creating them to avoid texture stretching and odd UV shell rotation in the future. We offer you a tileable checker pattern with letters and number that makes it easier to see potential UV mapping issues.
Simply use this pattern as the color map for your wearable while you are editing the UVs of your 3D model. You can also tile this pattern within your shader if needed.
Preview your digital wearable with the color on. You will be able to see the pattern lining up nicely and all the numbers and letters rotated in the same direction.
Download: genies_UVCheckMap.png
Here is an example of how to use the tileable checker pattern in Autodesk Maya:
Texture Mapping
Texture mapping is the next step after the 3D model is finalized and UV maps are created and edited appropriately. Texture maps can be created in both 2D and 3D space, but the final output is always a 2D image. Texture maps can include color and opacity maps, normal and height maps, metallic and smoothness maps that enhance the model's appearance in the game engine.
Read the Texturing page for more information about texturing for 3D Creations.
UV Unwrapping Example
The example below showcases a UV Unwrapping overview for a wearable in Autodesk Maya. The same principle can be applied to any other software.
- Create the initial/auto UV Map for your digital wearable
- Split the initial UV shell into pieces by strategically placing the cutlines (UV seams) on your mesh.
- “Unwrap” the pre-cut UV shells.
- Rotate and flip the shells consistently
- Scale your UV Shells consistently
- Pack UV Shells into one UDIM space
UV Unwrapping errors
Non-manifold UVs
Non-manifold UVs refer to a situation in 3D modeling where the UV coordinates of a mesh are not properly structured or defined. Unlike manifold UVs, which follow a consistent and organized layout, non-manifold UVs contain irregularities or inconsistencies that can cause issues during texture mapping and rendering.
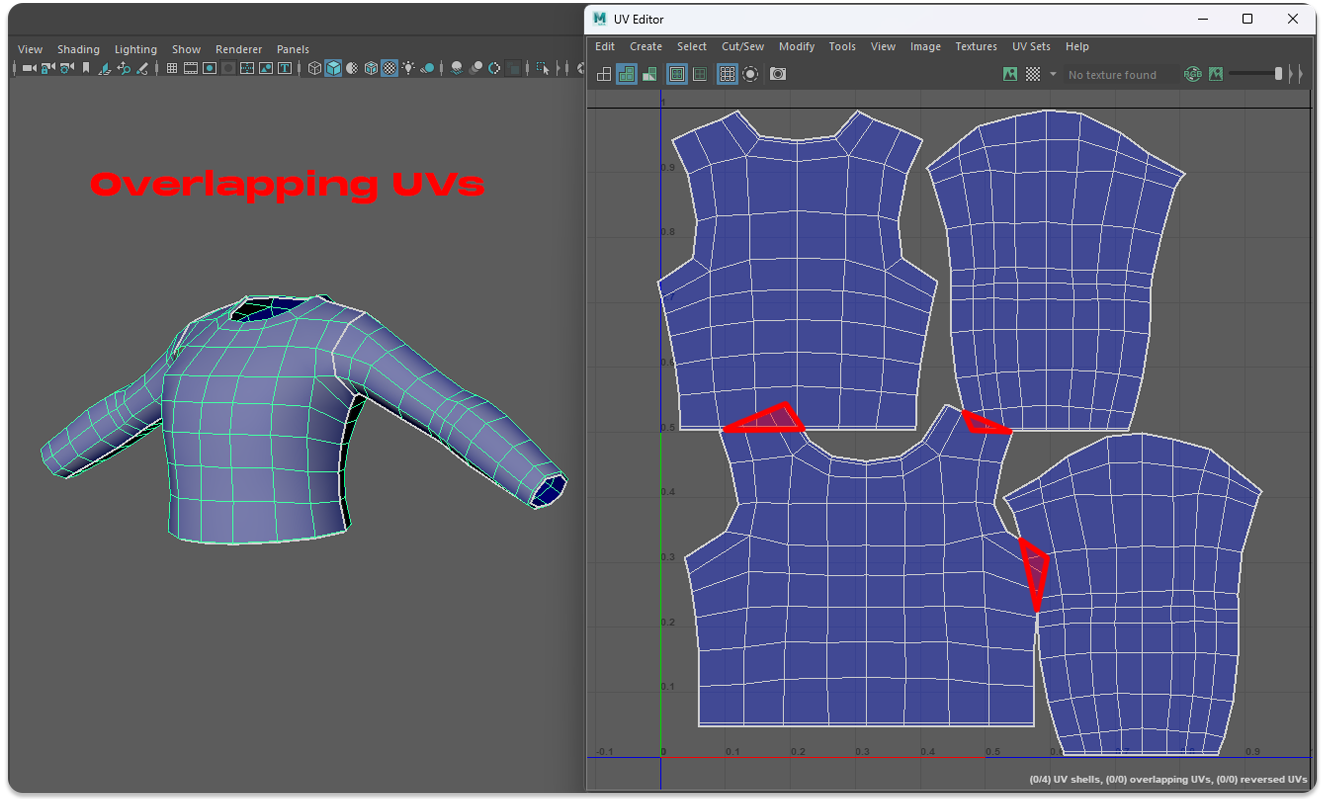
Overlapping UVs
One common issue with non-manifold UVs is overlapping UV coordinates. This occurs when multiple vertices in the 3D mesh are assigned the same UV coordinates, resulting in texture stretching or incorrect rendering.
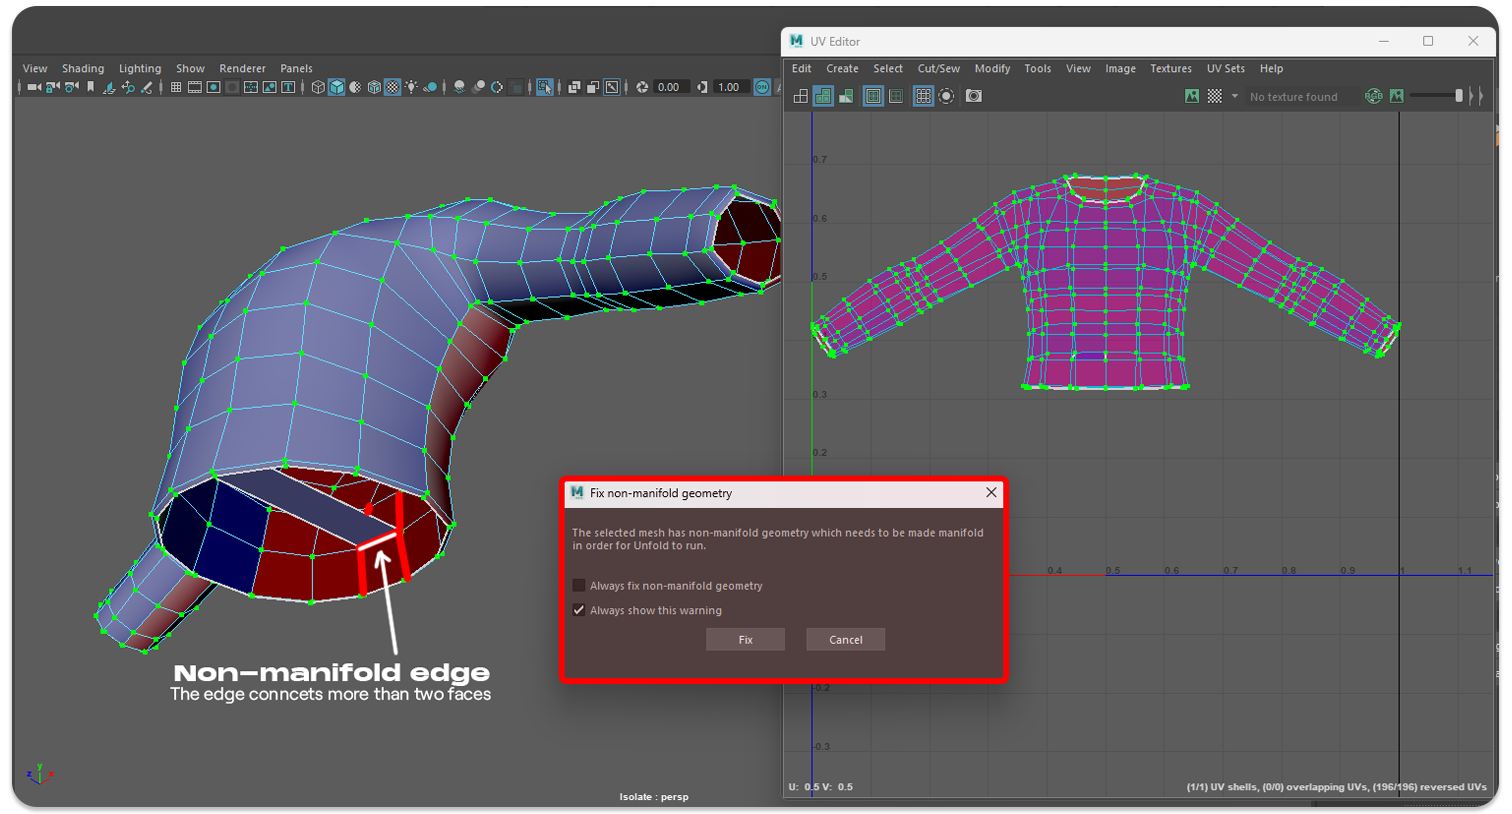
Non-Manifold Edges
Non-manifold UVs can also be caused by non-manifold edges in the mesh. Non-manifold edges are edges that are shared by more or fewer than two polygons. When UVs are associated with non-manifold edges, it can lead to irregular texture mapping and undesirable rendering results.
Texture Distortions
Non-manifold UVs can cause texture distortions when applying textures to the model's surface. This can result in uneven texture stretching, misaligned patterns, or texture bleeding across adjacent polygons. Distorted textures can significantly impact the visual quality and accuracy of the model's appearance.
How to fix non-manifold UVs
To address non-manifold UV issues, it is essential to ensure proper UV unwrapping techniques and resolve any inconsistencies in the UV coordinates. This can involve manually adjusting overlapping UVs, resolving non-manifold edges, or using tools and scripts specifically designed to handle UV-related problems.
We hope that the information above gives you a good understanding of how to prepare your 3D model for texturing by creating efficient UV maps for it.
For more software specific information on UV mapping please proceed to the Tutorials section of the 3D Creations documentation: