Texturing
Texturing for Mobile Games
To "texture" a digital wearable for mobile and augmented reality (AR) experiences refers to the process of applying visual and surface details to a 3D model of a wearable item. This involves creating and mapping 2D images, known as textures, onto the surface of the 3D model to give it a realistic and visually appealing appearance.
PBR Texturing Approach
PBR, short for Physically Based Rendering, is a rendering technique widely used in 3D graphics and game development to achieve more realistic and physically accurate rendering of materials and lighting.
Here at Genies we are using Unity cross-platform engine as a primary engine for the mobile and AR experience that we support. That means that we are using Unity Universal Render Pipeline (Metallic Standard) also known as URP when it comes to texturing.
Texturing Platforms
Texture maps for wearable assets can be created in a variety of 2D and 3D programs.
Some examples are:
- Adobe Photoshop
- 3D Coat
- Procreate
- Blender
- Adobe Substance 3D Painter
Also here are some free alternatives:
- Armor Paint
- Quixel Suite
- GIMP - for combining maps
Quick Tech Specs
No matter what software you use for texturing, please make sure to check our texture maps tech specs prior to the final asset submission.
Map format → .png
Map size → 4096x4096 pixels (4k)
Color mode → RGB 8 bit
Normal map type → Open GL
Here is the list of texture maps that you need for your digital wearable:
- yourAssetName_AlbedoTransparency
- yourAssetName_MetallicSmoothness
- yourAssetName_Normal
- yourAssetName_RGBAMask
AlbedoTransparency map
AlbedoTransparency is a map that is combined of Albedo (color) map and Transparency (opacity, cut out) map.
We are utilizing RGB+A channels of the .png file to combine two maps in one. In the final _AlbedoTransparency map, Albedo is being mapped into RGB channel and the Transparency map is being mapped into Alpha channel as a greyscale map.
- Albedo (Color) → RGB channel (color)
- Transparency (Opacity) → Alpha channel (greyscale)
Albedo Map
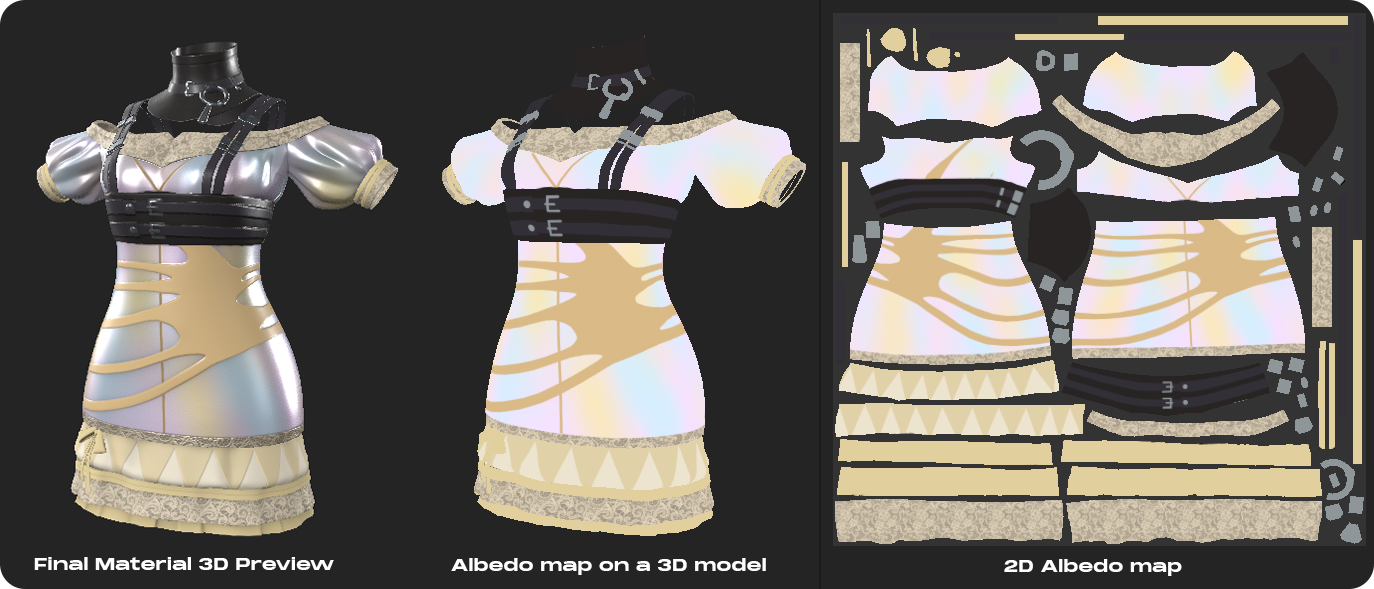
An albedo map is a 2D texture that defines the visual appearance of a 3D object's surface by mapping colors or patterns onto its geometry. It is also known as a diffuse map or a color map. The albedo map specifies the base color of the surface and contributes to the overall look of the object when illuminated by various light sources.
Transparency Map
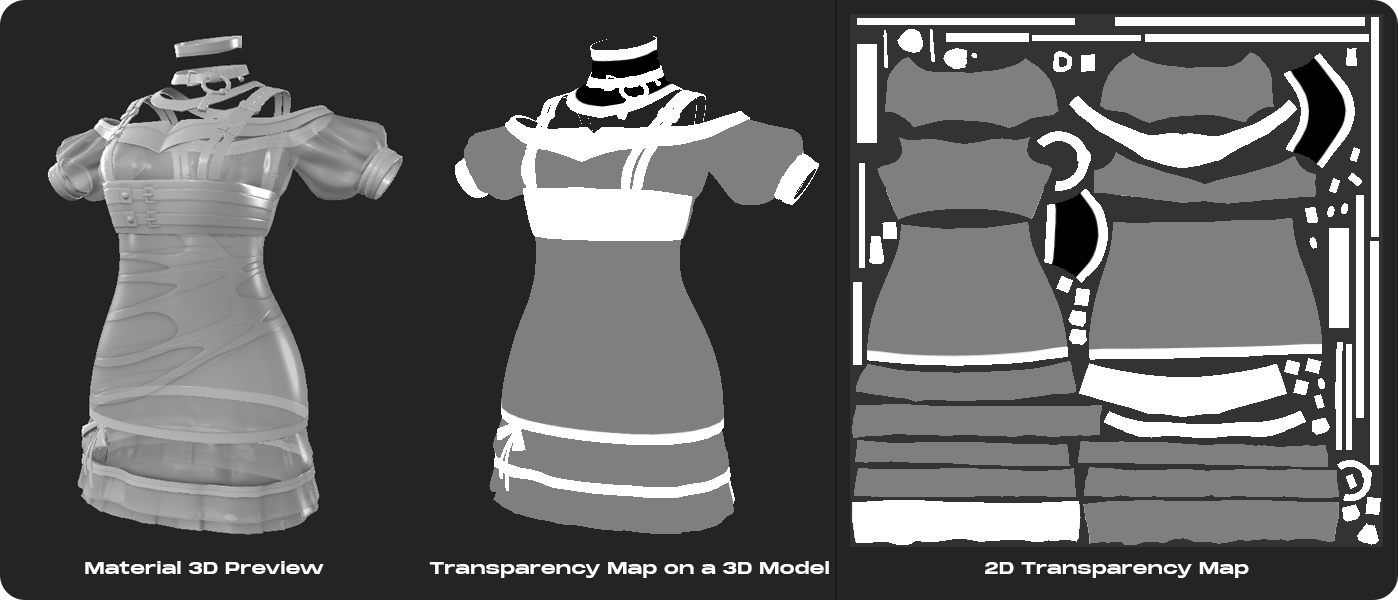
Genies Ecosystem currently does not support transparency. Please make sure you assets’ transparency map is all white and mapped into the alpha channel of the _AlbedoTransparency map.
A transparency map, also known as an alpha map or opacity map, is a type of texture used in 3D texturing to control the transparency or opacity of certain areas of a material or object. It is typically a grayscale image, where different shades of gray determine how transparent or opaque a particular part of the texture should be.
White areas in a transparency map represent fully opaque or solid parts of the texture. These areas will be completely visible in the rendered image. Black areas represent fully transparent parts. These areas will be see-through and show whatever is behind the object. Gray areas in between represent varying levels of transparency, allowing for gradual blending between opaque and transparent regions.
There are to types of transparency: see through transparency and alpha-cut out transparency type.
- See-through transparency is being used on assets like glasses or see through fabrics. The map for those areas of the assets is usually a various shade of grey depending on how see-through this part of the wearable is. Lighter grey color will be less see through than darker grey color.
- Alpha cut-out transparency is a black and white map where white area is not transparent and black area is fully transparent. There are no see-through areas (grey areas) on this type of map.
- Transparency map is a greyscale map.
MetallicSmoothness map
MetallicSmoothness is a map combined of Metallic map and Smoothness map. We are utilizing RGB+A channels of the .png file to combine two maps in one. In the final _MetallicSmoothness map, Metallic map is being mapped as a greyscale map into the RGB channel and Smoothness map is being mapped into the alpha channel.
- Metallic → RGB channel (greyscale)
- Smoothness (Glossiness or inverted Roughness) →Alpha channel (greyscale)
Metallic Map
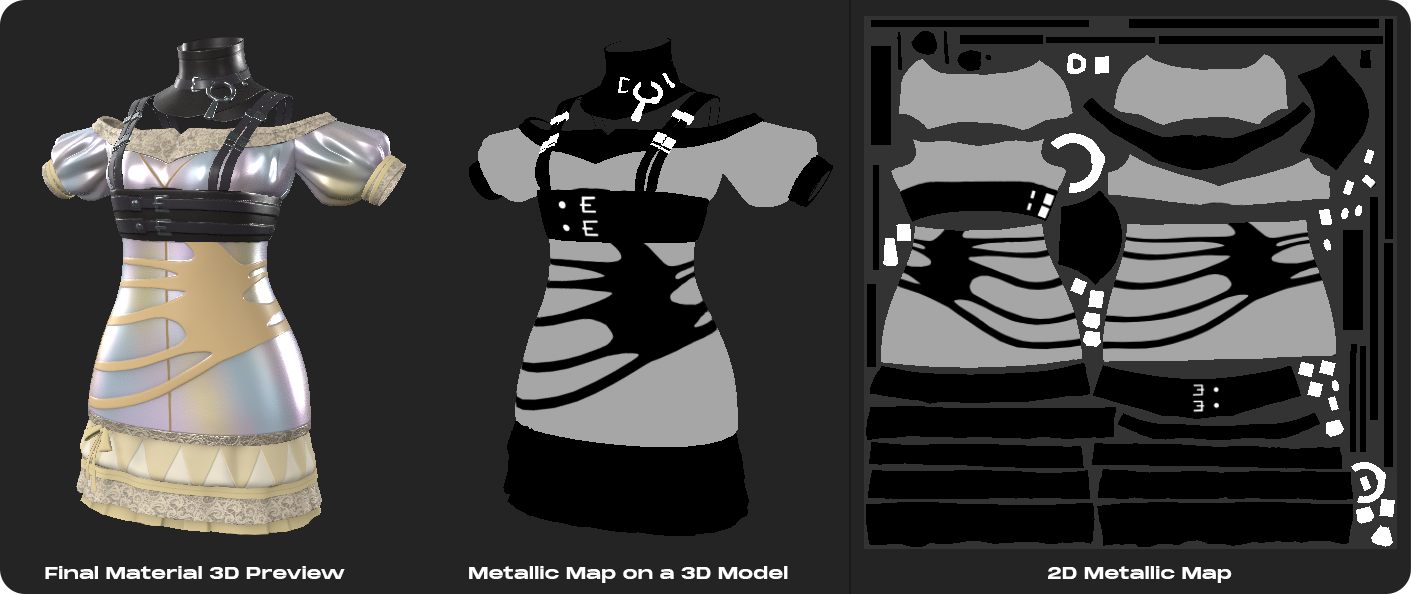
A metallic map, also known as a metalness map, is a texture used to define the metallic properties of a material on a 3D object. It is a key component of the PBR (Physically Based Rendering) workflow, which aims to create realistic lighting and shading effects in computer graphics.
The metallic map typically uses grayscale values to indicate whether a part of a material is metallic or non-metallic:
- Black areas represent non-metallic or dielectric parts of the material, such as plastic, wood, or ceramics. These areas reflect very little to no light like traditional non-metallic surfaces.
- White areas indicate fully metallic parts, such as metal or shiny surfaces. These areas reflect light in a way characteristic of metals. Gray areas (rarely used) represent varying degrees of metallic influence.
Smoothness Map
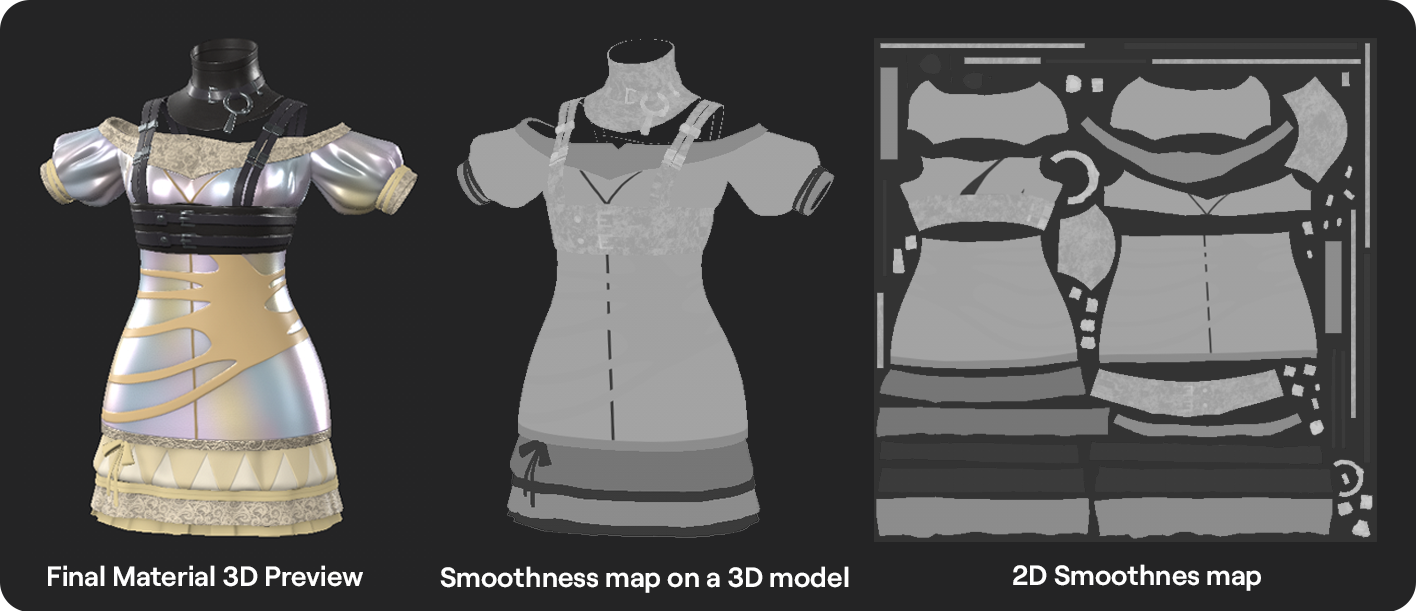
A smoothness map, also known as a glossiness map or inverted roughness map, is a texture used in 3D modeling and rendering to control the smoothness or roughness of a material's surface. It is a crucial component of the Physically Based Rendering (PBR) workflow, which aims to achieve realistic lighting and shading effects in computer graphics.
- Black areas represent rough or non-smooth parts of the material. These areas scatter light in multiple directions, resulting in diffuse or blurry reflections.
- White areas indicate smooth parts of the material's surface. These areas reflect light more directly, creating sharp and clear specular reflections.
- Gray areas represent varying levels of smoothness, allowing for smooth transitions between rough and smooth surfaces.
If you are using a roughness map in your 3D texturing software, don’t forget to invert it prior to combining the final MetallicSmoothness map for your 3D Creation submission.
Normal Map
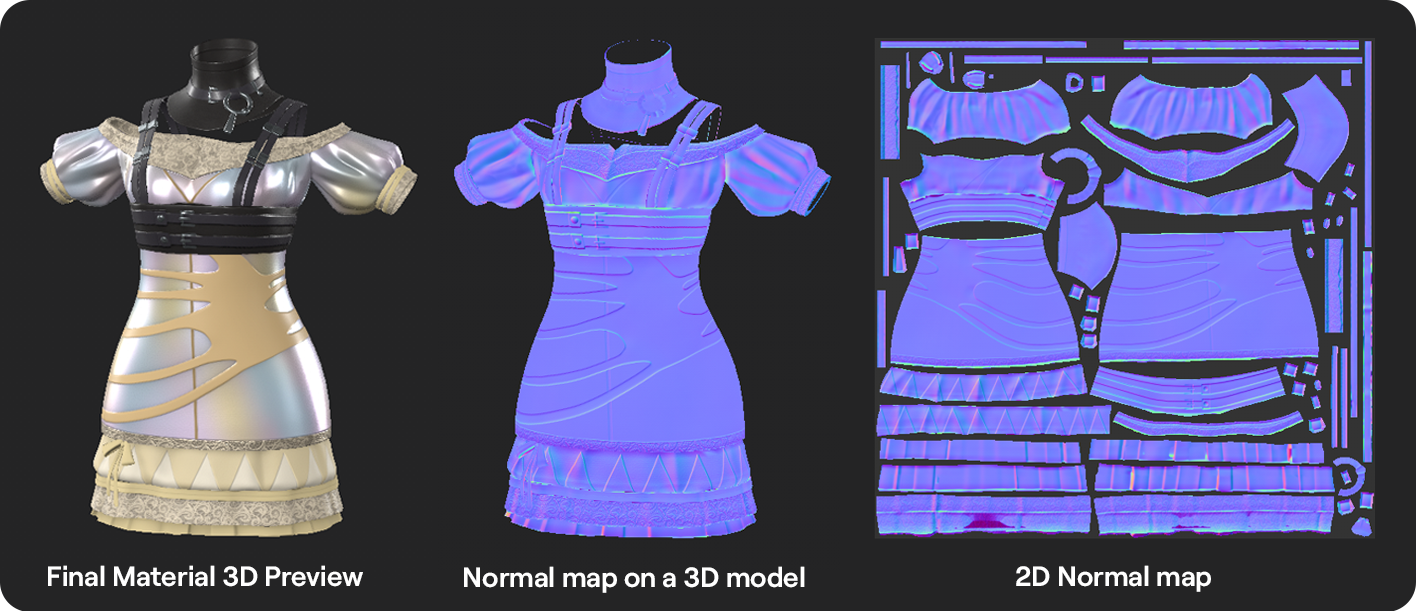
A normal map is a type of texture used to enhance the visual appearance of surfaces by simulating intricate details without the need for additional geometry.
A normal map encodes surface normals, which are vectors that define the direction a surface is facing at each point. These normals are usually represented in the RGB color channels of the texture, with each color corresponding to a different direction in 3D space: Red channel (X-axis): Encodes the horizontal orientation of the surface normal. Green channel (Y-axis): Encodes the vertical orientation of the surface normal. Blue channel (Z-axis): Encodes the depth or depth variation of the surface normal.
When applied to a 3D model, a normal map tricks the renderer into thinking that the surface is much more detailed and complex than it actually is by altering how light interacts with the surface. This creates the illusion of bumps, dents, creases, and other fine details without increasing the geometry count of the object.
Please make sure your Normal Map is being exported as an OpenGL normal map.
RGBA Mask Map
RGBA Mask is a color map that is being used in the upcoming DIY Feature in the Genies ecosystem. It allows in-app users to apply custom patterns and materials to different parts of the 3D asset. We have an ability to customize up to FOUR AREAS per wearable asset. We also have an ability to PRESERVE some areas of the asset. Those “preserved” areas will display the original texture and won’t be editable by the in-app user.
RGBA Mask texture map has RGB and Alpha channels.
RGB Channel of the RGBA Mask Map
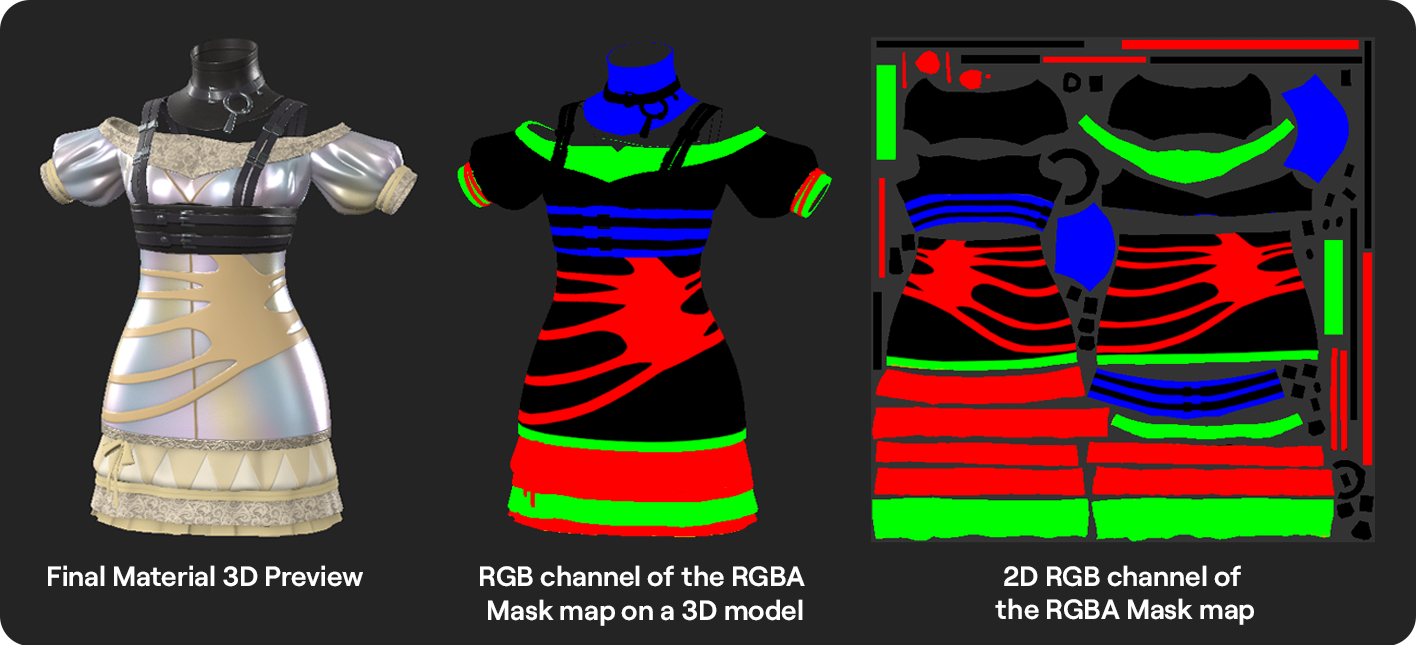
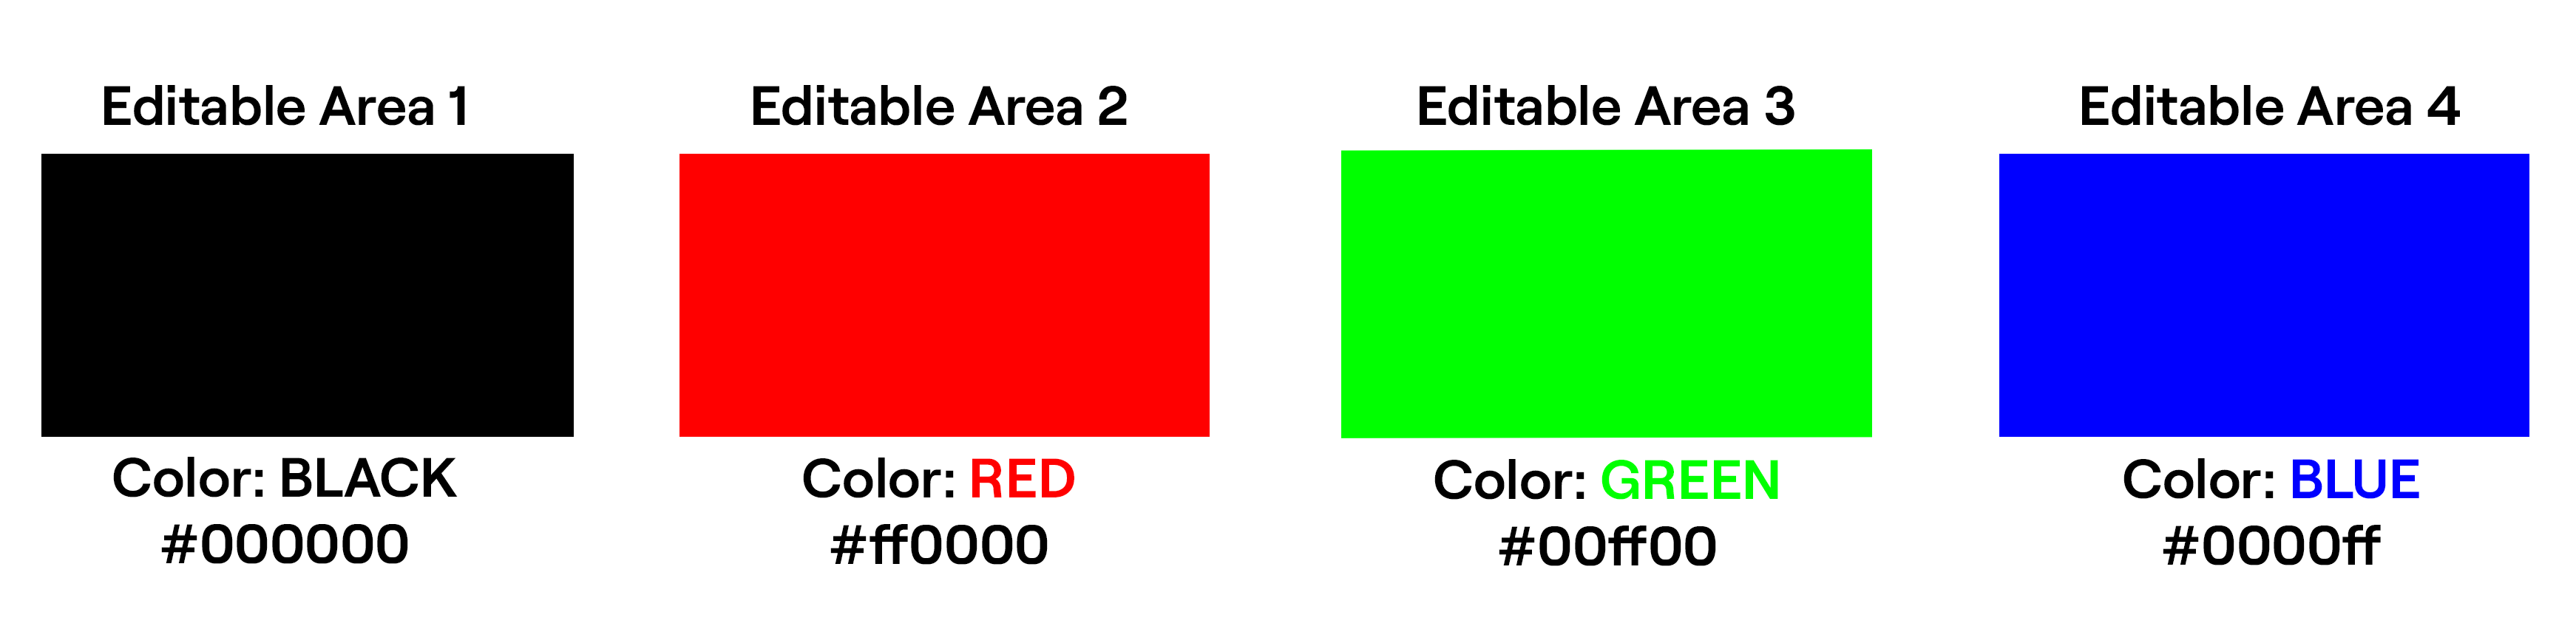
The RGB channel of the RGBA Mask texture map is used to define four areas on the asset that can be customized. It is a a color map that should only have FOUR colors (BLACK, RED, GREEN and BLUE). Each color represents the region that the in-app user will be able to edit.
The colors should be used in this specific order: BLACK → RED → GREEN → BLUE. For example if you have ONE editable area, use only BLACK color. If you have TWO editable areas, use BLACK and RED colors and so on.
Alpha Channel of the RGBA Mask
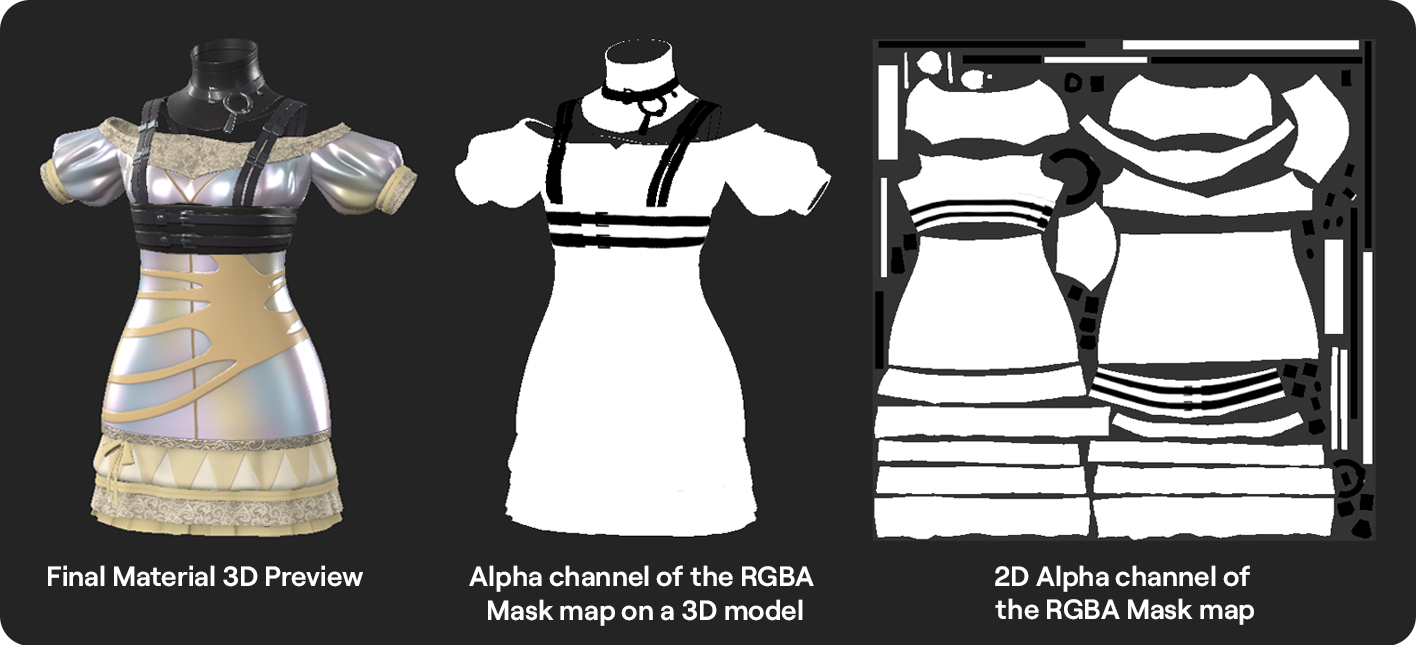
The Alpha channel of the RGBA Mask is used to define “preserved” areas of the wearable asset that the in-app user won’t be able to customize. It is a black and white greyscale map where white is the editable areas and black are the “preserved” / non-editable areas.
WHITE = EDITABLE
BLACK = NON-EDITABLE
Final RGBA Mask texture map should have both channels (RGB+A) combined appropriately. If you are not planning to “preserve” any parts of you wearable asset textures, please make sure the alpha channel of the RGBA Mask texture map is white.
RGBA Mask Examples
Example 1
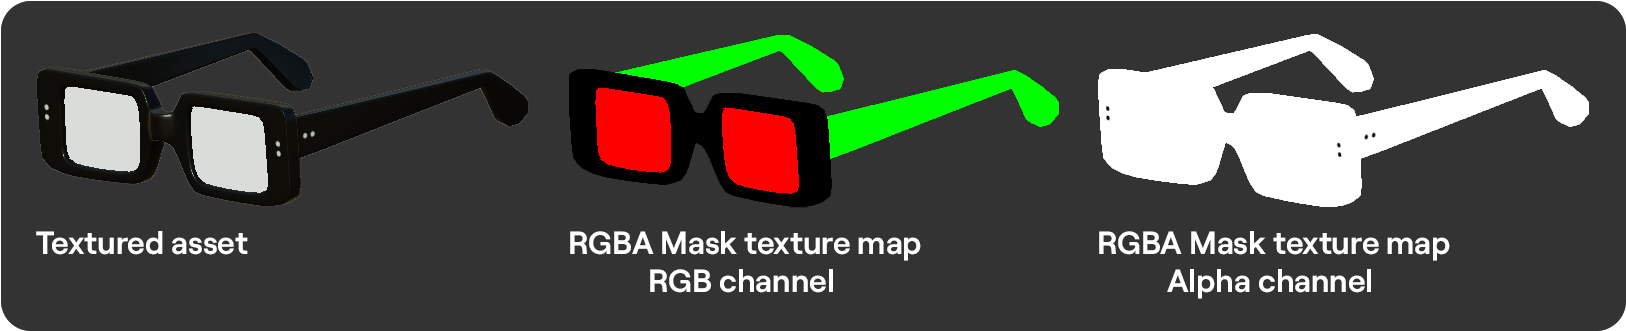
In this example above shows an asset with three editable areas and “preserved” small details.
- editable area 1 → BLACK in RGB channel→ the rims
- editable area 2 → RED in RGB channel → the lenses
- editable area 3 → GREEN in RGB channel → the temples
- “preserved” area → BLACK in Alpha channel → the screws
We highly recommend to “preserve” small areas of your design in the alpha channel of the RGBA Mask texture map.
Example 2
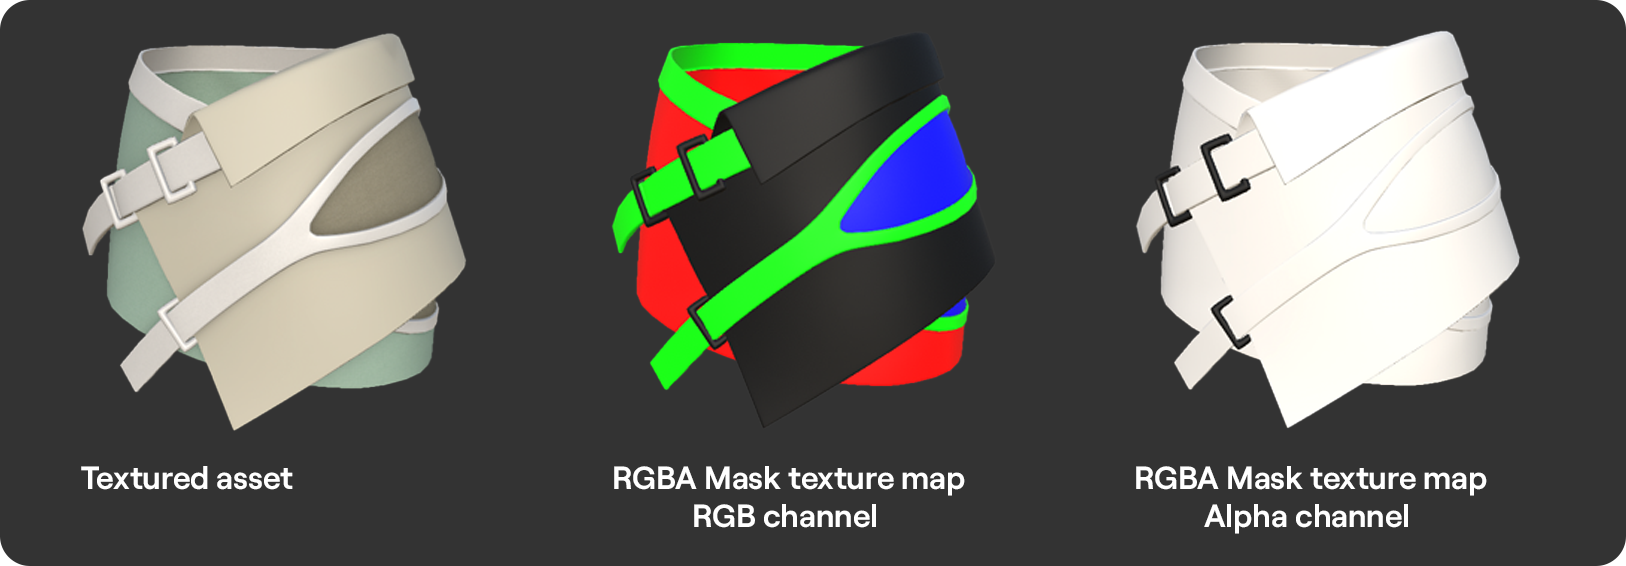
The skirt illustrated above has FOUR color zones by design: white cloth on the right, blue cloth on the left, white leather belts, and the darker under layer in the cut out areas. We also see small details like belt buckles that we can preserve in the alpha channel of the RGBA Mask.
The RGBA Mask color arrangement is done in order from black to red to green to blue. It also starts from the largest area on the asset. So in this case the RGBA Mask colors are arranged like this:
- editable area 1 → BLACK in RGB channel → white fabric
- editable area 2 → RED in RGB channel → green fabric
- editable area 3 → GREEN in RGB channel → white leather straps
- editable area 4 → BLUE in RGB channel → underlayer fabric
- “preserved” area - BLACK in Alpha channel→ belt buckles
Example 3
If your 3D Creation design has more than four materials and colors, you have a couple of options how to art direct the editable areas:
- Option 1. Decide on the four areas that you would like the in-app user to edit and “preserve” the rest.
- Option 2. Group some of the areas based on the materials that make sense to be edited together.
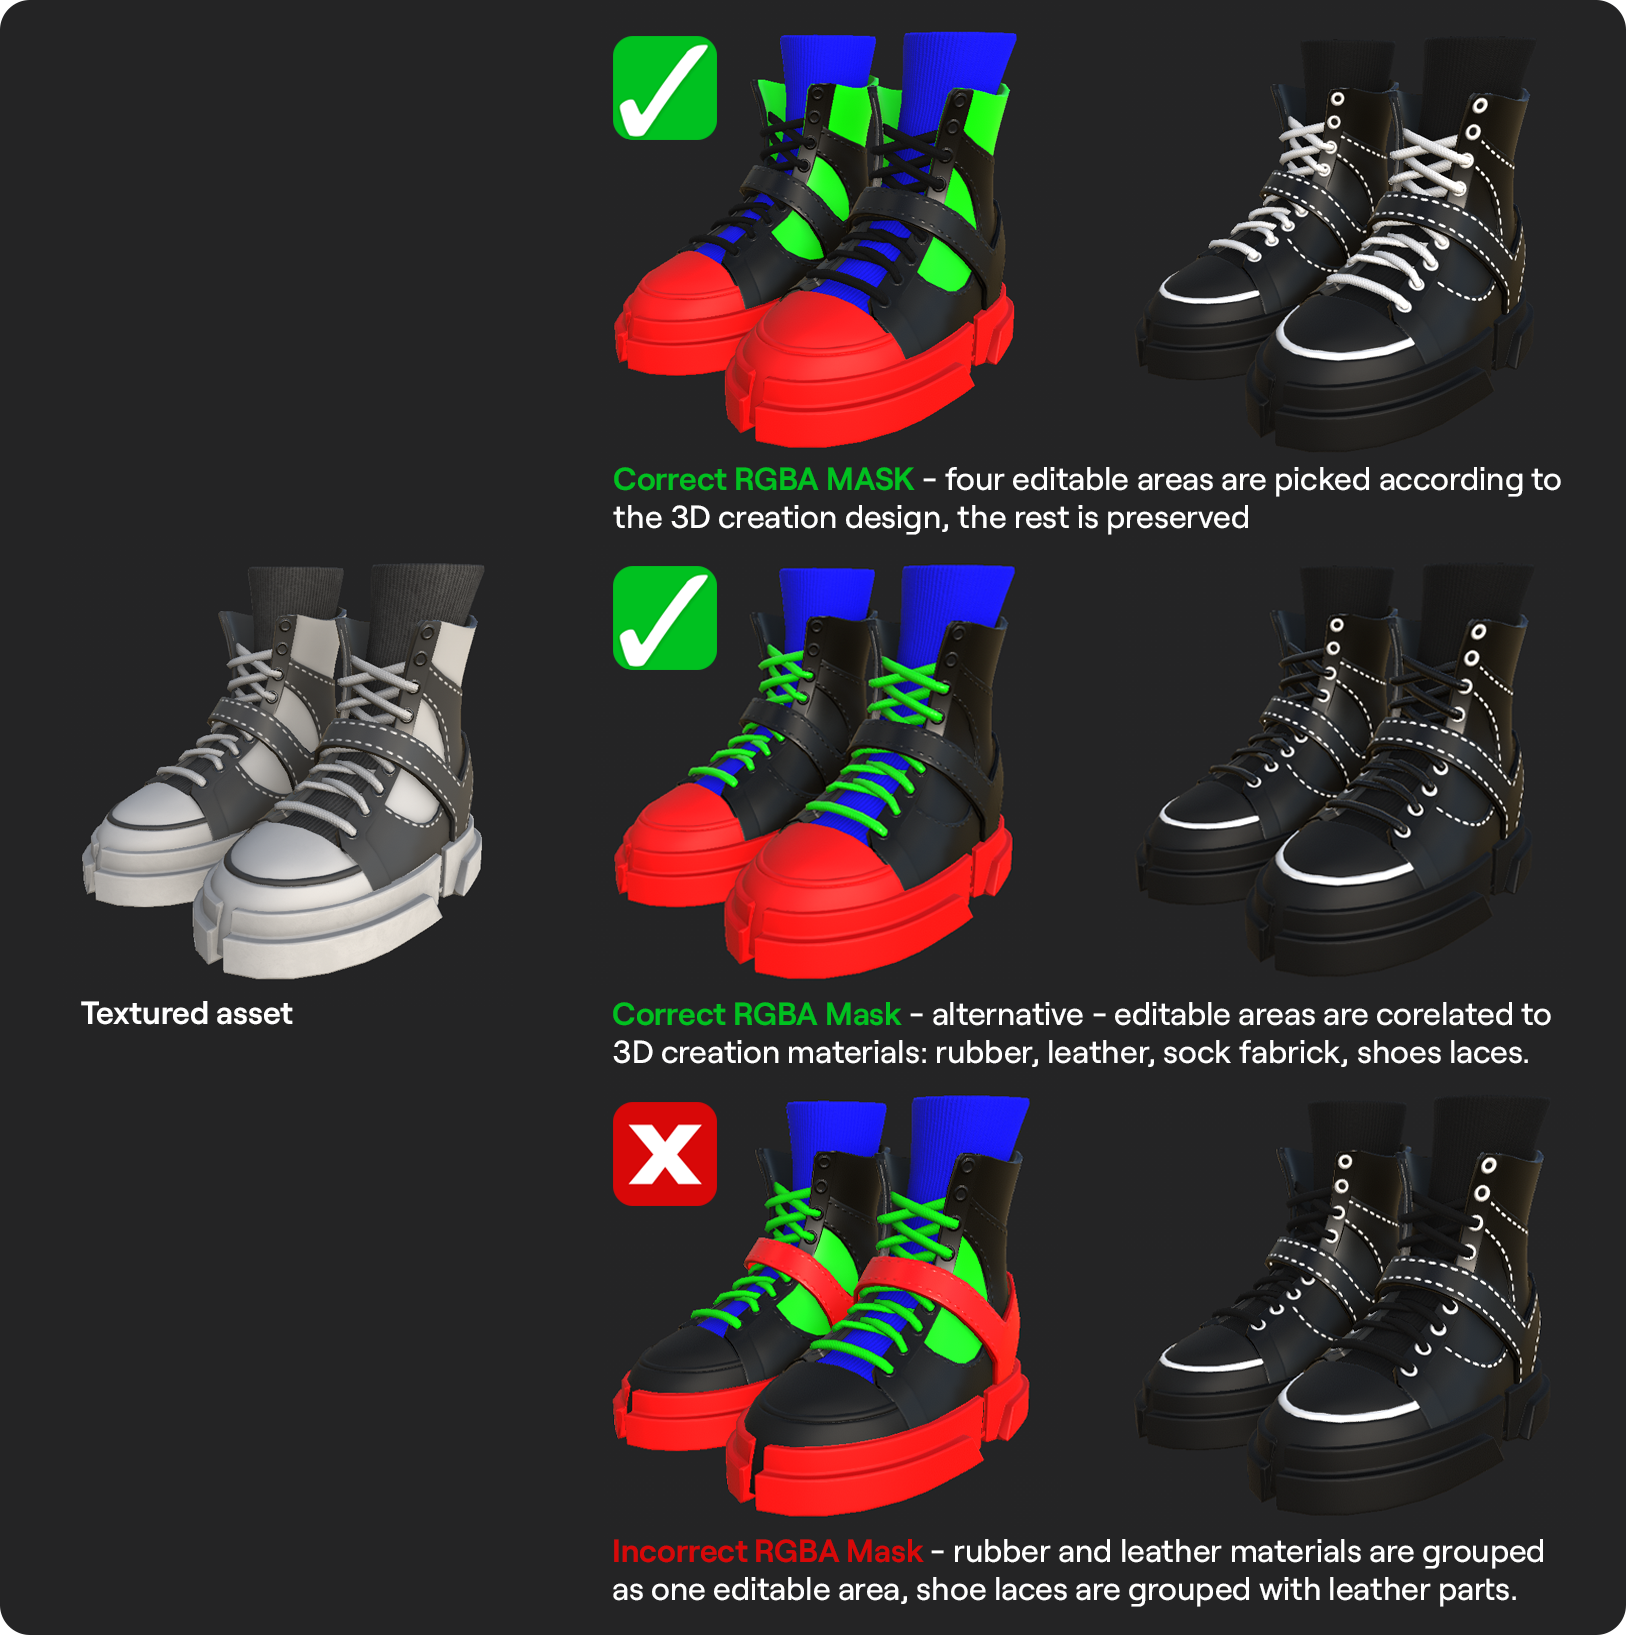
In the example above, we grouped the shoes soles with the nose area of the shoe as one editable area because both parts are made of rubber. Black colored leather panels are grouped as an editable area a well as the white colored leather panels. Socks have their own editable area. The shoe laces are preserved. As as alternative, all shoe leather can be grouped together and the shoe laces can have their own editable area.
Avoid color grouping different areas that do not make sense to be grouped in real life. For example, do not color group together rubber shoe soles with fabric shoe laces.
Read the Tutorials section to find software specific information on texturing.