Creating a Player Controller
The player will be represented as an Avatar. It will animate and move side to side based on the user's swipe input.
Modify the Player Root
The Player Root game object currently has default 3D Capsule components. This will need to be replaced with components to spawn the Avatar and collide with an enemy correctly.
Remove Capsule Mesh Components
Select the Player Root game object and open the Inspector window. Remove the Capsule (Mesh Filter) and Mesh Renderer components. This will be replaced later by the Avatar.
Add Collision Components
The Avatar needs a specific Capsule Collider size that reflects the size of the Avatar. It also needs a Rigidbody component to trigger collision events.
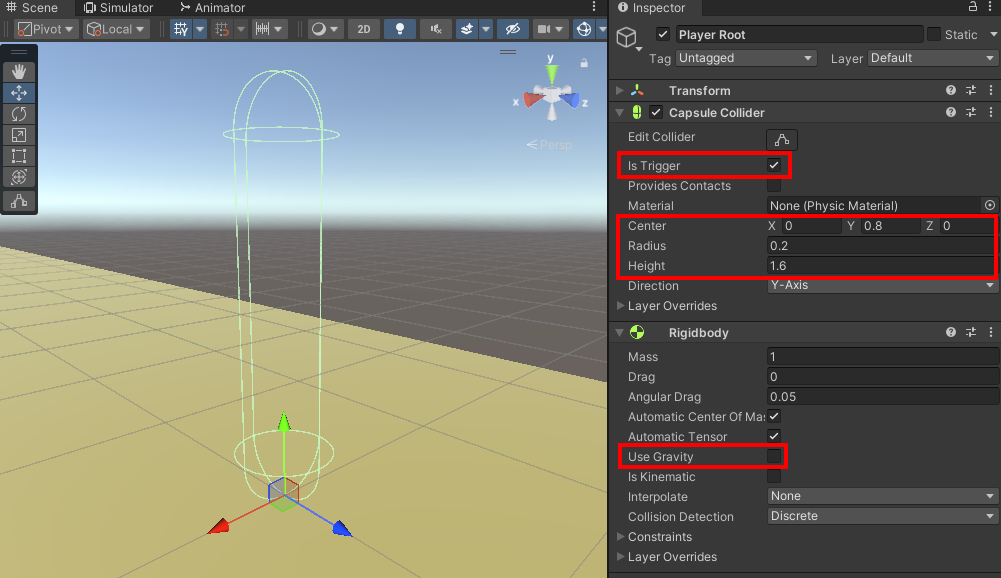
Add a Rigidbody component to the Player Root game object and then edit the following properties:
- Activate the Is Trigger property.
- Set the Center property to X:
0, Y:0.8, Z:0. - Set the Radius property to
0.2. - Set the Height property to
1.6. - Deactivate the Use Gravity property.
Grab an Animator Controller
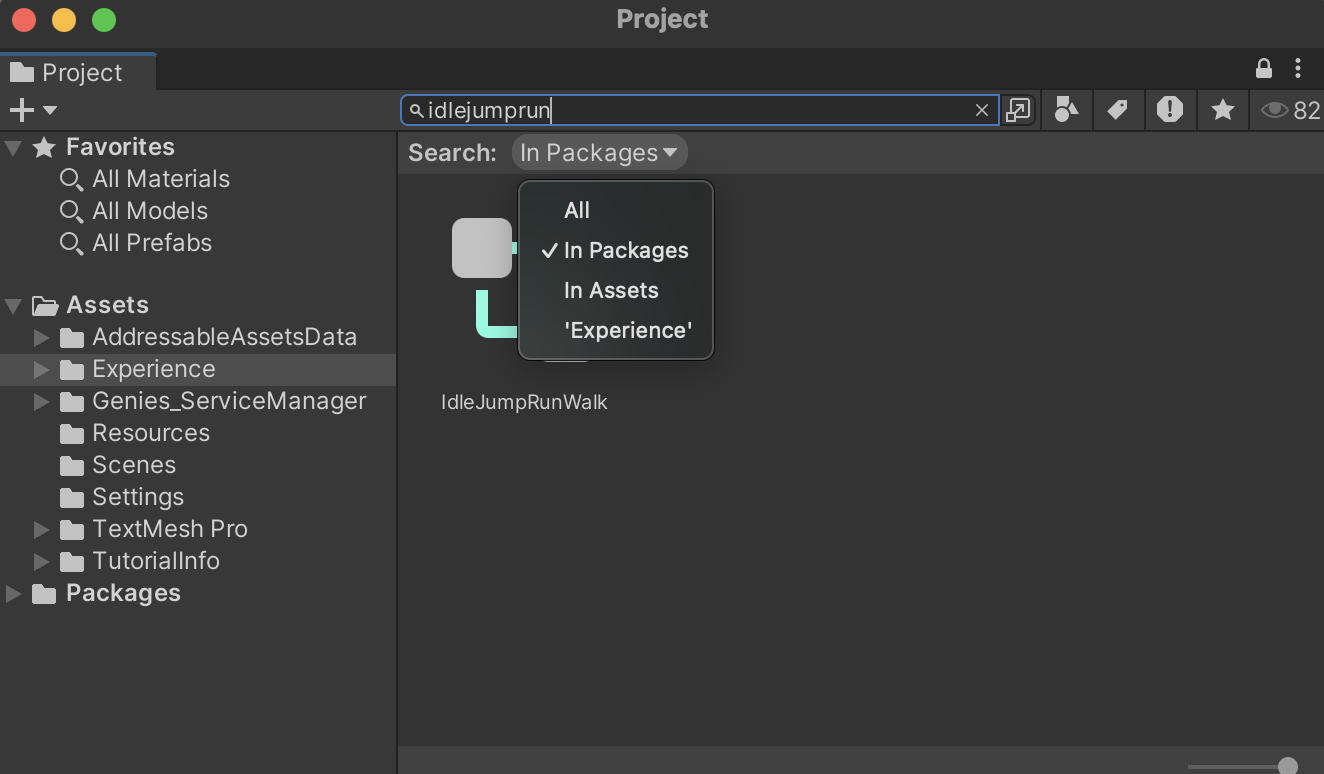
In the Project window, find the IdleJumpRunWalk.controller in the Packages > Genies Avatars SDK > Animation folder. You can also use the search bar in the Project window by typing IdleJumpRun and change the Search: option to In Packages. Copy and paste it into your Experience folder.
The animator controller has a simple blend tree that uses a float parameter named idle_run_walk to transition an Avatar from standing (0) to running (1.5). To keep things organized, you should move this to an Animation folder.
Create the Player Controller
The Player Controller will manage spawning the Avatar, animating the Avatar, and move the Avatar based on user input.
Create a Genies Behaviour Script
In the Project window, right click in the Assets > Experience folder and select GENIES > Create Scripts > Create Genies Behaviour Script. Rename the script to PlayerController.
Add the Code
Double click the PlayerController script to open the file in VS Code.
Replace the code with this:
import { MonoBehaviour, Input, Vector3, Mathf, Time, Animator, Collider, RuntimeAnimatorController } from 'UnityEngine';

import { GeniesAvatar, GeniesAvatarsSdk } from 'Genies.Avatars.Sdk';
import GameManager, { GameState } from './GameManager';

export default class PlayerController extends MonoBehaviour {

    @Header("Player Settings")
    @SerializeField private playerSpeed: float = 2;
    @SerializeField private playerAnimator: RuntimeAnimatorController;

    /**
     * This can only be one of three lanes the player can target to move:
     * * -1 is the left lane
     * * 0 is the middle lane
     * * 1 is the right lane
    */
    private targetLane: int = 0;
    private mouseStartPos: Vector3;

    private userAvatar: GeniesAvatar;
    private gameManager: GameManager;

    private canMove: bool = false;

    async Start() {
        //Get GameManager singleton and add a listener to OnGameStateChange event
        this.gameManager = GameManager.Instance;
        this.gameManager.OnGameStateChange.addListener(this.CheckGameState);
        //Initialize the SDK
        await GeniesAvatarsSdk.InitializeAsync();
        //Load the user Avatar
        this.userAvatar = await GeniesAvatarsSdk.LoadUserAvatarAsync("UserAvatar", this.transform, this.playerAnimator);
        //send message to GameManager that the Avatar has been loaded
        this.gameManager.ChangeGameState(GameState.GAME_PLAY);
    }

    Update() {
        //If game is playing, check for mouse swipe and move player accordingly
        if(this.canMove) {
            this.CheckSwipe();
            this.MovePlayer();
        }
    }

    /** Manages the player logic when the game state changes. @param newState */
    private CheckGameState(newState: GameState) {
        switch(newState) {
            case GameState.GAME_PLAY:
               this.OnGamePlay();
                break;
        }
    }

    /** This will manage the player once the game starts. */
    private OnGamePlay() {
        this.canMove = true;
        this.transform.position = Vector3.zero;
        this.targetLane = 0;
        this.userAvatar.Animator.SetFloat("idle_run_walk", 1);
    }

    /** Determines if the mouse swipes and sets a new target lane based on direction. */
    private CheckSwipe(){
        if (Input.GetMouseButtonDown(0)) {
            this.mouseStartPos = Input.mousePosition;
        }

        if (Input.GetMouseButtonUp(0)) {
            let direction = Input.mousePosition - this.mouseStartPos;

            // Determine if the swipe was more horizontal than vertical
            if (Mathf.Abs(direction.x) > Mathf.Abs(direction.y)) {
                //Change target lane based on swipe direction
                if (direction.x > 0 && this.targetLane < 1) {
                    this.targetLane = this.targetLane + 1;
                }
                if (direction.x < 0 && this.targetLane > -1) {
                    this.targetLane = this.targetLane - 1;
                }
            }
        }
    }

    /** Moves the player towards the target lane. */
    private MovePlayer() {
        let playerPos = this.transform.position;
        let targetPos = new Vector3(this.targetLane, playerPos.y, playerPos.z);
        let newPos = Vector3.MoveTowards(playerPos, targetPos, this.playerSpeed * Time.deltaTime);
        this.transform.position = newPos;
    }
}
Loading a Genies Avatar requires using an async method that can wait for the GeniesAvatarsSdk to initialize before trying to load the user's GeniesAvatar.
import { GeniesAvatar, GeniesAvatarsSdk } from 'Genies.Avatars.Sdk';

async Start() {
    //Initialize the Genies SDK
    await GeniesAvatarsSdk.InitializeAsync();
    //Load the user Avatar
    let userAvatar: GeniesAvatar = await GeniesAvatarsSdk.LoadUserAvatarAsync();
}
If VS Code is showing an error for the Vector math line of code then you may need to set the TypeScript version. Check out the VS Code page for more information.
Add the Script Component
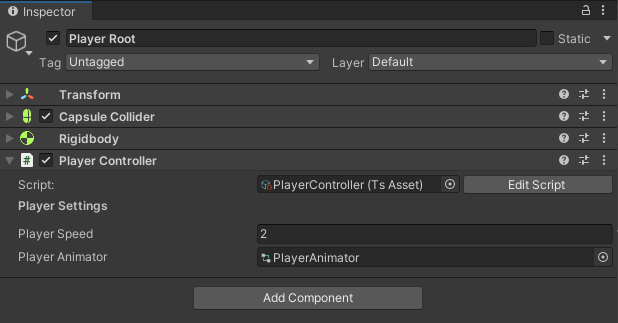
Drag the PlayerController script on top of the Player Root game object to add it as a component. Then add the imported PlayerAnimator asset in the Assets > Experience > Animation folder to the component.
Test the Project
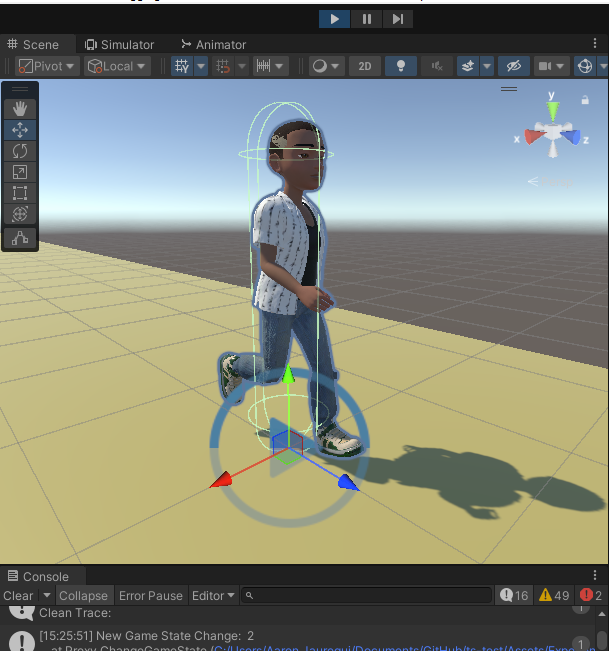
Press the Play button. The Avatar should eventually spawn in and start the run animation. Also the Console window should show a message confirming the gameState property is transitioned to GameState.GAME_PLAY (which is represented as the number 2) when the Avatar is loaded.
Add a Slipping Animation
In the next page, you will add enemy bananas the player needs to avoid. If the player collides with a banana, then it will slip and fall to the ground. This requires a custom animation for the Avatar slipping on the banana.
Import the Animation
Download this animation file: Slipping.fbx
Once downloaded, open Unity and right click in the Project window. Select the Import New Asset option and then select the downloaded file.
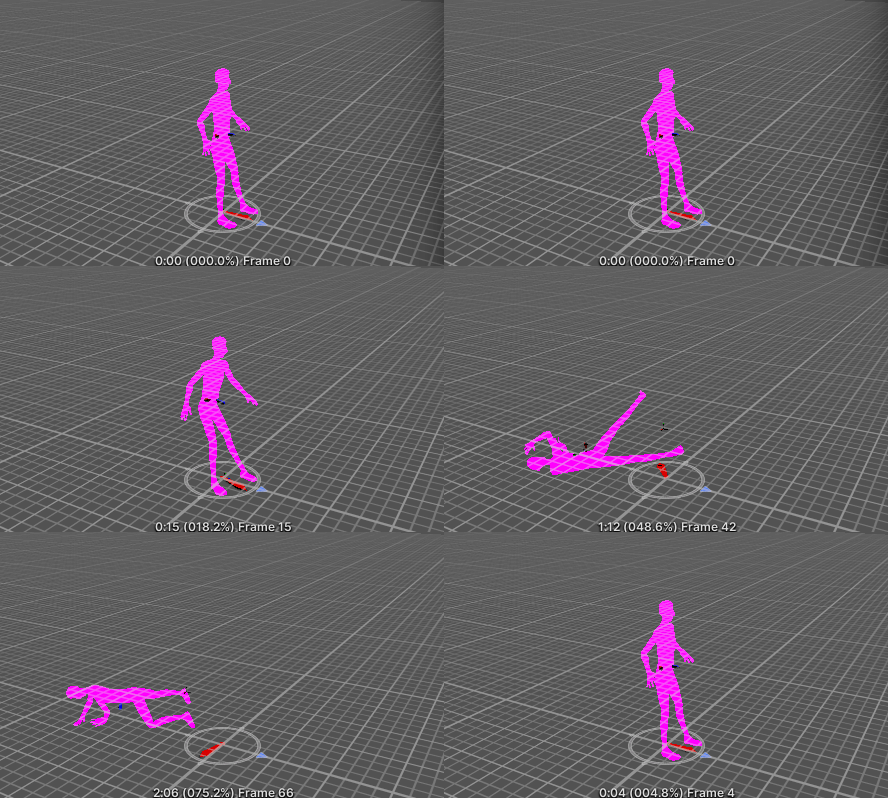
This animation came from from Mixamo which has a wide variety of animations and characters free to use.
Apply a Humanoid Rig
In order for the imported animation to work with our humanoid Avatar, it will need to be rigged accordingly.
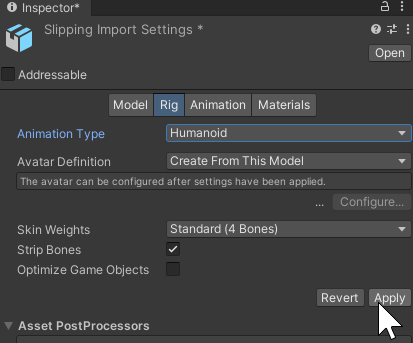
Select the Slipping asset and open the Inspector window to see the Slipping Import Settings. Select the Rig tab and select Humanoid for the Animation Type property. Click the Apply button.
Apply Animations
Now that the animation rig is set, the animation root transform changes will need to be baked so the Avatar will fall down correctly.
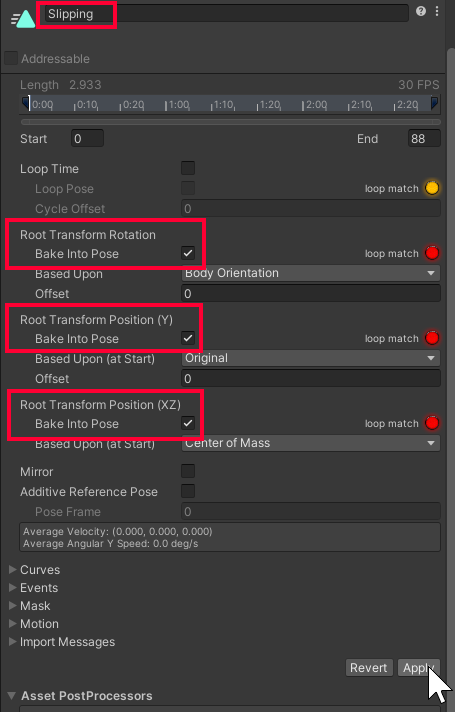
Inside the Slipping Import Settings, select the Animation tab. Set the name of the animation to Slipping. There are three different root transform changes and each need the Baked Into Pose property enabled. Click the Apply button.
Add to Animator Controller
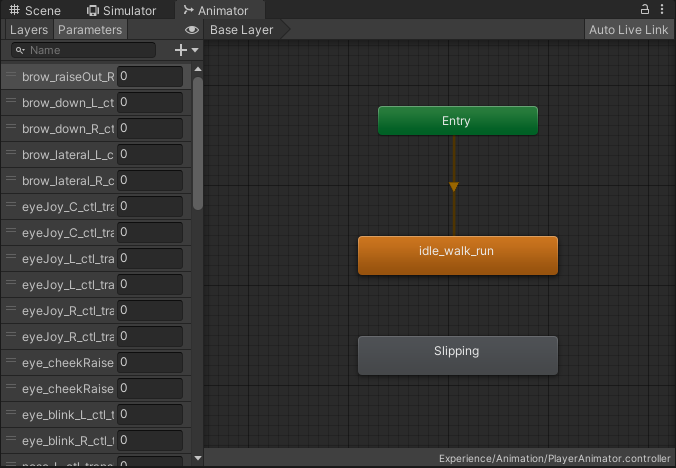
Double click the PlayerAnimator asset in the Assets > Experience > Animation folder to open the Animator window. Drag and drop the Slipping animation into the animator graph.
Add Transition to Slip
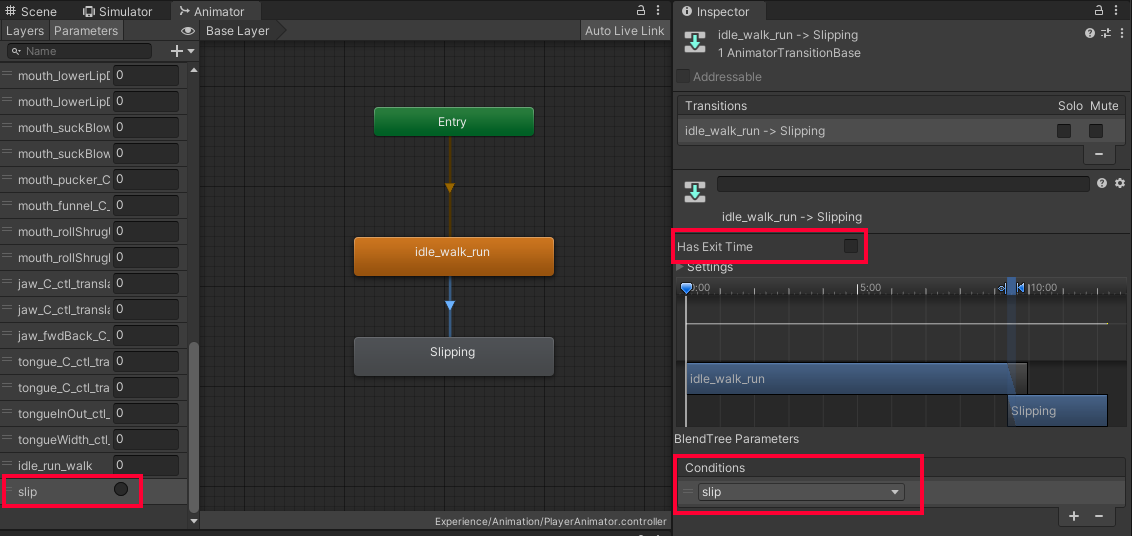
Create a new Trigger parameter named slip using the Animators left side panel. Then right click the idle_walk_run node in the animator graph and select Make Transition to connect to the Slipping node. Select the transition and open the Inspector window. Disable the Has Exit Time property and add the slip Trigger to the Conditions list.
Add Transition from Slip
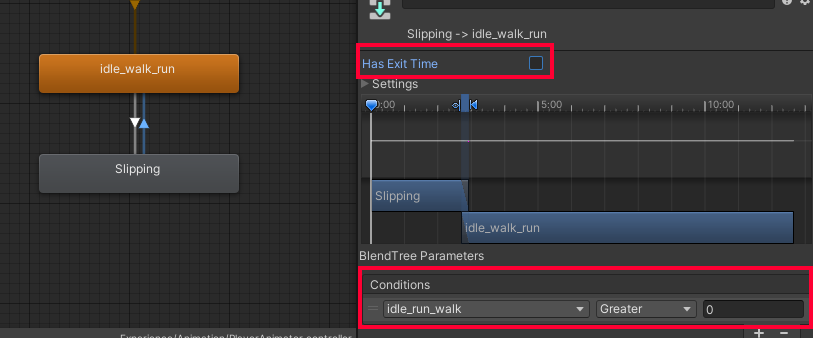
Create a transition from the Slipping node back to the idle_walk_run node. Disable the Has Exit Time property and add to the Conditions list if the idle_run_walk property is greater than 0.
Test the Project
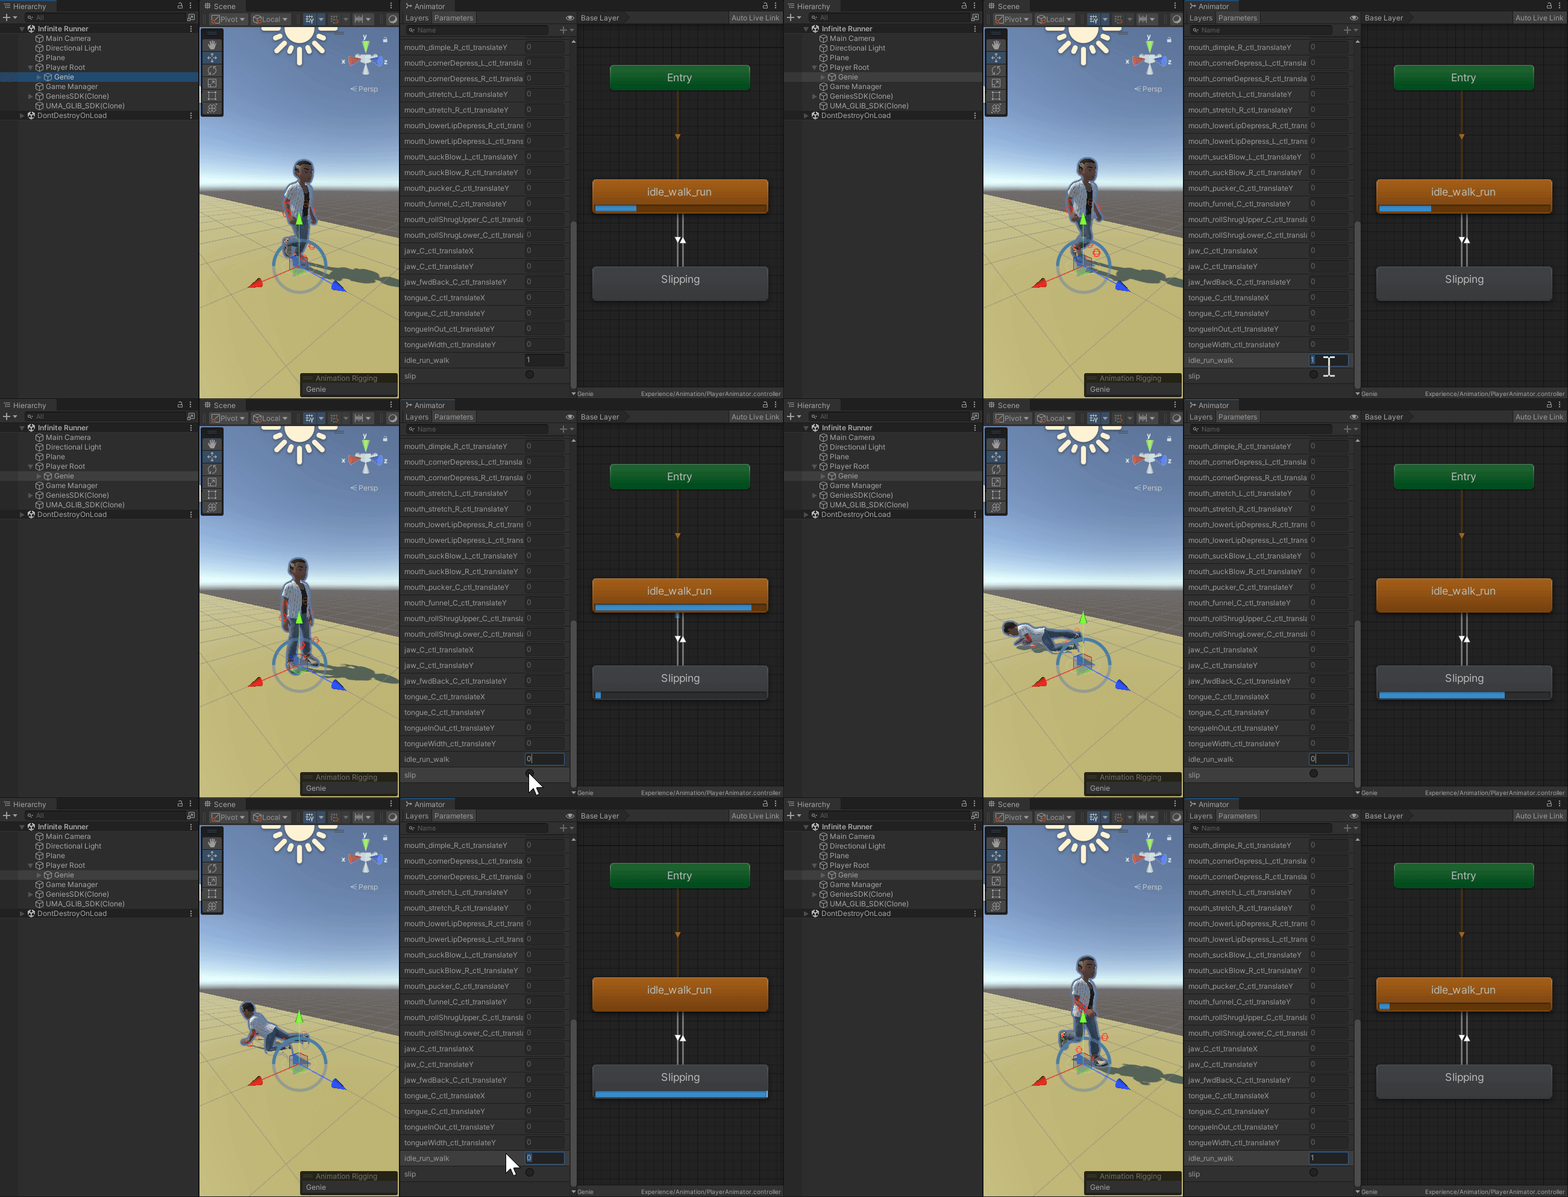
Press the Play button. While in Play mode, select the Genies child object from the Player Root root object. This will allow you to see the current animation logic in the Animator window. Test the idle_run_walk and slip property values.
